Konica Minolta bizhub PRESS C71hc bizhub PRESS C1060/C1070/C1070P/PRO C1060L D - Page 59
ColorPort
 |
View all Konica Minolta bizhub PRESS C71hc manuals
Add to My Manuals
Save this manual to your list of manuals |
Page 59 highlights
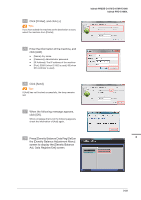
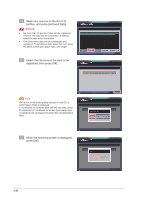
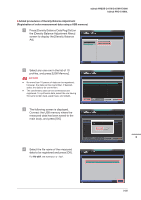
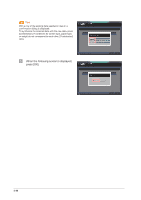
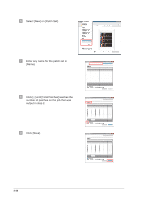
bizhub PRESS C1070/C1070P/C1060 bizhub PRO C1060L )Maximum Density Adjustment (for i1Pro/i1Pro2/ES-1000/ES-2000) Check the maximum density target value that is informed from the service representative. Perform the Maximum Density Adjustment using the paper for the maximum density management that has been decided in consultation with the service representative. To measure the chart, use the Color Port. Install the tool in advance. You can download the Color Port at the following Web site. After installing the tool, restart the computer. ColorPort v2.0.5: http://www.xrite.com/product_overview.aspx?Action=support&ID=719 1 Place the paper for the maximum density management that has been decided in consultation with the service representative. 2 Output the job data that includes the maximum density patch (density: 255) of Y, M, C, and K from the tray that the sheet for the maximum density management is placed. NOTICE - The job that the patches of Y, M, C, and K (5 each, 20 in total) are arranged entirely on the paper is recommended. - Select [Screen 1(Dot190)] from [Imaging] in the print driver to output the job data. 3 On the computer where the ColorPort. l has been installed, select [Start] - [All Programs] - [X-Rite] - [ColorPort 2.0]. 4 Connect the spectrophotometer to the computer and click [Create Target]. 3 5 Select [i1Pro] on [Measurement Device], and select [CMYK] on [Color Space]. 3-27
-
 1
1 -
2
-
3
-
4
-
5
-
6
-
7
-
8
-
9
-
10
-
11
-
12
-
13
-
14
-
15
-
16
-
17
-
18
-
19
-
20
-
21
-
22
-
23
-
24
-
25
-
26
-
27
-
28
-
29
-
30
-
31
-
32
-
33
-
34
-
35
-
36
-
37
-
38
-
39
-
40
-
41
-
42
-
43
-
44
-
45
-
46
-
47
-
48
-
49
-
50
-
51
-
52
-
53
-
 54
54 -
 55
55 -
 56
56 -
 57
57 -
 58
58 -
 59
59 -
 60
60 -
 61
61 -
 62
62 -
 63
63 -
 64
64 -
65
-
66
-
67
-
68
-
69
-
70
-
71
-
72
-
73
-
74
-
75
-
76
-
77
-
78
-
79
-
80
-
81
-
82
-
83
-
84
-
85
-
86
-
87
-
88
-
89
-
90
-
91
-
92
-
93
-
94
-
95
-
96
-
97
-
98
-
99
-
100
-
101
-
102
-
103
-
104
-
105
-
106
-
107
-
108
-
109
-
110
-
111
-
112
-
113
-
114
-
115
-
116
-
117
 |
 |
