Konica Minolta bizhub PRESS C71hc FD-9 Auto Scan Spectrophotometer User Guide - Page 30
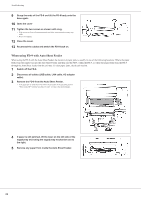
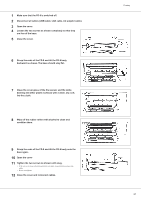
When using FD-9 with Auto Sheet Feeder, Remove the FD-9 from the Auto Sheet Feeder.
 |
View all Konica Minolta bizhub PRESS C71hc manuals
Add to My Manuals
Save this manual to your list of manuals |
Page 30 highlights
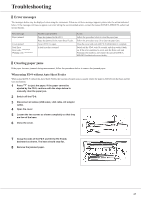
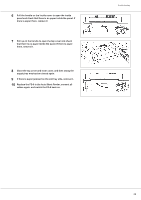
Troubleshooting 9 Grasp the ends of the FD-9 and tilt the FD-9 body onto the base again. 10 Open the cover 11 Tighten the two screws as shown until snug. • If the screws are loose when measurements are taken, measurement accuracy may suffer. • Do not overtighten. 12 Close the cover. 13 Reconnect the cables and switch the FD-9 back on. When using FD-9 with Auto Sheet Feeder When using the FD-9 with the Auto Sheet Feeder, the location of paper jams is usually in one of the following locations: Where the paper feeds from the supply tray into the Auto Sheet Feeder and then into the FD-9, within the FD-9, or where the paper feeds from the FD-9 through the Auto Sheet Feeder into the exit tray. To clear paper jams, check each section. 1 Switch off the FD-9. 2 Disconnect all cables (USB cable, LAN cable, AC adapter cable). 3 Remove the FD-9 from the Auto Sheet Feeder. • If the paper jam is inside the FD-9, follow the procedure in the preceding section "When using FD-9 without Auto Sheet Feeder" to remove the jammed paper. 4 If paper is still jammed, lift the lever on the left side of the supply tray and swing the supply tray mechanism out to the right. 5 Remove any paper from inside the Auto Sheet Feeder. 28
-
 1
1 -
2
-
3
-
4
-
5
-
6
-
7
-
8
-
9
-
10
-
11
-
12
-
13
-
14
-
15
-
16
-
17
-
18
-
19
-
20
-
21
-
22
-
23
-
24
-
 25
25 -
 26
26 -
 27
27 -
 28
28 -
 29
29 -
 30
30 -
 31
31 -
 32
32 -
 33
33 -
 34
34 -
 35
35 -
36
 |
 |
