Kyocera FS-9530DN KX Driver User Guide Version 5.90 - Page 9
Windows XP - Parallel Port (LPT), Windows XP - Network Connection, Custom, Universal Serial Bus USB - kx drivers
 |
View all Kyocera FS-9530DN manuals
Add to My Manuals
Save this manual to your list of manuals |
Page 9 highlights
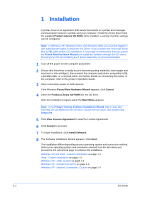
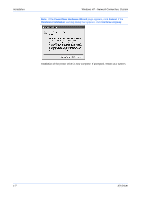
Windows XP - Parallel Port (LPT) Installation 2 In the Installation Method page, select Custom Mode > Driver. If you want to install the fonts, also select Utilities. 3 In the Connection Type page, select Universal Serial Bus (USB), and then click Next. 3 4 The Printing System appears in certain conditions, for example, when the installer cannot detect the USB connection. From the list, select the printing system to install, and click Next. 4 5 In the Custom Installation page, ensure that the KX Driver is selected as the product and then click Next. 1 6 In the Confirm Settings page, click Install if the settings are correct. Click Cancel to correct the settings. 2 Note: If the Found New Hardware Wizard appears, click Cancel. If the Hardware Installation warning dialog box appears, click Continue Anyway. The installation of the printer is now complete. If prompted, restart your system. Windows XP - Parallel Port (LPT) 1 In the Installation Method page, select Custom Mode > Driver. If you want to install the fonts, also select Utilities. 2 In the Connection Type page, select Parallel Port (LPT), then click Next. 2 3 The Printing System appears. From the list, select the printing system to install, and click Next. 3 4 In the Custom Installation page, ensure that the KX Driver is selected as the product and then click Next. 1 5 In Printer Settings you can assign a name to the printing system. This is the name that appears in Windows Printers and Faxes and in the printer lists in applications. Here you can also choose to share this printer with others or set this printer as the default printer. Make your selections and then click Next. 2 6 In the Printer Port page, select a port, and then click Next. 3 7 In the Confirm Settings page, click Install if the settings are correct. Click Cancel to correct the settings. 4 8 In the Printer Installed Successfully dialog box. Click Finish. 5 The installation of the printer is now complete. If prompted, restart your system. Windows XP - Network Connection, Custom 1 In the Installation Method page, select Custom Mode for Driver or Utilities. Later, you can choose to install a KX Driver or mini-driver and fonts, a scanner driver, and KMnet for clients. 1 User Guide 1-4
-
 1
1 -
2
-
3
-
 4
4 -
 5
5 -
 6
6 -
 7
7 -
 8
8 -
 9
9 -
 10
10 -
 11
11 -
 12
12 -
 13
13 -
 14
14 -
15
-
16
-
17
-
18
-
19
-
20
-
21
-
22
-
23
-
24
-
25
-
26
-
27
-
28
-
29
-
30
-
31
-
32
-
33
-
34
-
35
-
36
-
37
-
38
-
39
-
40
-
41
-
42
-
43
-
44
-
45
-
46
-
47
-
48
-
49
-
50
-
51
-
52
-
53
-
54
-
55
-
56
-
57
-
58
-
59
-
60
-
61
-
62
-
63
-
64
-
65
-
66
-
67
-
68
-
69
-
70
-
71
-
72
-
73
-
74
-
75
-
76
-
77
-
78
-
79
-
80
-
81
-
82
-
83
-
84
-
85
-
86
-
87
-
88
-
89
-
90
-
91
-
92
-
93
-
94
-
95
-
96
-
97
-
98
-
99
-
100
-
101
-
102
-
103
-
104
-
105
 |
 |