Kyocera FS-C8500DN FS-C8500DN Installation Instructions - Page 1
Kyocera FS-C8500DN Manual
 |
View all Kyocera FS-C8500DN manuals
Add to My Manuals
Save this manual to your list of manuals |
Page 1 highlights
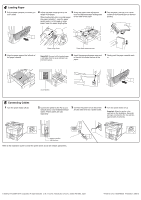
Clearance FS-C8500DN 400 mm (15-3/4") 300 mm (11-13/16") 300 mm (11-13/16") 100 mm (3-15/16") 1,000 mm (39-3/8") Installation Guide Environment • Temperature: 10 to 32.5 °C (50 to 90.5 °F) The humidity should be 70 % or less when the temperature is 32.5 °C (90.5 °F) • Humidity: 15 to 80 %RH The temperature should be 30 °C (86 °F) or less when the humidity is 80 % • Power Supply: 120 V AC, 60 Hz, 12 A / 220 to 240 V AC, 50/60 Hz, 7.2 A CAUTION: Be sure to provide enough space around printer. Prolonged use without sufficient clearance may cause overheating. 1 Unpacking 1 Unpack the printer and all its included components. Important: The printer must be carried by four persons. 2 Check the parts and components. CD-ROMs Manuals and Other Printed Materials 2 Removing the Lift Plate Stoppers 1 Pull out the paper cassettes 1 and 2. Printer Power Cord Waste Toner Box 2 Remove the lift plate stopper and attach it to the storage location. Lift Plate Stopper Toner Containers (4) Paper Size Sheets (4) 3 Installing the Toner Container and Waste Toner Box 1 Open the front cover. 2 Hold the toner container with both hands and shake it from side to side several times so that the toner is uniformly distributed inside. 3 Hold the toner container with both hands and gently push it in. 4 Turn the toner container release lever to the horizontal position. Follow the procedure above to install the other color toner containers. Note: Ensure the toner container is in the correct location for that color. 5 Press the release button and pull out the waste toner tray. 6 Open the cap of the waste toner box. 7 Install the waste toner box. Cap Black (K) Cyan (C) Yellow (Y) Magenta (M) 8 Press on the left edge of the new waste toner box to lock it. 9 Press the specified position to set the waste toner tray. When the tray reaches the correct position, it locks into place with a "click" sound. 10 Close the front cover.
-
 1
1 -
 2
2
 |
 |
