Kyocera KM-1650 Network Fax Online Manual (Revision) - Page 75
Setting the Network FAX functions
 |
View all Kyocera KM-1650 manuals
Add to My Manuals
Save this manual to your list of manuals |
Page 75 highlights
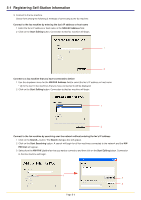
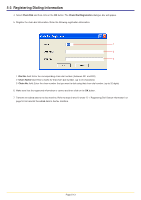
5-2 Setting the Network FAX functions You can use the Address Editor for FAX utility to make settings for the Network FAX functions. Perform the following procedure when you want to make settings for the Network FAX functions. 1. Follow steps 1 through 6 under "5-1 Registering Self-Station Information" on page 5-2 and open the Address Editor for FAX window. Then select the desired method of connection to the fax machine. 2. Point to the NW-FAX command under the Setting menu. The NW-FAX Setting window will appear. 3. Perform the various settings as appropriate. * Refer to the Fax Edition of your Operation Guide for more detailed information on the function of each setting. 1 2 3 4 5 6 7 8 9 10 1 NW-FAX RX radio buttons: Turns Network FAX reception ON or OFF. 2 Print Here radio buttons: Turns printout at the fax machine ON or OFF during Network FAX reception. 3 File name field: Enter the default file name for data received during Network FAX reception. (up to 13 characters) 4 Save Folder No. field: Enter the save folder number for data received during Network FAX reception. (between 001 and 100) 5 File name field: Enter the default file name to be used when the "Turning the Save transmitted Documents Function ON" setting is selected. (up to 13 characters) 6 Save Folder No. field: Enter the save folder number to be used when the "Turning the Save transmitted Documents Function ON" setting is selected. (between 001 and 100) 7 IP Address or Host Name field: Enter the IP address or host name of the Server Computer (the computer where the Scanner File Utility is installed) in which the Network FAX files will be saved. (up to 32 characters) 8 Admin's E-mail Address field: Enter the email address of the Network FAX administrator. (up to 64 characters) 9 SMTP Authentication Account field: Enter the SMTP authorization account for the Network FAX administrator's email address. (up to 64 characters) 10 SMTP Authentication Password field: Enter the SMTP authorization password* for the Network FAX administrator's email address. (up to 31 characters) * An asterisk ("*") will be displayed in place of each character when you enter the SMTP authorization password. 4. Transmit the edited data to the fax machine. Refer to steps 9 and 10 under "5-1 Registering Self-Station Information" on page 5-2 to transmit the edited data to the fax machine. Page 5-8
-
 1
1 -
2
-
3
-
4
-
5
-
6
-
7
-
8
-
9
-
10
-
11
-
12
-
13
-
14
-
15
-
16
-
17
-
18
-
19
-
20
-
21
-
22
-
23
-
24
-
25
-
26
-
27
-
28
-
29
-
30
-
31
-
32
-
33
-
34
-
35
-
36
-
37
-
38
-
39
-
40
-
41
-
42
-
43
-
44
-
45
-
46
-
47
-
48
-
49
-
50
-
51
-
52
-
53
-
54
-
55
-
56
-
57
-
58
-
59
-
60
-
61
-
62
-
63
-
64
-
65
-
66
-
67
-
68
-
69
-
 70
70 -
 71
71 -
 72
72 -
 73
73 -
 74
74 -
 75
75 -
 76
76 -
 77
77 -
 78
78 -
 79
79 -
 80
80 -
81
-
82
-
83
-
84
-
85
-
86
-
87
-
88
-
89
-
90
-
91
-
92
-
93
-
94
-
95
-
96
-
97
-
98
-
99
-
100
-
101
-
102
-
103
-
104
-
105
-
106
-
107
-
108
 |
 |
