Kyocera KM-2030 IB-2x Quick Configuration Guide Rev 2.2 - Page 5
NetWare Printing - mita
 |
View all Kyocera KM-2030 manuals
Add to My Manuals
Save this manual to your list of manuals |
Page 5 highlights
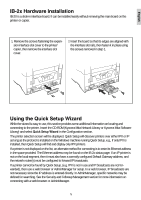
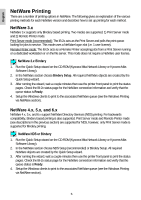
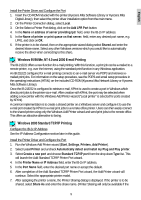
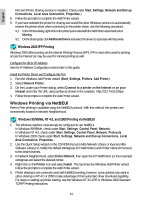
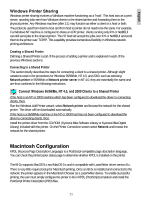
English NetWare Printing There are a number of printing options in NetWare. The following gives an explanation of the various printing methods for each NetWare version and describes how to set up printing for each method. NetWare 3.x NetWare 3.x supports only Bindery based printing. Two modes are supported; 1) Print Server mode and 2) Remote Printer mode. Print Server mode (recommended): The IB-2x acts as the Print Server and polls the print queue looking for jobs to service. This mode uses a NetWare logon slot (i.e. 1 user license). Remote Printer mode: The IB-2x acts as a Remote Printer accepting jobs from a Print Server running on a dedicated workstation or on the file server. This mode does not require a NetWare user license. NetWare 3.x Bindery 1. Run the Quick Setup wizard on the CD-ROM (Kyocera Mita Network Library or Kyocera Mita Software Library). 2. In the NetWare section choose Bindery Setup. All required NetWare objects are created by the Quick Setup wizard. 3. After running the wizard, wait a couple minutes then use the printer front panel to print the status pages. Check the IB-2x status page for the NetWare connection information and verify that the queue status is Ready. 4. Setup the Windows clients to print to the associated NetWare queue (see the Windows Printing via NetWare section). NetWare 4.x, 5.x, and 6.x NetWare 4.x, 5.x, and 6.x support NetWare Directory Services (NDS) printing. For backwards compatibility, Bindery based printing is also supported. Print Server mode and Remote Printer mode (see descriptions in the previous section) are supported for NDS, however, only Print Server mode is supported for Bindery printing. NetWare NDS or Bindery 1. Run the Quick Setup wizard on the CD-ROM (Kyocera Mita Network Library or Kyocera Mita Software Library). 2. In the NetWare section choose NDS Setup (recommended) or Bindery Setup. All required NetWare objects are created by the Quick Setup wizard. 3. After running the wizard, wait a couple minutes then use the printer front panel to print the status pages. Check the IB-2x status page for the NetWare connection information and verify that the queue status is Ready. 4. Setup the Windows clients to print to the associated NetWare queue (see the Windows Printing via NetWare section). 6
-
 1
1 -
 2
2 -
 3
3 -
 4
4 -
 5
5 -
 6
6 -
 7
7 -
 8
8 -
 9
9 -
 10
10 -
 11
11 -
12
-
13
-
14
-
15
-
16
-
17
-
18
-
19
-
20
-
21
-
22
-
23
-
24
-
25
-
26
-
27
-
28
-
29
-
30
-
31
-
32
-
33
-
34
-
35
-
36
-
37
-
38
-
39
-
40
-
41
-
42
-
43
-
44
-
45
-
46
-
47
-
48
-
49
-
50
-
51
-
52
-
53
-
54
-
55
-
56
-
57
-
58
-
59
-
60
-
61
-
62
-
63
-
64
-
65
-
66
-
67
-
68
-
69
-
70
-
71
-
72
-
73
-
74
-
75
-
76
-
77
-
78
-
79
-
80
-
81
-
82
-
83
-
84
-
85
-
86
-
87
-
88
-
89
-
90
-
91
-
92
-
93
-
94
-
95
-
96
-
97
-
98
-
99
-
100
-
101
-
102
-
103
-
104
-
105
-
106
-
107
-
108
-
109
-
110
-
111
-
112
-
113
-
114
-
115
-
116
-
117
-
118
-
119
-
120
-
121
-
122
-
123
-
124
-
125
-
126
-
127
-
128
-
129
-
130
-
131
-
132
-
133
-
134
-
135
-
136
-
137
-
138
-
139
-
140
-
141
-
142
-
143
-
144
-
145
-
146
-
147
-
148
-
149
-
150
-
151
-
152
-
153
-
154
-
155
-
156
-
157
-
158
-
159
-
160
-
161
-
162
-
163
-
164
-
165
-
166
-
167
-
168
-
169
-
170
-
171
-
172
-
173
-
174
-
175
-
176
-
177
-
178
-
179
-
180
-
181
-
182
-
183
-
184
-
185
-
186
-
187
-
188
-
189
-
190
-
191
-
192
-
193
-
194
-
195
-
196
-
197
-
198
-
199
-
200
-
201
-
202
-
203
-
204
-
205
 |
 |