Kyocera KM-2550 KM-Net ServiceGateway Quick Start Guide Rev-1 - Page 8
Step 6 Continued, Step 7
 |
View all Kyocera KM-2550 manuals
Add to My Manuals
Save this manual to your list of manuals |
Page 8 highlights
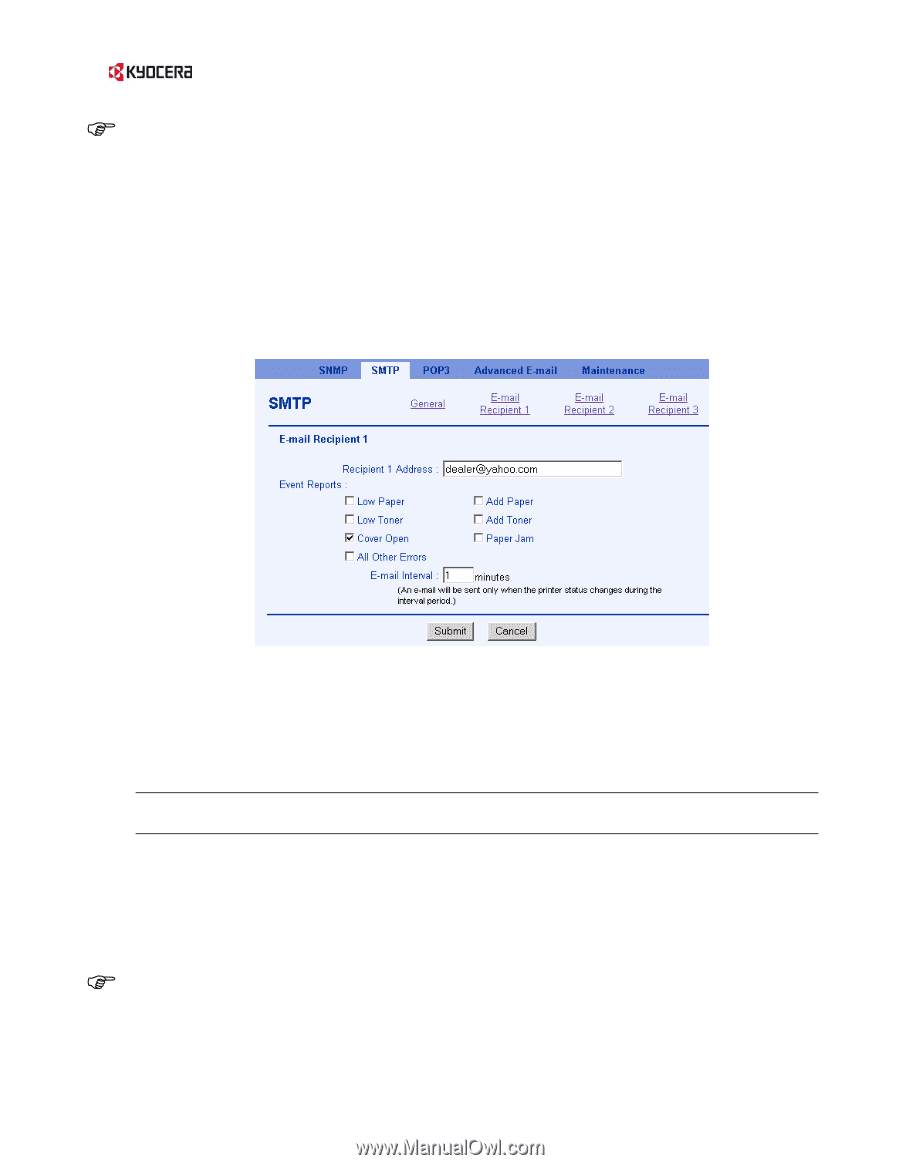
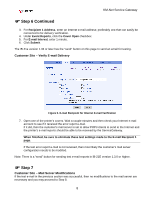
KM-Net Service Gateway ) Step 6 Continued 3. For Recipient 1 Address, enter an Internet e-mail address; preferably one that can easily be connected to for delivery verification. 4. Under Event Reports, click the Cover Open checkbox. 5. For E-mail Interval, enter 1 minute. 6. Click Submit. The IB-21e version 1.33 or later has the "send" button on this page to send an email for testing. Customer Site - Verify E-mail Delivery Figure 5. E-mail Recipient for Internet E-mail Verification 7. Open one of the printer's covers. Wait a couple minutes and then check your Internet e-mail account to see if it received the error report e-mail. If it did, then the customer's mail server is set to allow POP3 clients to send to the Internet and the printer's e-mail reports should be able to be received by the ServiceGateway. When finished, be sure to eliminate these test settings made to the E-mail Recipient 1 page. If the test error report e-mail is not received, then most likely the customer's mail server configuration needs to be modified. Note: There is a "send" button for sending test e-mail reports in IB-21E version 1.3.0 or higher. ) Step 7 Customer Site - Mail Server Modifications If the test e-mail in the previous section was successful, then no modifications to the mail server are necessary and you may proceed to Step 8. 8
-
 1
1 -
2
-
 3
3 -
 4
4 -
 5
5 -
 6
6 -
 7
7 -
 8
8 -
 9
9
 |
 |