Kyocera KM-2550 Printer Accounting Systems Settings Guide - Page 9
Add Account Code
 |
View all Kyocera KM-2550 manuals
Add to My Manuals
Save this manual to your list of manuals |
Page 9 highlights
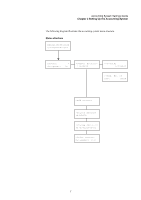
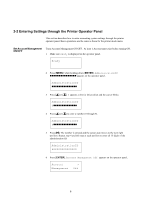
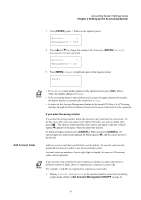
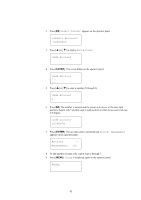
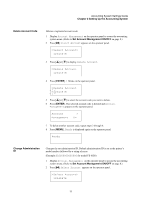
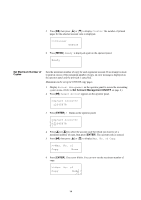
Accounting System Settings Guide Chapter 2 Setting Up the Accounting System 7 Press [ENTER] again. ? blinks on the operator panel. Account > Management ? Off 8 Press [ ] or [ ] to change the setting to On, then press [ENTER]. Account Management is now set to On. Account > Management ? On 9 Press [MENU]. Ready is displayed again on the operator panel. Ready Add Account Code • If Sleeping (sleep mode) appears on the operator panel, press [GO]. After a while, the display changes to Ready. • If the accounting menu is open without any key input for approximately 60 seconds, the printer display is automatically restored to Ready. • In order for the Account Management feature to be turned ON (Step # 6 of "Entering Settings through the Printer Operator Panel) and Account Code must first be registered . If you enter the wrong number If you enter the wrong number, delete the incorrect entry and enter the correct one. To do this, move the cursor one space to the right of the entry you want to delete, then press [ ]. The entry is deleted and the cursor moves one space to the left. A black square („) appears in the space where the entry was deleted. To delete all inputs entered, press [CANCEL]. When you press [CANCEL], all entered digits are deleted and replaced by black squares („), and the cursor moves to the far left. Adds an account code that is permitted to use the printer. An account code must be registered in advance in order to use the accounting system. Account codes are numbers of up to eight digits in length. As many as 100 account codes can be registered. If one account code contains the same numbers as another account code but has a different number of digits, then it is registered as a separate account code. For example, 1 and 001 are registered as separate account codes. 1 Display Account Management on the operator panel to access the accounting system menu. (Refer to Set Account Management ON/OFF on page 8.) 9
-
 1
1 -
2
-
3
-
 4
4 -
 5
5 -
 6
6 -
 7
7 -
 8
8 -
 9
9 -
 10
10 -
 11
11 -
 12
12 -
 13
13 -
 14
14 -
15
-
16
-
17
-
18
-
19
-
20
-
21
-
22
-
23
-
24
-
25
-
26
-
27
-
28
-
29
-
30
-
31
-
32
-
33
-
34
-
35
-
36
 |
 |