Kyocera KM-3035 KM-NET for Accounting Operation Guide Rev-1.4 - Page 10
Enabling the Accounting Function, 2.7. Configuring the Kyocera Extended Driver - fax driver
 |
View all Kyocera KM-3035 manuals
Add to My Manuals
Save this manual to your list of manuals |
Page 10 highlights
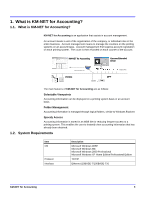
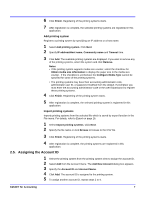
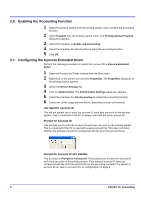
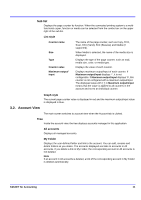
2.6. Enabling the Accounting Function 1 Select the printing system from the printing system view to enable the accounting function. 2 Select Property from the printing system menu. The Printing System Property dialog box appears. 3 Select the checkbox to Enable Job Accounting. 4 Select the checkbox for each function to apply the accounting function. 5 Click OK. 2.7. Configuring the Kyocera Extended Driver Perform the following procedure to register the account ID to Kyocera Extended Driver. 1 Open the Printers and Faxes window from the Start menu. 2 Right-click on the printer icon and click Properties. The Properties dialog box of the printing system appears. 3 Select the Device Settings tab. 4 Click on Administrator. The Administrator Settings dialog box appears. 5 Select the checkbox for Job Accounting to enable the accounting function. 6 Select one of the usage patterns below, depending on your environment. Use Specific Account ID This will not prompt you to enter the account ID each time you print on the printing system. This is convenient if the PC is always used with the same account ID. Prompt for Account ID This prompts you to enter the account ID each time you print on the printing system. This is convenient if the PC is used with several account IDs. This does not check whether the entered account ID corresponds with the ID in the account ID list. Prompt for Account ID and Validate This is similar to Prompt for Account ID. This prompts you to enter the account ID each time you print on the printing system. If the entered account ID does not correspond with the ID in the account ID list, the job will be canceled. For details of account ID list, refer to Account ID List Configuration on page 9. 8 KM-NET for Accounting
-
 1
1 -
2
-
3
-
4
-
 5
5 -
 6
6 -
 7
7 -
 8
8 -
 9
9 -
 10
10 -
 11
11 -
 12
12 -
 13
13 -
 14
14 -
 15
15 -
16
-
17
-
18
-
19
-
20
-
21
-
22
-
23
-
24
-
25
-
26
-
27
-
28
-
29
-
30
-
31
-
32
-
33
 |
 |