Kyocera KM-3035 Print/Scan System (U) Operation Guide (Setup Edition) - Page 15
• User registration information, Send E-mail functions - scan to email
 |
View all Kyocera KM-3035 manuals
Add to My Manuals
Save this manual to your list of manuals |
Page 15 highlights
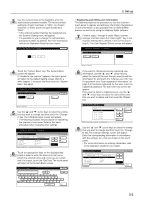
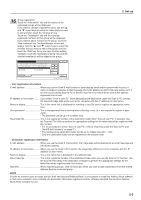
16 Group registration Touch the "Information" tab and the names of the registered groups will be displayed. If you want to change a registered name, use the "L" and "M" cursor keys to select the name that you want to edit and then touch the "Change #" key. Touch the "Destination" tab and the currently registered members of that group will be displayed. If you want to add a member to the group, touch the "Add content #" key. The Add Member screen will appear. Use the "L" and "M" cursor keys to select the member that you want to add to that group and then touch the "Add" key. Once you have finished adding members, touch the "Complete entering" key and the selected member(s) will be added to the group. 2. Set-up • User registration information E-mail address When you use the Send E-mail function to send data by email and the person who receives it clicks on Reply in response to that message, this is the address to which that reply will be sent. If an error occurs during Scan to PC or Send E-mail, the error notice will be sent to the address registered here as well. IP address or host name .......... If you select "Save at user PC" when designating the destination under the Scan to PC function, the scanned image data will be sent to the computer with this IP address (or host name). Name to display This is the name that is displayed for selecting a user. Be sure to register an appropriate name here. User password This is the password that is entered when selecting a user. (It is not required to register a password.) * The password can be up to 8 numbers long. Save folder No This is the registered number of the destination folder when "Save at user PC" is selected. Use the Scanner File Utility to perform the appropriate settings for the folder that will be registered with this number. * For the procedure to select "Save at user PC", refer to "Scanning under the Scan to PC and Send E-mail functions" on page 3-1. * The number of the destination folder can be up to 3 digits long (001 - 100). * Only one destination folder can be registered in the scanner itself. • Destination registration information E-mail address When you use the Send E-mail function, the image data will be attached to an email message and sent to this address. IP address or host name .......... When you use the Scan to PC function, the image data will be sent to the computer with this IP address (or host name). Name to display This is the name that is displayed in the address book. Save folder No This is the registered number of the destination folder when you use the Scan to PC function. Use the Scanner File Utility in the destination computer to perform the appropriate settings for the folder that will be registered with this number. Add dest When registering groups, click on this button when you want to add a destination from the shared Address Book to a selected group. NOTE In order for scanner users to create and use their own personal Address Book, it is necessary to install the Address Book software in that user's computer. Once installed, the destination information registered and the software rebooted, the personal Address Book will be available for use. 2-5
-
 1
1 -
2
-
3
-
4
-
5
-
6
-
7
-
8
-
9
-
 10
10 -
 11
11 -
 12
12 -
 13
13 -
 14
14 -
 15
15 -
 16
16 -
 17
17 -
 18
18 -
 19
19 -
 20
20 -
21
-
22
-
23
-
24
-
25
-
26
-
27
-
28
-
29
-
30
-
31
-
32
 |
 |
