Kyocera KM-6030 Scan To SMB (Scan to Folder) Setup Rev-1.0 - Page 2
How to perform SMB transmission, Error messages and corrective actions - smb scanning
 |
View all Kyocera KM-6030 manuals
Add to My Manuals
Save this manual to your list of manuals |
Page 2 highlights
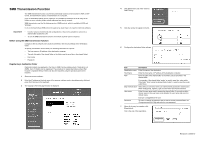
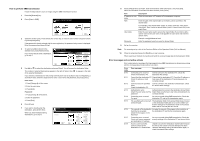
How to perform SMB transmission Follow the steps below to scan an image using the SMB transmission function. 1 Press the [Scanner] key. 2 Press [Scan to SMB]. Select scanner function. 09/0 Send E- ma i l Scan to PC TWAIN Edit addr. book Database Connection Scan to FTP Scan to SMB Hi stor y of sending 3 Select the sender (user). Press directly the number key, or enter the user number using the numeric keys and press [Enter]. If the password is already entered with the user registration, the password entry screen is displayed. Enter the password and press [Enter]. 4 To select an address stored in the address book, press [Address book]. Ready to scan. Place the original and select destination. If you wish to directly enter a destination, go to step 7. Scan to SMB-Continuous TX Destination Enter dest. Address Book Delete Dest. check Auto Select Orig.Size Auto size Select Send Size Basic Original 11x17" 09/0 Single Scan Top Edge Orig. Set Direction 200dpi Scanning Resolution Quality 5 Use [S] or [T] to select the destination and press [Enter]. You will access the destination folder. The number of selected destinations appears to the right of Select. Also, of the selected destination. is appears to the right If you selected a destination for which Skip Authentication was set to [NO] in step 6 of Registering a destination folder, follow the steps below to enter a user name and password, and press [Close]. User name: 1. Press [Change #] at User name. 2. Enter the user name. 3. Press [End]. Password: 1. Press [Change #] at Password. 2. Enter the password. 3. Press [End]. 6 Press [Close]. 7 If you wish to directly enter the destination, press [Enter dest.]. When you have finished entering destinations, go to step 9. Ready to scan. Place the original and select destination. Scan to SMB-Continuous TX Destination Enter dest. Address Book Delete Dest. check Auto Select Orig.Size Auto size Select Send Size Basic Original 11x17" 09/0 Single Scan Top Edge Orig. Set Direction 200dpi Scanning Resolution Quality 8 Press [Change #] for each item, enter the destination folder information, and press [End]. When the information for all items has been entered, press [Close]. Item IP address or host name Path User name Password Description Enter the host name or IP address of the destination computer. Enter the path of the shared folder or the folder used to save files in the shared folder. For example, if the shared folder "public" is used to save files, enter public. If the folder "Scan" inside the shared folder "public" is used to save files, enter public\Scan. Enter the user name used to access the shared folder. If you wish to add a domain name to the user name, enter @ after the user name and enter the domain name. Example: [email protected] Enter the password used to access the shared folder. 9 Set up for scanning. Note For scanning set up, refer to the Functions Edition of the Operation Guide (On-Line Manual). 10 Place the original and press the [Start] key to start scanning. When scanning is finished, the machine will send the scanned image data to the destination folder. Error messages and corrective actions Error codes and error messages that may appear during SMB transmission are shown below, along with the corresponding remedial action to be taken. Error code E110 E111 E112 E113 E114 E115 E116 E117 E118 Error message Corrective action Connecting error occurred. Check the destination PC. Cannot connect to the destination PC. Check the destination PC settings. Cannot find the destination PC. Cannot find the destination PC. Check the IP address or Check IP address or host host name of the destination PC and make sure it is name. correctly entered. Cannot access the specified folder. Check the destination PC. Cannot connect to the destination shared folder. Check the shared folder settings. Authentication error. Authentication for access to the destination shared folder Check the user name and the failed. Make sure that your user name and password are password. correctly entered. Connecting error occurred. Try again. An error occurred during SMB transmission. Check the destination PC and try the transmission again. The specified path is incorrect. The destination folder in the shared folder does not exist, Check the path. or the destination folder path is not correct. Make sure that the settings for the destination folder in the shared folder and the entered path are correct. The capacity of the destination Increase the amount of free space in the hard drive of Hard Disk is exceeded. the destination PC and try the transmission again. Check the free space on the Hard Disk. Connecting error occurred. An error occurred during SMB transmission. Check the Check user name, password, security settings of the destination PC and shared folder. and destination PC settings. Access count exceeded. Cannot connect to the destination PC. Resend later. Unable to access the destination shared folder because the limit on the number of access attempts has been reached. Wait briefly and try the transmission again, or check the shared folder settings.
-
 1
1 -
 2
2
 |
 |
