Kyocera KM-7530 Printing System (R) Operation Guide (Setup Edition) - Page 11
Network TCP/IP settings
 |
View all Kyocera KM-7530 manuals
Add to My Manuals
Save this manual to your list of manuals |
Page 11 highlights
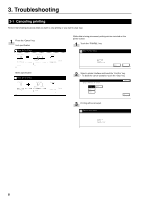
2. Set-up 2-4 Network (TCP/IP) settings To use the printer as a network printer, it is necessary to set an IP address for the printer. Notes • The IP address that should be registered here will differ depending upon your network environment. Check with your network administrator BEFORE performing this setting. • If you are using a DHCP server to automatically configure the IP address, this setting will not be necessary because DHCP server configuration is already enabled as the factory default setting. * To cancel the setting midway through it, press the Stop/Clear key. 1 Press the Printer key. The printer will switch to the printer mode. 5 Use the "L" and "M" cursor keys to select "TCP/IP" and then touch the "Change" key. 6 Select "ON" under the "TCP/IP" setting and "OFF" under the "DHCP" setting. 2 Touch the "Printer Menu" key. 7 Use the "L" and "M" cursor keys to select "IP Address" and then touch the "Change" key. 3 Touch the "Interface" key. 8 Use the numeric keys to input the address. Input the first block of 3 digits of the address in the highlighted area. • Press the sharp (#) key to set the address after inputting each block of 3 digits. 4 Touch the "Network" key and then the "Detail" key. 6
-
 1
1 -
2
-
3
-
4
-
5
-
 6
6 -
 7
7 -
 8
8 -
 9
9 -
 10
10 -
 11
11 -
 12
12 -
 13
13 -
 14
14 -
 15
15 -
 16
16 -
17
-
18
-
19
-
20
-
21
-
22
-
23
-
24
-
25
-
26
-
27
-
28
-
29
-
30
-
31
-
32
-
33
-
34
-
35
-
36
-
37
-
38
-
39
-
40
-
41
-
42
-
43
-
44
-
45
-
46
-
47
-
48
-
49
-
50
-
51
-
52
-
53
-
54
-
55
-
56
 |
 |
