Kyocera KM-8530 KM-NET ADMIN Operation Guide for Ver 2.0 - Page 18
Start/Stop Discovery, Mail Server, Selecting E-mail Settings
 |
View all Kyocera KM-8530 manuals
Add to My Manuals
Save this manual to your list of manuals |
Page 18 highlights
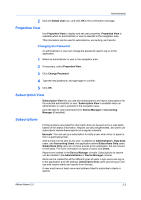
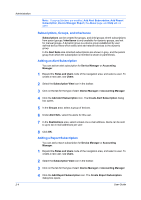
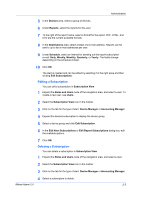
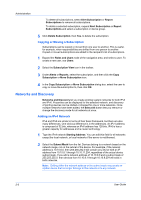
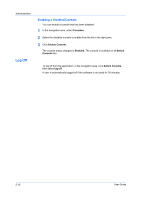
Administration Start/Stop Discovery The Discovery button is available on the General or the Discovery tab when you select a single or multiple managed networks. Discovery is a process for scanning a network for IP addresses of network printers to identify what devices are currently on the network. This function is independent from the discovery enabled or disabled setting and takes place immediately. It can run on any managed network even if discovery is disabled. Stop Discovery is available whenever discovery is in progress on any of the selected networks. Start Discovery is available when discovery is not in progress on any of the selected networks. Mail Server KMnet Admin communicates with a mail server to send e-mail alerts and information to system administrators and subscribers. Currently mail can only be sent to an SMTP server. SMTP Server Defines an SMTP server for sending notifications. This information must be complete and correct for e-mail notification to work. If alert e-mail fails to arrive, your antivirus software may be preventing the alert email. Adding port 25 or netadmin.exe to the exception list in your antivirus software may resolve the issue. Authentication Specifies the User name and Password, if SMTP authentication is required. E-mail setup When alerts and status e-mails are sent out, the address entered in Sender address will appear in the e-mail address line. Selecting E-mail Settings You can select settings for e-mail alerts and information to system administrators and subscribers. 1 In the navigation area, select Mail Server. 2 Under SMTP Server, enter the server name and port number. 3 Setting for the end of Under Authentication, enter the User name and Password, if your SMTP server connection requires authentication. 4 Under E-mail setup, enter the sender's e-mail address. 5 Click Test Email to make sure the e-mail feature works. In the Test Email dialog box, enter the recipient's e-mail address, and click OK. The recipient will receive a test email. 6 Click Submit to save the e-mail settings, or click Reset to clear the settings. 2-8 User Guide
-
 1
1 -
2
-
3
-
4
-
5
-
6
-
7
-
8
-
9
-
10
-
11
-
12
-
 13
13 -
 14
14 -
 15
15 -
 16
16 -
 17
17 -
 18
18 -
 19
19 -
 20
20 -
 21
21 -
 22
22 -
 23
23 -
24
-
25
-
26
-
27
-
28
-
29
-
30
-
31
-
32
-
33
-
34
-
35
-
36
-
37
-
38
-
39
-
40
-
41
-
42
-
43
-
44
-
45
-
46
-
47
-
48
-
49
-
50
-
51
-
52
-
53
-
54
-
55
-
56
-
57
-
58
-
59
-
60
-
61
-
62
-
63
-
64
-
65
-
66
-
67
-
68
-
69
-
70
-
71
-
72
-
73
-
74
-
75
-
76
-
77
-
78
-
79
-
80
-
81
-
82
-
83
-
84
-
85
-
86
-
87
-
88
-
89
-
90
-
91
-
92
-
93
-
94
-
95
-
96
-
97
-
98
-
99
-
100
-
101
-
102
-
103
-
104
-
105
-
106
-
107
 |
 |