Kyocera KM-C2525E C2525E/C3225E/C3232E/C4035E Operation Guide Rev-1.0 (Advance - Page 322
Using Job Accounting, Copying, Printing, Scanning - scanner driver
 |
View all Kyocera KM-C2525E manuals
Add to My Manuals
Save this manual to your list of manuals |
Page 322 highlights
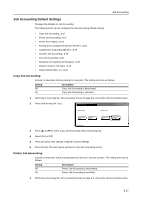
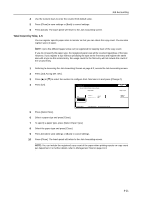
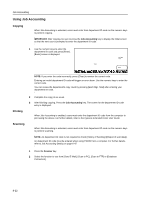
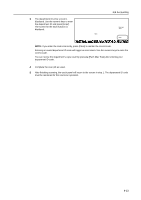
Job Accounting Using Job Accounting Copying When Job Accounting is activated, users must enter their department ID-code on the numeric keys to perform copying. IMPORTANT: After copying, be sure to press the Job Accounting key to display the initial screen so that the next user is prompted to enter the department ID-code. 1 Use the numeric keys to enter the D. department ID code and press [Enter]. [Basic] screen is displayed. Clear Each Mgt. Total Enter NOTE: If you enter the code incorrectly, press [Clear] to reenter the correct code. Entering an invalid department ID-code will trigger an error alarm. Use the numeric keys to enter the correct code. You can review the department's copy count by pressing [Each Mgt. Total] after entering your department ID-code. 2 Complete the copy job as usual. 3 After finishing copying, Press the Job Accounting key. The screen for the department ID-code entry is displayed. Printing When Job Accounting is enabled, users must enter the department ID code from the computer to print using the device. For further details, refer to the Kyocera Extended Driver User Guide. Scanning When Job Accounting is activated, users must enter their department ID-code on the numeric keys to perform scanning. NOTE: An department ID code is not required to check [History of Sending] ([Report of sent data]). An department ID code must be entered when using TWAIN from a computer. For further details, refer to Job Accounting Setting on page 6-47. 1 Press the Scanner key. 2 Select the function to use from [Send E-Mail], [Scan to PC], [Scan to FTP] or [Database Connection]. 8-22
-
 1
1 -
2
-
3
-
4
-
5
-
6
-
7
-
8
-
9
-
10
-
11
-
12
-
13
-
14
-
15
-
16
-
17
-
18
-
19
-
20
-
21
-
22
-
23
-
24
-
25
-
26
-
27
-
28
-
29
-
30
-
31
-
32
-
33
-
34
-
35
-
36
-
37
-
38
-
39
-
40
-
41
-
42
-
43
-
44
-
45
-
46
-
47
-
48
-
49
-
50
-
51
-
52
-
53
-
54
-
55
-
56
-
57
-
58
-
59
-
60
-
61
-
62
-
63
-
64
-
65
-
66
-
67
-
68
-
69
-
70
-
71
-
72
-
73
-
74
-
75
-
76
-
77
-
78
-
79
-
80
-
81
-
82
-
83
-
84
-
85
-
86
-
87
-
88
-
89
-
90
-
91
-
92
-
93
-
94
-
95
-
96
-
97
-
98
-
99
-
100
-
101
-
102
-
103
-
104
-
105
-
106
-
107
-
108
-
109
-
110
-
111
-
112
-
113
-
114
-
115
-
116
-
117
-
118
-
119
-
120
-
121
-
122
-
123
-
124
-
125
-
126
-
127
-
128
-
129
-
130
-
131
-
132
-
133
-
134
-
135
-
136
-
137
-
138
-
139
-
140
-
141
-
142
-
143
-
144
-
145
-
146
-
147
-
148
-
149
-
150
-
151
-
152
-
153
-
154
-
155
-
156
-
157
-
158
-
159
-
160
-
161
-
162
-
163
-
164
-
165
-
166
-
167
-
168
-
169
-
170
-
171
-
172
-
173
-
174
-
175
-
176
-
177
-
178
-
179
-
180
-
181
-
182
-
183
-
184
-
185
-
186
-
187
-
188
-
189
-
190
-
191
-
192
-
193
-
194
-
195
-
196
-
197
-
198
-
199
-
200
-
201
-
202
-
203
-
204
-
205
-
206
-
207
-
208
-
209
-
210
-
211
-
212
-
213
-
214
-
215
-
216
-
217
-
218
-
219
-
220
-
221
-
222
-
223
-
224
-
225
-
226
-
227
-
228
-
229
-
230
-
231
-
232
-
233
-
234
-
235
-
236
-
237
-
238
-
239
-
240
-
241
-
242
-
243
-
244
-
245
-
246
-
247
-
248
-
249
-
250
-
251
-
252
-
253
-
254
-
255
-
256
-
257
-
258
-
259
-
260
-
261
-
262
-
263
-
264
-
265
-
266
-
267
-
268
-
269
-
270
-
271
-
272
-
273
-
274
-
275
-
276
-
277
-
278
-
279
-
280
-
281
-
282
-
283
-
284
-
285
-
286
-
287
-
288
-
289
-
290
-
291
-
292
-
293
-
294
-
295
-
296
-
297
-
298
-
299
-
300
-
301
-
302
-
303
-
304
-
305
-
306
-
307
-
308
-
309
-
310
-
311
-
312
-
313
-
314
-
315
-
316
-
 317
317 -
 318
318 -
 319
319 -
 320
320 -
 321
321 -
 322
322 -
 323
323 -
 324
324 -
 325
325 -
 326
326 -
 327
327 -
328
-
329
-
330
-
331
-
332
-
333
-
334
-
335
-
336
-
337
-
338
-
339
-
340
-
341
-
342
-
343
-
344
-
345
-
346
-
347
-
348
-
349
-
350
-
351
-
352
-
353
-
354
-
355
-
356
-
357
-
358
-
359
-
360
-
361
-
362
-
363
-
364
-
365
-
366
-
367
-
368
-
369
-
370
-
371
-
372
-
373
-
374
 |
 |