Kyocera TASKalfa 3551ci Printing System (11),(12),(13),(14) Printing Guide (Fi - Page 57
Customizing the Quick Access icon, Viewing the copier status
 |
View all Kyocera TASKalfa 3551ci manuals
Add to My Manuals
Save this manual to your list of manuals |
Page 57 highlights
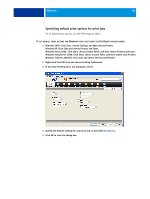
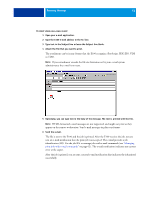
WINDOWS 57 Customizing the Quick Access icon The Quick Access view can be customized with the print options that you use frequently. This saves time because you do not have to open all of the other print option icons if you only want to set the options in Quick Access. When you place a print option in Quick Access, it still appears under its original print option icon. You can set the option from either location. TO CUSTOMIZE QUICK ACCESS 1 In your application, choose File > Print, and select the E100 as your printer. 2 Click Properties. 3 Click the Fiery Printing tab. 4 Click Customize to specify the options shown in the Customize Quick Access window. You can select a shortcut from the Available Shortcuts list and add it to the Current Shortcuts list, as well as remove a shortcut from the Current Shortcuts list. Click OK to save your changes. For more information about customizing the Quick Access icon, see printer driver Help. Viewing the copier status If you enabled a TCP/IP network, you can retrieve copier status and color settings from the E100 and display them in the printer driver using the Two-Way Communication option. If you have enabled Two-Way Communication for your copier, you can monitor the status of the copier, including the levels of consumable materials, such as paper and toner. For more information about enabling Two-Way Communication, see printer driver Help. Saving files to print at a remote location If you do not have an E100 onsite and are preparing files to take to a service bureau or other location, print the final files to the File port (as opposed to one of the local ports). You can also print to the File port to create a file to download using the Docs WebTool. For instructions on printing to the File port, see the documentation that accompanies Windows.
-
 1
1 -
2
-
3
-
4
-
5
-
6
-
7
-
8
-
9
-
10
-
11
-
12
-
13
-
14
-
15
-
16
-
17
-
18
-
19
-
20
-
21
-
22
-
23
-
24
-
25
-
26
-
27
-
28
-
29
-
30
-
31
-
32
-
33
-
34
-
35
-
36
-
37
-
38
-
39
-
40
-
41
-
42
-
43
-
44
-
45
-
46
-
47
-
48
-
49
-
50
-
51
-
 52
52 -
 53
53 -
 54
54 -
 55
55 -
 56
56 -
 57
57 -
 58
58 -
 59
59 -
 60
60 -
 61
61 -
 62
62 -
63
-
64
-
65
-
66
-
67
-
68
-
69
-
70
-
71
-
72
-
73
-
74
-
75
-
76
-
77
-
78
-
79
-
80
-
81
-
82
-
83
-
84
-
85
-
86
-
87
-
88
-
89
-
90
-
91
-
92
-
93
-
94
-
95
-
96
-
97
-
98
-
99
-
100
-
101
-
102
-
103
-
104
-
105
-
106
-
107
-
108
-
109
-
110
 |
 |