Kyocera TASKalfa 400ci Scan To SMB (PC) Setup Guide Rev-3 - Page 16
the Operation, Guide, Start
 |
View all Kyocera TASKalfa 400ci manuals
Add to My Manuals
Save this manual to your list of manuals |
Page 16 highlights
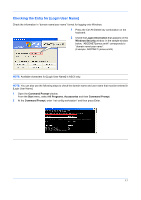
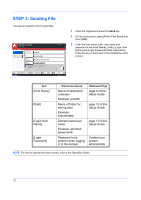
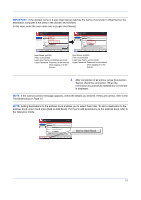
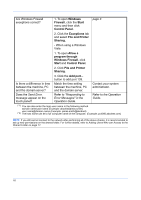
5 Once the connection is checked, press [OK]. 6 Press the Start key. The scanned original data is converted to a file and sent to the shared folder of the computer you specified. NOTE: The file name containing scanned originals starts with "doc" followed by additional information (by default, a timestamp). For example, a file containing data sent on December 31, 2008, 02:30:40 pm will be "doc20081231143040". You can also specify a name of file in [File Name Entry] before sending it. For details, refer to the Operation Guide. 14
-
 1
1 -
2
-
3
-
4
-
5
-
6
-
7
-
8
-
9
-
10
-
 11
11 -
 12
12 -
 13
13 -
 14
14 -
 15
15 -
 16
16 -
 17
17 -
 18
18 -
 19
19 -
 20
20 -
 21
21 -
22
-
23
 |
 |
14
5
Once the connection is checked, press [OK].
6
Press the
Start
key. The scanned original data is
converted to a file and sent to the shared folder of
the computer you specified.
NOTE:
The file name containing scanned originals starts with “doc” followed by additional information (by
default, a timestamp). For example, a file containing data sent on December 31, 2008, 02:30:40 pm will be
“doc20081231143040”.
You can also specify a name of file in [File Name Entry] before sending it. For details, refer to
the Operation
Guide
.