Kyocera TASKalfa 5551ci Printing System (11),(12),(13),(14) Configuration and - Page 22
Ethernet connection, About Setup, Setup from the copier touch panel
 |
View all Kyocera TASKalfa 5551ci manuals
Add to My Manuals
Save this manual to your list of manuals |
Page 22 highlights
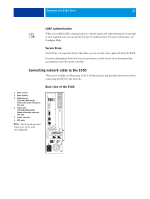
PREPARING FOR E100 SETUP 22 Ethernet connection For Ethernet connections, the E100 supports Unshielded Twisted Pair (UTP) cabling for these network speeds: • 10BaseT: Category 3 or higher • 100BaseTX: Category 5 or higher (4-pair/8-wire, short-length) • 1000BaseT: Category 5e or higher (4-pair/8-wire, short-length) TO CONNECT TO THE NETWORK 1 Power off the copier and E100. For information about the proper procedures, see page 52. 2 Connect the cable from the copier to the appropriate connector on the back of the E100. 3 Connect the network cable from the network to the appropriate network connector on the back of the E100. 4 Power on the E100 and the copier. About Setup Setup configures the E100 to communicate with other devices and manage print jobs. Perform Setup the first time you turn on the E100, after new system software is loaded, and any time Server software is reinstalled. Then perform the remaining Setup options from Configure. When the network or user printing environment changes, change the options accordingly. You can perform Setup from a networked computer using Configure or from the copier touch panel. Configure Setup allows you to use your keyboard to enter Setup options. If you prefer to use Configure to configure the E100, see "Accessing Configure from a network computer" on page 31. Setup from the copier touch panel Perform initial Setup from the copier touch panel. After the initial Setup, you can change Setup options from a network computer (page 31). If you do not set options in the Setup menus, the E100 uses default settings. You must choose settings appropriate for the printing environment at your site.
-
 1
1 -
2
-
3
-
4
-
5
-
6
-
7
-
8
-
9
-
10
-
11
-
12
-
13
-
14
-
15
-
16
-
 17
17 -
 18
18 -
 19
19 -
 20
20 -
 21
21 -
 22
22 -
 23
23 -
 24
24 -
 25
25 -
 26
26 -
 27
27 -
28
-
29
-
30
-
31
-
32
-
33
-
34
-
35
-
36
-
37
-
38
-
39
-
40
-
41
-
42
-
43
-
44
-
45
-
46
-
47
-
48
-
49
-
50
-
51
-
52
-
53
-
54
-
55
-
56
-
57
-
58
-
59
 |
 |