Kyocera TASKalfa 5551ci Printing System (11),(12),(13),(14) Printing Guide (Fi - Page 45
Completing Standard TCP/IP Port (Raw or LPR) printing connections
 |
View all Kyocera TASKalfa 5551ci manuals
Add to My Manuals
Save this manual to your list of manuals |
Page 45 highlights
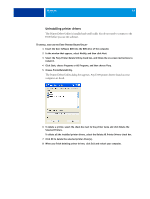
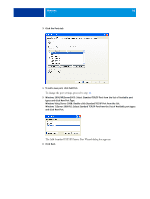
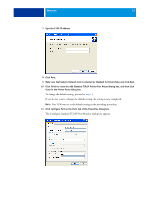
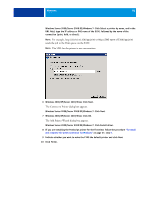
WINDOWS 45 Completing Standard TCP/IP Port (Raw or LPR) printing connections After you install the PostScript and printer driver files, you can add or configure the Setup for the Standard TCP/IP Port (Raw or LPR) connection as follows: • Prepare the E100 to accept print jobs using Standard TCP/IP Port (Raw or LPR) protocols. • Enable LPD or Port 9100 on the E100. • Configure the computer for the TCP/IP connection. For more information about Setup, see Configure Help. Before you complete the following procedure, contact your system administrator for the IP address assigned to the E100. The TCP/IP protocol should be installed as a default on the Windows computer. For Port 9100, you can set up the connection and install the printer driver in one procedure. NOTE: You can also set up the LPR Port connection by installing Print Services for UNIX, which is supplied as an add-on Windows component. For more information, see the documentation that accompanies Windows. TO SET UP STANDARD TCP/IP PORT (RAW OR LPR) FOR WINDOWS NOTE: The following procedures use Windows XP illustrations. 1 Windows 2000: Click Start, choose Settings, and then choose Printers. Windows XP: Click Start and choose Printers and Faxes. Windows Server 2003: Click Start, choose Control Panel, and then choose Printers and Faxes. Windows Vista/Server 2008: Click Start, choose Control Panel, and then double-click Printers. Windows 7/Server 2008 R2: Click Start and choose Devices and Printers. 2 Windows 2000/XP/Server 2003/Server 2008/Vista: Right-click the E100 icon and choose Properties. Windows 7/Server 2008 R2: Right-click the E100 icon and choose Printer properties.
-
 1
1 -
2
-
3
-
4
-
5
-
6
-
7
-
8
-
9
-
10
-
11
-
12
-
13
-
14
-
15
-
16
-
17
-
18
-
19
-
20
-
21
-
22
-
23
-
24
-
25
-
26
-
27
-
28
-
29
-
30
-
31
-
32
-
33
-
34
-
35
-
36
-
37
-
38
-
39
-
 40
40 -
 41
41 -
 42
42 -
 43
43 -
 44
44 -
 45
45 -
 46
46 -
 47
47 -
 48
48 -
 49
49 -
 50
50 -
51
-
52
-
53
-
54
-
55
-
56
-
57
-
58
-
59
-
60
-
61
-
62
-
63
-
64
-
65
-
66
-
67
-
68
-
69
-
70
-
71
-
72
-
73
-
74
-
75
-
76
-
77
-
78
-
79
-
80
-
81
-
82
-
83
-
84
-
85
-
86
-
87
-
88
-
89
-
90
-
91
-
92
-
93
-
94
-
95
-
96
-
97
-
98
-
99
-
100
-
101
-
102
-
103
-
104
-
105
-
106
-
107
-
108
-
109
-
110
 |
 |