Kyocera TASKalfa 820 Scan System (H) Operation Guide Rev-1 (Functions Edition) - Page 74
Sender Address Registration Editing, Add to Destination
 |
View all Kyocera TASKalfa 820 manuals
Add to My Manuals
Save this manual to your list of manuals |
Page 74 highlights
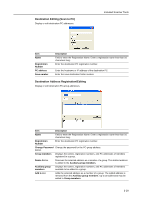
Included Scanner Tools Item Edit Button Import Button Delete Button Description Click this button to modify sender data. The sender editing dialog box is shown. (See page 3-24) Click this button to import sender data from an Address Editor file or CSV file. The Import dialog box is shown. (See page 3-30) Click to delete the selected sender data. You can also select and delete multiple senders in a single operation. Sender Address Registration (Editing) Register a new sender address or edit a sender address. Item Description Name Field to enter the Registration Name. Enter a registration name less than 16 characters long. Registration Number Enter the sender data registration number. Specify a registration number from 001 - 040. E-mail Address Enter the sender e-mail address. Signature Enter signature data to be attached during e-mail transmission. Enter text less than 256 characters long. Address of PC with Enter the address of the PC on which Address Book is installed. "Address Book" installed Save number Specify the PC save number for the destination PC for Scan to PC mode. Specify a save number from 001 - 100. Change Password Change the password of each user. Enter a numerical password less than 8 Button digits long. SMTP TX Authentication Button Configure SMTP authentication settings for each user. When specifying SMTP authentication for each user, first configure SMTP Authentication in System Basic Setting. (See page 3-18) Add to Destination When this item is checked, the sender (user) address is added to the E-mail List (E-mail) Destination List. Add to Destination When this item is checked, the sender (user) address is added to the PC List (PC) Destination List. 3-24
-
 1
1 -
2
-
3
-
4
-
5
-
6
-
7
-
8
-
9
-
10
-
11
-
12
-
13
-
14
-
15
-
16
-
17
-
18
-
19
-
20
-
21
-
22
-
23
-
24
-
25
-
26
-
27
-
28
-
29
-
30
-
31
-
32
-
33
-
34
-
35
-
36
-
37
-
38
-
39
-
40
-
41
-
42
-
43
-
44
-
45
-
46
-
47
-
48
-
49
-
50
-
51
-
52
-
53
-
54
-
55
-
56
-
57
-
58
-
59
-
60
-
61
-
62
-
63
-
64
-
65
-
66
-
67
-
68
-
 69
69 -
 70
70 -
 71
71 -
 72
72 -
 73
73 -
 74
74 -
 75
75 -
 76
76 -
 77
77 -
 78
78 -
 79
79 -
80
-
81
-
82
-
83
-
84
-
85
-
86
-
87
-
88
-
89
-
90
-
91
-
92
-
93
-
94
-
95
-
96
-
97
-
98
-
99
-
100
-
101
-
102
-
103
-
104
-
105
-
106
-
107
-
108
-
109
-
110
-
111
-
112
-
113
-
114
-
115
-
116
-
117
-
118
-
119
-
120
-
121
-
122
-
123
-
124
 |
 |
