LG 32UD89-W Owners Manual - Page 2
Contents, User Settings, Troubleshooting, Specifications, License, Assembling And Preparing
 |
View all LG 32UD89-W manuals
Add to My Manuals
Save this manual to your list of manuals |
Page 2 highlights
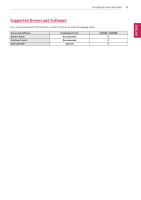
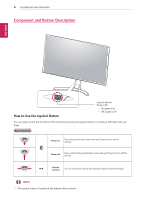
2 Contents ENEGNLGISH CONTENTS 3 LICENSE 4 ASSEMBLING AND PREPARING 4 Product Components 5 Supported Drivers and Software 6 Component and Button Description 6 - How to Use the Joystick Button 7 Input Connector 8 Moving and Lifting the Monitor 9 Installing the Monitor 9 - Assembling the stand base 10 - Using the cable holder 11 - Installing onto a table 12 - Adjusting the angle 12 - Adjusting the Stand Height 13 - Pivot Feature 14 - Using the Kensington lock 15 - Detaching the Stand Body 15 - Installing the wall mount plate 15 - Installing to a wall 20 USER SETTINGS 20 Activating the Main Menu 20 - Main Menu Features 21 User Settings 21 - Menu Settings 25 TROUBLESHOOTING 27 SPECIFICATIONS 27 32UD89/32MU89 28 Factory Support Mode (Preset Mode, PC) 28 HDMI 28 DisplayPort / USB-C 28 Power LED 17 USING THE MONITOR 17 Connecting to a PC 17 - HDMI connection 17 - DisplayPort connection 18 - USB-C connection 18 Connecting to AV Devices 18 - HDMI connection 19 Connecting to External Devices 19 - Connecting Headphones 19 Service only port
-
 1
1 -
 2
2 -
 3
3 -
 4
4 -
 5
5 -
 6
6 -
 7
7 -
 8
8 -
9
-
10
-
11
-
12
-
13
-
14
-
15
-
16
-
17
-
18
-
19
-
20
-
21
-
22
-
23
-
24
-
25
-
26
-
27
-
28
-
29
 |
 |
