LG 37LT560E Quick Reference Guide - Page 28
RS-232C configurations
 |
View all LG 37LT560E manuals
Add to My Manuals
Save this manual to your list of manuals |
Page 28 highlights
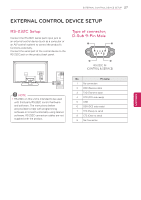
28 EXTERNAL CONTROL DEVICE SETUP RS-232C configurations 7-Wire Configuration (Serial female-female NULL modem cable) PC TV RXD 2 3 TXD TXD 3 2 RXD GND 5 5 GND DTR 4 6 DSR DSR 6 4 DTR RTS 7 8 CTS CTS 8 7 RTS D-Sub 9 D-Sub 9 3-Wire Configurations(Not standard) PC TV RXD 2 3 TXD 3 2 GND 5 5 DTR 4 6 DSR 6 4 RTS 7 8 CTS 8 7 D-Sub 9 D-Sub 9 TXD RXD GND DSR DTR CTS RTS Set ID Set ID number. OPTION ꔂ Move ꔉ OK • Language • Caption : Off • Standby Light : On • My Media Setting • Initial Setting • Set ID : 1 ꔉ • Mode Setting : Home Use 1 Press Home or MENU to access the main menus. 2 Press the Navigation buttons to scroll to option and press ENTER. 3 Press the Navigation buttons to scroll to Set ID and press ENTER. 4 Scroll left or right to select a set ID number and select close. The adjustment range is 1-99. 5 When you are finished, press exit. *Real data mapping 0 : Step 0 A : Step 10 (SET ID 10) F : Step 15 (SET ID 15) 10 : Step 16 (SET ID 16) 63 : Step 99 (SET ID 99) 64 : Step 100 ...... ... ENEGNLGISH
-
 1
1 -
2
-
3
-
4
-
5
-
6
-
7
-
8
-
9
-
10
-
11
-
12
-
13
-
14
-
15
-
16
-
17
-
18
-
19
-
20
-
21
-
22
-
 23
23 -
 24
24 -
 25
25 -
 26
26 -
 27
27 -
 28
28 -
 29
29 -
 30
30 -
 31
31 -
 32
32 -
 33
33 -
34
-
35
-
36
 |
 |
