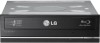
LG BH12LS35 Owners Manual - Page 6
Device, Drivers, How to Use the, Discs - blu ray
 |
View all LG BH12LS35 manuals
Add to My Manuals
Save this manual to your list of manuals |
Page 6 highlights
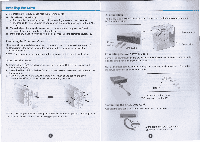
Device Drivers When using Windows XP SP2, Vista and Windows 7, no special device driver is required. Your system, upon Power On and bootup after installing and connecting the new Blu-ray Disc Rewriter will recognize and load native software drivers automatically. For Windows XP Users • In order to ensure normal drive operation, please check the following: • The drive is displayed in Windows XP : [Control Panel]-([Performance and Maintenance])-[System][Hardware ]-[Device Manager]-[DVD/CD-ROM-drives] • If the drive is not recognized by your computer, please check the following items. • If an 0 indicator is displayed on the IDE ATAIATAPI controllers in [Control Panel]-([Performance and Maintenance ])-[System ]-[Hardware ]-[Device Manager], you will need to contact your PC's manufacturer or the motherboard's manufacturer and get the appropriate IDE controller driver. • Run Add New Hardware in Control Panel to let PC search again for new device. Included Software Retail versions of this drive come with CD/DVD/BD authoring Software. Before installing, please uninstall any previous CD/DVD/BD burning software you may have loaded on your PC in order to prevent possible compatibility issues. Once you have installed the application software, you may (if you wish) begin to reinstall previous software, taking note for errors. Check for software updates for all of your writing software. How to Use the Discs Don't attach any stickers or labels to discs, It could cause read/write errors and data loss. The Discs in this unit operate at a very high speed! DO NOT use damaged, cracked or warped discs. The drive's optical unit may be damaged if they break. DO NOT use non-standard discs. NON-standard discs may not play or store data properly, Em 1'1;n y Eject TI1I drlv ho I ature that allows the disc to be ejected manually if this becomes n Iry ucl, s failure of the drive or a power outage. NOT : Don'l u this feature except in an emergency, I) 1111'11 1I1 power to OFF. ') I 1« \ fin -tipped object (such as a straightened heavy duty paper clip) into the 111,11 1101 above the eject button. The front door will pop open and the disk tray will (:)111 p rtw y out. 3) Pilil 111 front door to open it all the way, then grip the disc tray between thumb and I I( liMn r nd gently pull it straight out. NOTE: This feature is a last measure to be used only in an emergency. Using it excessively will cause malfunction. • If you cannot get a good grip on the disc tray with your fingers, use a steel binder clip or pring clamp to pull it out.
-
 1
1 -
 2
2 -
 3
3 -
 4
4 -
 5
5 -
 6
6 -
 7
7
 |
 |
