LG CG180 Owner's Manual (English) - Page 53
Settings
 |
View all LG CG180 manuals
Add to My Manuals
Save this manual to your list of manuals |
Page 53 highlights
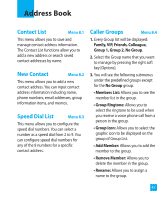
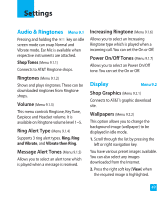
Settings Audio & Ringtones Menu 9.1 Pressing and holding the key on idle screen mode can swap Normal and Vibrate mode. Ear Mic is available when respective instruments are attached. Shop Tones (Menu 9.1.1) Connects to AT&T Ringtone shops. Ringtones (Menu 9.1.2) Shows and plays ringtones. These can be downloaded ringtones from Ringtone shops. Volume (Menu 9.1.3) This menu controls Ringtone, Key Tone, Earpiece and Headset volume. It is available on Ringtone volume level 1~5. Ring Alert Type (Menu 9.1.4) Supports 3 ring alert types. Ring, Ring and Vibrate, and Vibrate then Ring. Message Alert Tones (Menu 9.1.5) Allows you to select an alert tone which is played when a message is received. Increasing Ringtone (Menu 9.1.6) Allows you to select an Increasing Ringtone type which is played when a incoming call. You can set the On or Off. Power On/Off Tones (Menu 9.1.7) Allows you to select an Power On/Off tone. You can set the On or Off. Display Menu 9.2 Shop Graphics (Menu 9.2.1) Connects to AT&T's graphic download site. Wallpapers (Menu 9.2.2) This option allows you to change the background image (wallpaper) to be displayed in idle mode. 1. Scroll through the list by pressing the left or right navigation key. You have various preset images available. You can also select any images downloaded from the Internet. 2. Press the right soft key [View] when the required image is highlighted. 49
-
 1
1 -
2
-
3
-
4
-
5
-
6
-
7
-
8
-
9
-
10
-
11
-
12
-
13
-
14
-
15
-
16
-
17
-
18
-
19
-
20
-
21
-
22
-
23
-
24
-
25
-
26
-
27
-
28
-
29
-
30
-
31
-
32
-
33
-
34
-
35
-
36
-
37
-
38
-
39
-
40
-
41
-
42
-
43
-
44
-
45
-
46
-
47
-
 48
48 -
 49
49 -
 50
50 -
 51
51 -
 52
52 -
 53
53 -
 54
54 -
 55
55 -
 56
56 -
 57
57 -
 58
58 -
59
-
60
-
61
-
62
-
63
-
64
-
65
-
66
-
67
-
68
-
69
-
70
-
71
-
72
-
73
-
74
-
75
-
76
-
77
-
78
-
79
-
80
-
81
-
82
-
83
-
84
-
85
-
86
-
87
-
88
-
89
-
90
-
91
-
92
-
93
-
94
-
95
-
96
-
97
-
98
-
99
-
100
-
101
-
102
-
103
-
104
-
105
-
106
-
107
-
108
-
109
-
110
-
111
-
112
-
113
-
114
-
115
-
116
-
117
-
118
-
119
-
120
-
121
-
122
-
123
-
124
-
125
-
126
-
127
-
128
-
129
-
130
-
131
-
132
-
133
-
134
-
135
-
136
-
137
-
138
-
139
-
140
-
141
-
142
-
143
-
144
-
145
-
146
-
147
-
148
-
149
-
150
-
151
-
152
-
153
-
154
-
155
-
156
-
157
-
158
-
159
-
160
-
161
-
162
-
163
-
164
-
165
-
166
-
167
-
168
-
169
-
170
-
171
-
172
-
173
-
174
-
175
-
176
-
177
-
178
-
179
-
180
-
181
-
182
 |
 |