LG DLE2516W Owners Manual - Page 26
Starting your dryer, Dry Level, Start / Pause Button - dryer lint screen
 |
View all LG DLE2516W manuals
Add to My Manuals
Save this manual to your list of manuals |
Page 26 highlights
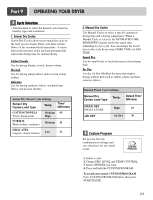
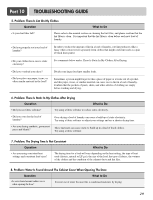
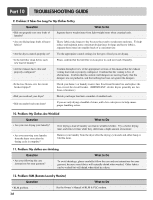
Part 9 OPERATING YOUR DRYER When Using Air Dry This chart shows examples of items that can be dried using AIR DRY. Type of Load Foam rubber-pillows, padded bras, stuffed toys Plastic shower curtains, tablecloths Rubber-backed rugs Default Time* (Minutes) 20 - 30 20 - 30 40 - 50 Olefin, polypropylene, shear nylon 10 - 20 Reset cycle to complete drying, if needed. • Check to see that coverings are securely stitched. • Shake and fluff pillows by hand periodically during the cycle. • Dry item completely. Foam rubber pillows are slow to dry. NOTE: Air Dry is not available with Sensor Dry Cycles. 10 Dry Level • Use these buttons to set dry level • First, select sensor dry cycle. • Select dry level to adjust how much you want to dry the load. As the cycle runs, the control senses the dryness of the load and adjusts the time automatically based on the selected dryness level. Note DRY LEVEL selections can only be made while using Sensor Dry Cycles. Selecting MORE Dry or LESS Dry automatically adjusts the needed time which is already sensed. 11 Start / Pause Button • Use this button for start or pause. 26 Starting your dryer 1. Before use • Clean lint screen before or after each cycle. • Place laundry into dryer and shut door. See Loading. • Turn the knob to select the drying cycle you want. The preset setting for Sensor Dry Cycles or Manual Cycles will glow. The estimated or actual cycle time (in minutes) will show in the display. Following are sample loads for Super Capacity Dryers: Heavy Work Clothes 4 jeans 4 workpants 4 work shirts Cotton/Towels 10 bath towels 10 hand towels 2 sweatpants 2 sweatshirts 14 wash cloths Mixed Load 3 sheets (1 king, 2 twin) 4 pillowcases 3 shirts 3 blouses 9 T-shirts 9 shorts 10 handkerchiefs 2. Loading • Determine load size by the amount of space the load requires rather than the weight of the load. • Avoid overloading the dryer. Following these instructions can help reduce your utility bill, prolong the life of your clothes, and decrease the likelihood of uneven drying and wrinkle. 3. To use a sensor dry cycle • Select DRY LEVEL to adjust how dry you want the load. As the cycle runs, the control senses the dryness of the load and adjusts the time automatically for the selected dryness level. • Select the desired options. • Press START/PAUSE Note DRY LEVEL selections can only be made while using Sensor Dry Cycles. Selecting MORE Dry or LESS Dry automatically adjusts the sensed time needed.
-
 1
1 -
2
-
3
-
4
-
5
-
6
-
7
-
8
-
9
-
10
-
11
-
12
-
13
-
14
-
15
-
16
-
17
-
18
-
19
-
20
-
 21
21 -
 22
22 -
 23
23 -
 24
24 -
 25
25 -
 26
26 -
 27
27 -
 28
28 -
 29
29 -
 30
30 -
 31
31 -
32
-
33
-
34
-
35
-
36
-
37
-
38
-
39
-
40
-
41
-
42
-
43
-
44
-
45
-
46
-
47
-
48
-
49
-
50
-
51
-
52
-
53
-
54
-
55
-
56
-
57
-
58
-
59
-
60
-
61
-
62
 |
 |