LG L206WU-PF Owner's Manual (English) - Page 7
Using the Computer - usb
 |
UPC - 719192184695
View all LG L206WU-PF manuals
Add to My Manuals
Save this manual to your list of manuals |
Page 7 highlights
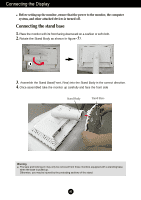
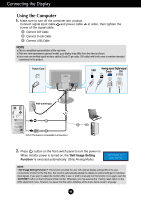
Connecting the Display Using the Computer 1. Make sure to turn off the computer and product. Connect signal input cable 1 and power cable 2 in order, then tighten the screw of the signal cable. A Connect DVI Cable B Connect D-sub Cable C Connect USB Cable NOTE This is a simplified representation of the rear view. This rear view represents a general model; your display may differ from the view as shown. User must use shielded signal interface cables (D-sub 15 pin cable, DVI cable) with ferrite cores to maintain standard compliance for the product. Power Cord USB Analog signal Digital signal D-sub DVI AC-IN D-SUB DVI-D Wall-outlet type B C A DVI-D (This feature is not available in all countries.) 2. Press button on the front switch panel to turn the power on. When monitor power is turned on, the 'Self Image Setting Function' is executed automatically. (Only Analog Mode) NOTE ' Self Image Setting Function'? This function provides the user with optimal display settings.When the user connects the monitor for the first time, this function automatically adjusts the display to optimal settings for individual input signals. If you want to adjust the monitor while in use, or wish to manually run this function once again, push the 'AUTO/SET' button on the front panel of the monitor. Otherwise, you may execute the ' Factory reset' option on the OSD adjustment menu. However, be aware that this option initializes all the menu items except 'Language'. A6
-
 1
1 -
 2
2 -
 3
3 -
 4
4 -
 5
5 -
 6
6 -
 7
7 -
 8
8 -
 9
9 -
 10
10 -
 11
11 -
 12
12 -
13
-
14
-
15
-
16
-
17
-
18
-
19
-
20
-
21
-
22
-
23
-
24
-
25
-
26
-
27
-
28
 |
 |
