LG LDF6810WW Owner's Manual - Page 20
Troubleshooting - problems
 |
View all LG LDF6810WW manuals
Add to My Manuals
Save this manual to your list of manuals |
Page 20 highlights
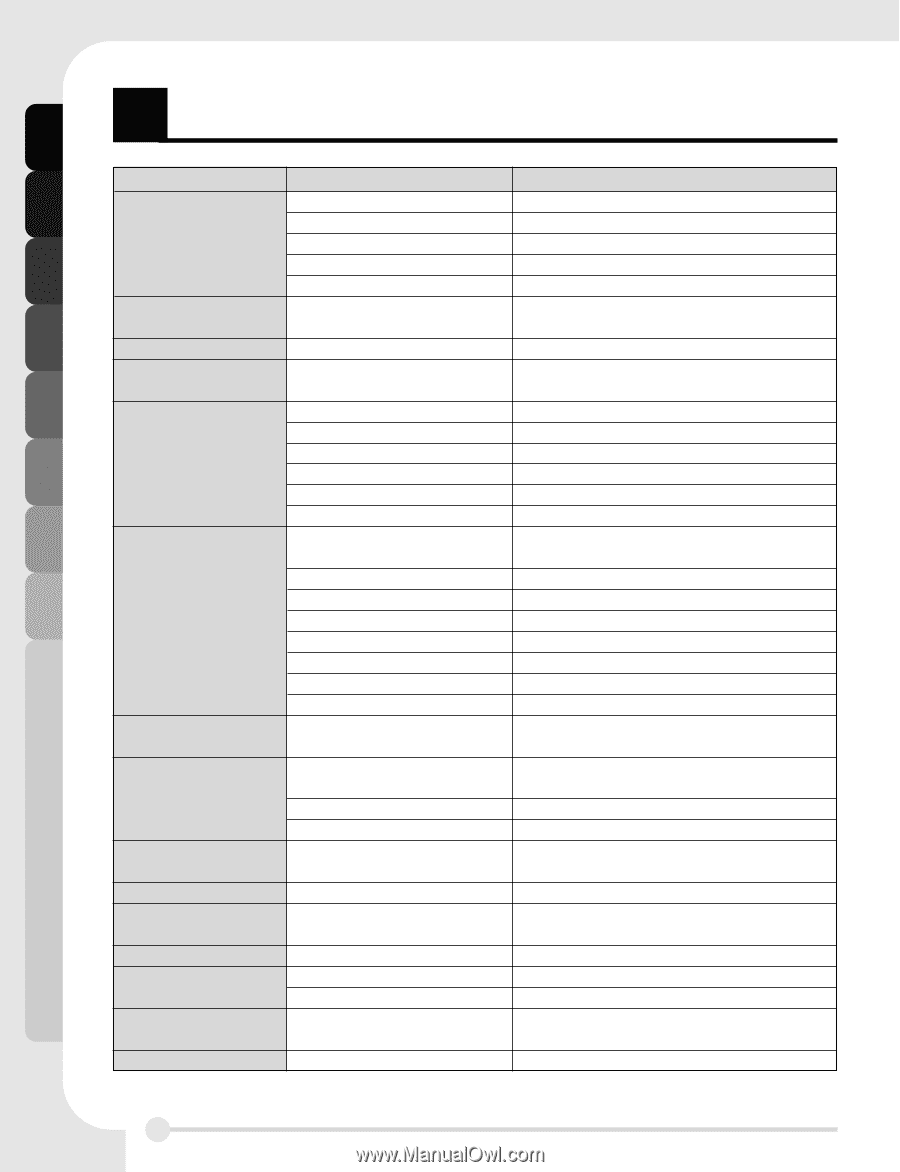
T ROUBLESHOOTING Problem Causes Recommended Actions Dishwasher does not operate Door is not completely closed. Cycle is not selected. Check the door is completely closed and latched. Select the desired cycle. Power supply is not connected. Water is not supplied. Connect power supply properly. Check water faucet. Too long operation Fuse is blown out. Cold water is supplied. Replace fuse or reset circuit breaker. Check hot water faucet is connected (Heating water takes it longer). Odor Remaining water inside from the last cycle Operate Quick Wash cycle with detergents without loading dishes. Water remains after a cycle finishes Drain hose is bent or clogged. Straight hose. Food Soil remains on dishes Improper cycle selection Water temperature is low. Select right cycle based on dish types and soil toughness. Use hot water faucet. Dishwashing detergent was not used. Low inlet water pressure Use recommended detergents. Water pressure should range between 20 ~ 120psi. Water jet holes of spray arms blocked. Improper dish loading Clean the arm. Dishes shouldn' t interrupt arm rotation and detergent dispensing. Spots and filming on dishes Low water temperature Supplied water temperature should be minimum 120℉ for the best washing performance. Too much detergent used Overloading Reduce detergent amount. See page 15. Load the proper amount of dishes. Improper loading Insufficient water pressure Rearrange dishes referring to photos on pages 12 and 13. Check water pressure is above 20 PSI. Insufficient detergent Rinse aid dispenser empty. Increase the detergent amount. See page 15. Refill the rinse aid dispenser. Extremly hard water Install home water softener or use Glass Magic (page 16). Spots and filming on door and tank Extremely hard water Follow instructions of pages 16 and 17 for detergent use and tub cleaning. Noise This is normal. Detergent cover opening. Drainage Sound at the early stage. Your Dishwasher isn't horizontal. Reposition your dishwasher. Cloudiness on glassware Nozzle arm knocks against the dishes. Combination of excessive detergent and soft water. Reposition your dishes. Underload the dishwasher and use a rinse aid to minimize this process. Black or gray marks on dishes Aluminum items rub dishes during cycle. Remove aluminum markings with a mild cleaner. Yellow or brown film on inside surfaces Coffee or tea soils Eliminate the soil by using a stain removal product. Dishes don't dry The lamps don't illuminate Spray arms don't rotate smoothly Rinse agent dispenser empty. Check and refill the rinse agent if empty. Power is not connected. Connect power supply. Fuse is blown out or circuit breaker is tripped. Replace fuse and repair circuit breaker. The holes of spray arms is blocked by food Clean the holes of the spray arms. particles. Upper rack crooked after loading Rack is poorly adjusted. Adjust the upper rack properly referring to page 12. TROUBLESHOOTING 20
-
 1
1 -
2
-
3
-
4
-
5
-
6
-
7
-
8
-
9
-
10
-
11
-
12
-
13
-
14
-
 15
15 -
 16
16 -
 17
17 -
 18
18 -
 19
19 -
 20
20 -
 21
21 -
 22
22 -
 23
23 -
 24
24 -
 25
25 -
26
-
27
-
28
-
29
-
30
-
31
-
32
-
33
-
34
-
35
-
36
-
37
-
38
-
39
-
40
-
41
-
42
-
43
-
44
-
45
-
46
-
47
-
48
 |
 |