LG LFX25974SW Owner's Manual - Page 2
Table Of Contents - refrigerator
 |
View all LG LFX25974SW manuals
Add to My Manuals
Save this manual to your list of manuals |
Page 2 highlights
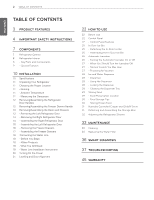
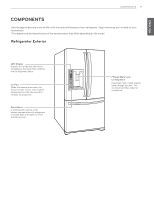
2 TABLE OF CONTENTS ENGLISH TABLE OF CONTENTS 3 PRODUCT FEATURES 4 IMPORTANT SAFETY INSTRUCTIONS 7 COMPONENTS 7 Refrigerator Exterior 8 Refrigerator Interior 8 - Key Parts and Components 9 - Special Features 10 INSTALLATION 10 Specifications 11 Unpacking Your Refrigerator 11 Choosing the Proper Location 11 - Flooring 11 - Ambient Temperature 11 - Measuring the Clearances 12 Removing/Assembling the Refrigerator Door Handles 12 Removing/Assembling the Freezer Drawer Handle 13 Removing/Assembling the Doors and Drawers 13 - Removing the Left Refrigerator Door 14 - Removing the Right Refrigerator Door 14 - Assembling the Right Refrigerator Door 15 - Assembling the Left Refrigerator Door 16 - Removing the Freezer Drawers 17 - Assembling the Freezer Drawers 18 Connecting the Water Line 18 - Before You Begin 18 - Water Pressure 18 - What You Will Need 19 - Water Line Installation Instructions 20 Turning On the Power 21 Leveling and Door Alignment 22 HOW TO USE 22 Before Use 22 Control Panel 22 - Control Panel Features 25 In-Door Ice Bin 25 - Detaching the In-Door Ice Bin 25 - Assembling the In-Door Ice Bin 26 Automatic Icemaker 26 - Turning the Automatic Icemaker On or Off 27 - When You Should Turn the Icemaker Off 27 - Normal Sounds You May Hear 27 - Preparing for Vacation 28 Ice and Water Dispenser 28 - Dispenser 28 - Using the Dispenser 28 - Locking the Dispenser 28 - Cleaning the Dispenser Tray 29 Storing Food 29 - Food Preservation Location 30 - Food Storage Tips 30 - Storing Frozen Food 31 Humidity Controlled Crisper and Glide'N'Serve 31 Detaching and Assembling the Storage Bins 32 Adjusting the Refrigerator Shelves 33 MAINTENANCE 33 Cleaning 34 Replacing the Water Filter 36 SMART DIAGNOSIS 37 TROUBLESHOOTING 45 WARRANTY
-
 1
1 -
 2
2 -
 3
3 -
 4
4 -
 5
5 -
 6
6 -
 7
7 -
 8
8 -
9
-
10
-
11
-
12
-
13
-
14
-
15
-
16
-
17
-
18
-
19
-
20
-
21
-
22
-
23
-
24
-
25
-
26
-
27
-
28
-
29
-
30
-
31
-
32
-
33
-
34
-
35
-
36
-
37
-
38
-
39
-
40
-
41
-
42
-
43
-
44
-
45
-
46
-
47
-
48
-
49
 |
 |