LG LHT799 Owner's Manual - Page 9
Optional Equipment, Connection
 |
View all LG LHT799 manuals
Add to My Manuals
Save this manual to your list of manuals |
Page 9 highlights
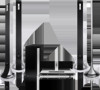
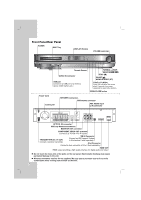
MENU Installation and Setup Optional Equipment Connection DVD Player (or Digital Device, etc) U USB Memory, MP3 Player (or Memory Card Reader, etc.) OPTICAL OUT O Auxiliary device OUT IN VIDEO AUDIO (L) AUDIO (R) To AUDIO OUT (L/R) A To AV IN AUDIO (L/R) OPTICAL IN connection (O) Connect an optical output of DVD Player (or Digital Device etc) to the OPTICAL IN connector. AUDIO IN connection (D) Connect a output of portable device (MP3 or PMP etc) to the AUDIO input connector. Rear of DVD/CD Receiver MONITOR INPUT L - AUX - R Y PB PR XM IN COMPONENT VIDEO (PROGRESSIVE SCAN) i Pod OUT PUT HDMI OUT USB connection (U) Connect the USB port of USB Memory (or MP3 player, etc.) to the USB port on the front of the unit. Removing the USB Device from the unit 1. Choose a different function mode or press STOP (x) twice in a row. 2. Remove the USB device from the unit. Notes: Don't extract the USB device while operating. Music files (MP3/WMA), image files (JPEG) and video files can be played. This unit cannot use a USB HUB. Recommended Memory Cards. Compact Flash Card (CFC), Micro Drive (MD), Smart Media Card (SMC), Memory Stick (MS), Secure Digital Card (SD), Multimedia Card (MMC), Memory Stick Pro (MS-Pro) - Compatible with: FAT16, FAT32 - Only use the memory cards recommended. Devices which require additional program installation when you have connected the unit to a computer are not supported. In case of a USB HDD, make sure to connect an auxiliary power cord to the USB HDD for proper operation. Up to four primary partitions of a drive are supported. If there is an extension partition, it will not be supported. If the drive of USB device is two or more, a drive folder is displayed on the screen. If you want to move to the initial menu after you select a folder, press RETURN. Digital cameras and mobile phones are not supported. AUX IN connection (A) Connect a Output of auxiliary device to the AUX AUDIO Input (L/R) Connector. Portable device To AUDIO IN D To AUDIO OUT iPod connection Connect the iPod connector on the rear of the DVD/ CD Receiver to the dock connector of iPod using an iPod cable (I). Rear of DVD/CD Receiver iPod MONITOR INPUT L - AUX - R Y PB PR XM IN COMPONENT VIDEO (PROGRESSIVE SCAN) i Pod OUT PUT HDMI OUT I Notes: Depending on the type of iPod, you may need to insert one of the dock adapters into the dock slot before you station your iPod. Adjust the volume to a moderate level before you connect your iPod and this unit. 9
-
 1
1 -
2
-
3
-
 4
4 -
 5
5 -
 6
6 -
 7
7 -
 8
8 -
 9
9 -
 10
10 -
 11
11 -
 12
12 -
 13
13 -
 14
14 -
15
-
16
-
17
-
18
-
19
-
20
-
21
-
22
-
23
-
24
-
25
-
26
-
27
-
28
-
29
-
30
-
31
-
32
-
33
 |
 |
