LG LRMDS3006D Owners Manual - Page 24
Turning on the Power
 |
View all LG LRMDS3006D manuals
Add to My Manuals
Save this manual to your list of manuals |
Page 24 highlights
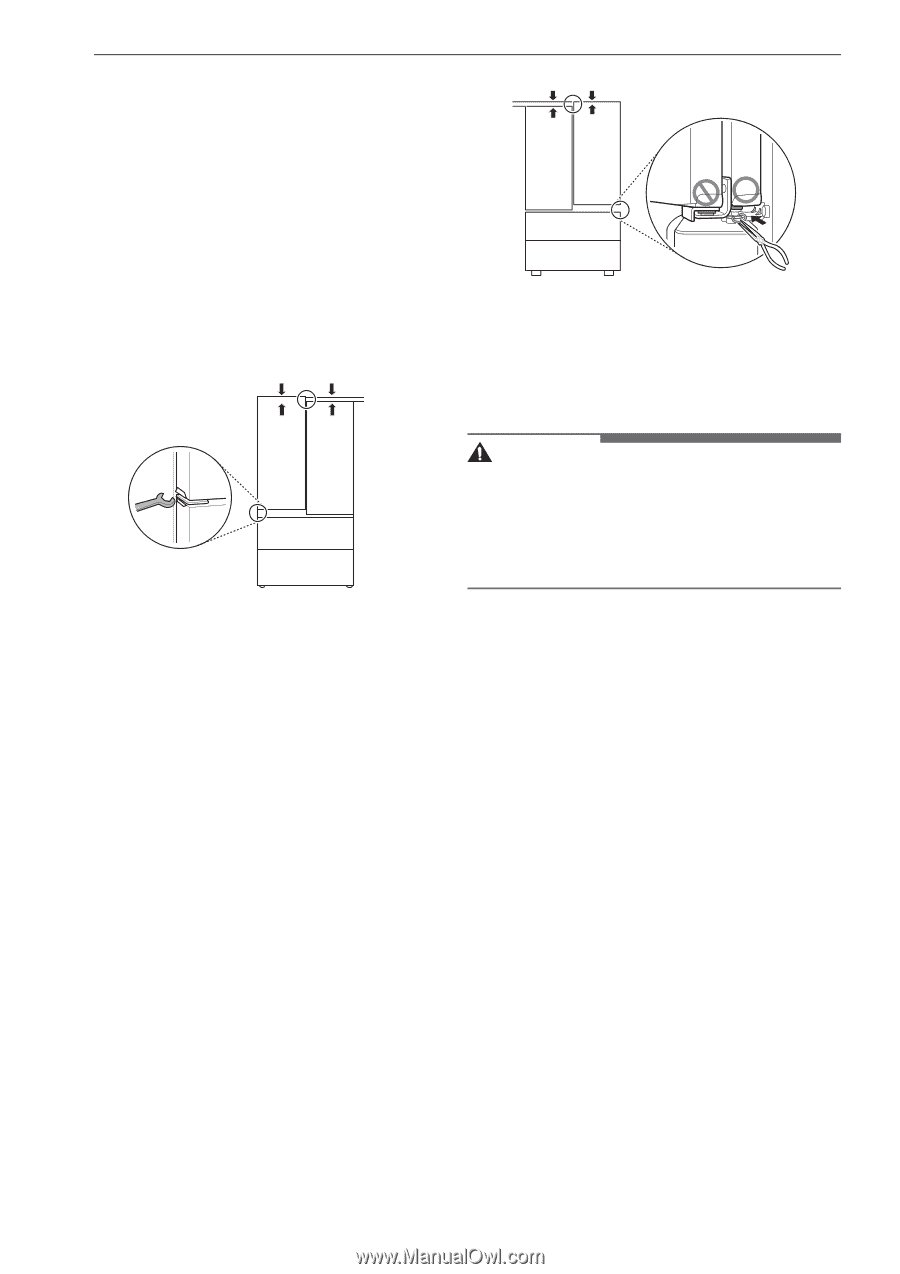
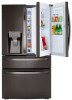
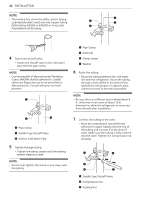
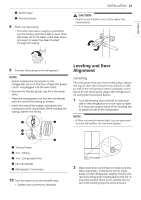
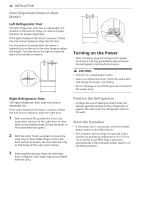
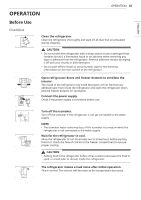
24 INSTALLATION Door Alignment (Door-in-Door Model) Left Refrigerator Door The left refrigerator door has an adjustable nut, located on the bottom hinge, to raise and lower the door for proper alignment. If the space between the doors is uneven, follow the instructions below to align the left door: Use the wrench (included with the owner's manual) to turn the nut in the door hinge to adjust the height. Turn the nut to the right to raise the door or to the left to lower it. Turning on the Power • After installing, plug the refrigerator's power cord into a 3-prong grounded outlet and push the refrigerator into the final position. CAUTION • Connect to a rated power outlet. • Have a certified electrician check the wall outlet and wiring for proper grounding. • Do not damage or cut off the ground terminal of the power plug. Right Refrigerator Door The right refrigerator door does not have an adjustable nut. If the space between the doors is uneven, follow the instructions below to align the right door: 1 With one hand, lift up both the inner and outer door sections of the right door to raise them at the middle hinge. (It may be easier to lift it with the doors open.) 2 With the other hand, use pliers to insert the snap ring on the middle hinge of the inner door section as shown. Do not insert the ring on the hinge of the outer door section. 3 Insert additional snap rings until the right door is aligned. (Two snap rings are provided with the unit.) Position the Refrigerator • Arrange the coil of tubing so that it does not vibrate against the back of the refrigerator or against the wall. Push the refrigerator back to the wall. Start the Icemaker • If the water line is connected, set the icemaker power switch to the ON position. • The icemaker will not begin to operate until it reaches its operating temperature of 15 °F (-9 °C) or below. It will then begin operation automatically if the icemaker power switch is in the ON (I) position.
-
 1
1 -
2
-
3
-
4
-
5
-
6
-
7
-
8
-
9
-
10
-
11
-
12
-
13
-
14
-
15
-
16
-
17
-
18
-
 19
19 -
 20
20 -
 21
21 -
 22
22 -
 23
23 -
 24
24 -
 25
25 -
 26
26 -
 27
27 -
 28
28 -
 29
29 -
30
-
31
-
32
-
33
-
34
-
35
-
36
-
37
-
38
-
39
-
40
-
41
-
42
-
43
-
44
-
45
-
46
-
47
-
48
-
49
-
50
-
51
-
52
-
53
-
54
-
55
-
56
-
57
-
58
-
59
-
60
-
61
-
62
-
63
-
64
-
65
-
66
-
67
-
68
 |
 |