LG LW1816HR Owners Manual - Page 13
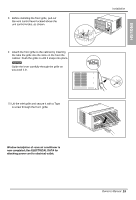
outer edge of the window sill. Tighten
 |
View all LG LW1816HR manuals
Add to My Manuals
Save this manual to your list of manuals |
Page 13 highlights
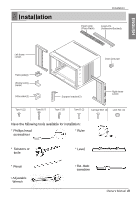
5. frame curtain frame guides. 6. screws. upper guide 10 Type A Upper guide Left Guide panel Right Guide Panel Screws (Type A) Frame guide 1. Open the window. Mark a line on the center of the window stool. Loosely attach the sill bracket to the support bracket using the carriage bolt and the lock nut. Sill Bracket Carriage Bolt 2. Attach the sill bracket to the window sill using the screws (Type B). Carefully place the cabinet on the window stool and align the center mark on the bottom front with the center hole marked window stool. 3. Using the screw (Type D) and the lock nut, attach the support bracket to the cabinet track hole. Use the first track hole after the sill bracket on the outer edge of the window sill. Tighten the carriage bolt and the lock nut. Be sure the cabinet slants outward. Cabinet Track hole Support Bracket Carriage bolt and lock nut 4. Pull the bottom window sash down behind the top retainer bar until they meet. Support Bracket Lock nut Screw (Type B) Sill bracket Machine screw (Type D) and lock nut Outer edge of window sill Do not drill a hole in the bottom pan. The unit is designed to operate with approximately 1/2" of water in bottom pan. Top retainer bar Window stool Front angle 13
-
 1
1 -
2
-
3
-
4
-
5
-
6
-
7
-
 8
8 -
 9
9 -
 10
10 -
 11
11 -
 12
12 -
 13
13 -
 14
14 -
 15
15 -
 16
16 -
 17
17 -
 18
18 -
19
-
20
-
21
-
22
-
23
-
24
-
25
-
26
-
27
-
28
-
29
-
30
-
31
-
32
-
33
-
34
-
35
-
36
-
37
-
38
-
39
-
40
-
41
-
42
-
43
-
44
-
45
-
46
-
47
-
48
 |
 |
