LG LW7010HR Owner's Manual - Page 12
Installation Kits Contents
 |
View all LG LW7010HR manuals
Add to My Manuals
Save this manual to your list of manuals |
Page 12 highlights
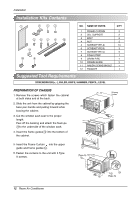
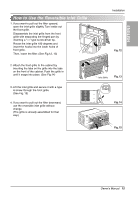
Installation Installation Kits Contents 1 2 3 4 5 6 7 8 12 11 10 9 NO. NAME OF PARTS 1 FRAME CURTAIN 2 SILL SUPPORT 3 BOLT 4 NUT 5 SCREW(TYPE A) 6 SCREW(TYPE B) 7 SCREW(TYPE C) 8 FOAM-STRIP 9 DRAIN PIPE 10 FRAME GUIDE 11 WINDOW LOCKING BRACKET 12 FOAM-PE Q'TY 2 2 2 2 13 3 5 1 1 2 1 1 Suggested Tool Requirements SCREWDRIVER(+, -), RULER, KNIFE, HAMMER, PENCIL, LEVEL PREPARATION OF CHASSIS 1. Remove the screws which fasten the cabinet at both sides and at the back. 2. Slide the unit from the cabinet by gripping the base pan handle and pulling forward while bracing the cabinet. 3. Cut the window sash seal to the proper length. Peel off the backing and attach the foam-pe 12 to the underside of the window sash. 4. Insert the frame guides 10 into the bottom of the cabinet. Shipping Screws 5. Insert the Frame Curtain into the upper guide and frame guides 10 . 6. Fasten the curtains to the unit with 4 Type A screws. 11 (Type A) Upper guide 5 5 10 10 5 (Type A) 12 Room Air Conditioner
-
 1
1 -
2
-
3
-
4
-
5
-
6
-
 7
7 -
 8
8 -
 9
9 -
 10
10 -
 11
11 -
 12
12 -
 13
13 -
 14
14 -
 15
15 -
 16
16 -
 17
17 -
18
-
19
-
20
-
21
-
22
-
23
-
24
-
25
-
26
-
27
-
28
-
29
-
30
-
31
-
32
-
33
-
34
-
35
-
36
-
37
-
38
-
39
-
40
-
41
-
42
-
43
-
44
 |
 |
