LG LWHD1209R Owners Manual - Page 15
S:iiii
 |
View all LG LWHD1209R manuals
Add to My Manuals
Save this manual to your list of manuals |
Page 15 highlights
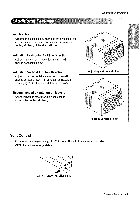
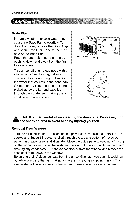
Installation The cabinet should be installed with a very slight tilt (about 1/2") downward toward the outside Screw(Type B) Q Adjust the bolt and the nut of Sill Support _'_for balancing the cabinet. Attach the cabinet to the window stool by driving the screws t_ (Type B: Length 16ram (5/8 inch) and below.) through the front angle into window stool. Pull each Frame Curtain (_) fully to each window sash track, and repeat step 2. Sill Support (_ iiiiiiiiiii! :' ifi_ iiiiiHiiiiiiiiiiiii_i!iJiiiiiiiiii_ sh track Sill Support (_) _ Front Angle Screw(Type B) (_) Attach each Frame Curtain C:_thewindow sash using screws C>(Type C). a, CAUTION: Do not drill a hole in the bottom pan. The unit is designed to operate with approximately 1/2" of water in bottom pan. There is no need to add water if the pan is dry. S:iiii J Slide the unit into the cabinet. _lb CscArUewTIsON(T: ypFeorAs)eacturcitaybinpeut'rsposseid,esr.einstall Screw(Type A) Pow_ }_ Cut the Foam-Strip ¢_ to the proper length and insert between the upper window sash and the lower window sash. Screw (Type A) Owner's Manual 15
-
 1
1 -
2
-
3
-
4
-
5
-
6
-
7
-
8
-
9
-
 10
10 -
 11
11 -
 12
12 -
 13
13 -
 14
14 -
 15
15 -
 16
16 -
 17
17 -
 18
18 -
 19
19 -
 20
20 -
21
-
22
-
23
-
24
-
25
-
26
-
27
-
28
-
29
-
30
-
31
-
32
-
33
-
34
-
35
-
36
-
37
-
38
-
39
-
40
-
41
-
42
-
43
-
44
-
45
-
46
-
47
-
48
-
49
-
50
-
51
-
52
 |
 |
