LG M4710C-BA User Guide
LG M4710C-BA - LG - 47" LCD Flat Panel Display Manual
 |
UPC - 719192184046
View all LG M4710C-BA manuals
Add to My Manuals
Save this manual to your list of manuals |
LG M4710C-BA manual content summary:
- LG M4710C-BA | User Guide - Page 1
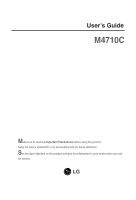
User's Guide M4710C Make sure to read the Important Precautions before using the product. Keep the User's Guide(CD) in an accessible place for future reference. See the label attached on the product and give the information to your dealer when you ask for service. - LG M4710C-BA | User Guide - Page 2
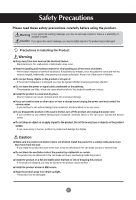
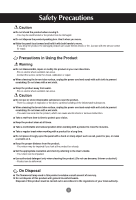
odors or hear a strange sound unplug the power cord and contact the service center. - If you continue to use without taking proper measures, electrical objects on the product screen. - It can cause injury to human, problem to product and damage the display. Caution Make sure the product ventilation - LG M4710C-BA | User Guide - Page 3
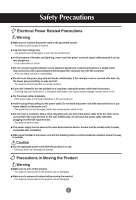
Safety Precautions Electrical Power Related Precautions Warning Make sure to connect the power cable to the grounded current. - You may be electrocuted or injured. Use the rated voltage only. - The product can be damaged, or you may be electrocuted. In the presence of thunder and lightning, never - LG M4710C-BA | User Guide - Page 4
the damaged product can cause electric shock or fire. Contact with the service center for repair. Precautions in Using the Product Warning Do not disassemble, at the product too closely. Set the appropriate resolution and clock by referring to the User's Guide. - Your vision can be impaired. Use - LG M4710C-BA | User Guide - Page 5
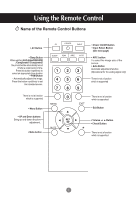
time duration • PSM Button - Automatically adjusts the image. Press this button repetitively to set the intended screen. There is not a function which is supported • Menu Button • UP and Down buttons Bring up and down direction adjustment. • Mute button 123 456 789 0 • Power On/Off Button • Input - LG M4710C-BA | User Guide - Page 6
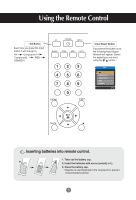
Using the Remote Control • AV Button Each time you press the Input button it will change to AV Component1 Component2 RGB HDMI/DVI 123 456 789 0 • Input Select Button If you press the button once, the following Input Signal Window will appear. Select the signal type you want using the - LG M4710C-BA | User Guide - Page 7
user's guide could be different from the actual image. Rear View REMOTE CONTROL IN RS-232C (CONTROL& SERVICE) OUT L-AUDIO-R AV OUT S-VIDEO REMOTE CONTROL IN RS-232C (CONTROL& SERVICE) OUT HDMI/DVI IN IN RGB IN RGB OUT AUDIO (RGB/DVI PC sound card supports both Speaker Out and Line Out, - LG M4710C-BA | User Guide - Page 8
cable. AUDIO (RGB/DVI) Rear side of the product. Connect the power cord. PC Rear side of the product. REMOTE CONTROL IN RS-232C (CONTROL& SERVICE) OUT IN HDMI/DVI IN RGB IN RGB OUT AUDIO (RGB/DVI) COMPONENT IN VIDEO Y P B P R L-AUDIO-R 1 2 VIDEO AV IN L-AUDIO-R AV OUT S-VIDEO - LG M4710C-BA | User Guide - Page 9
Connecting to External Devices 1 Turn on power by pressing the power button on the product. 2 Turn on the PC. SOURCE AUTO/SET ON/OFF Power button Select an input signal. Press the INPUT button on the remote control to select the input signal. INPUT SET Or, press the SOURCE button on the - LG M4710C-BA | User Guide - Page 10
Connecting to External Devices Watching RGB Outputs Use this function when displaying ANALOG RGB inputs of a PC to the other product. • To use different products connected to each other Connect one end of the signal input cable(15-pin D-Sub Signal Cable) to the RGB OUT connector of product 1 and - LG M4710C-BA | User Guide - Page 11
Connecting to External Devices When watching VCR / DVD Connect the video cable as shown in the below figure and then connect the power cord (See page 7). A When connecting with a BNC cable. • Connect the input terminal with a proper color match. B When connecting with a S-Video cable. • Connect - LG M4710C-BA | User Guide - Page 12
Connecting to External Devices When watching HDTV/DVD(480p/576p/720p/1080i/480i/576i) Connect the video/audio cable as shown in the below figure and then, connect the power cord (See page 7). • Connect the input terminal with a proper color match. A Product COMPONENT IN VIDEO Y P B P R L- - LG M4710C-BA | User Guide - Page 13
Connecting to External Devices When watching HDMI/DVI/RGB from the VCR/DVD/Set-top Box (480p/576p/720p/1080i) Connect the video/audio cable as shown in the below figure and then connect the power cord (See page 7). Product A HDMI/DVI IN RGB IN AUDIO (RGB/DVI) Product HDMI/DVI IN RGB IN - LG M4710C-BA | User Guide - Page 14
Connecting to External Devices Watching AV Outputs • When you set the input signal of the main screen as 'AV (CVBS)', you can transmit the signal that you're watching to the AV output terminal. Video/TV BNC Cable (not included) Audio Cable (not included) VIDEO AV IN L-AUDIO-R AV OUT S-VIDEO - LG M4710C-BA | User Guide - Page 15
cable management * Applicable only for models that support the stand. 1. Arrange the cables in the center as shown in the following picture. OUT RGB OUT IN 1 S-VIDEO 2 AV OUT 2. Fit the cable management to the Holder Groove downwards. SERVICE) OUT IN RGB OUT Y P B P R 1 2 AV OUT - LG M4710C-BA | User Guide - Page 16
Selecting and Adjusting the Screen Name of the Buttons in the Screen Adjustment Unit SOURCE SOURCE AUTO/SET ON/OFF AUTO/SET ON/OFF Power Button • Press this button to turn on the power. Press this button again to turn it off. Power Indicator • This Indicator lights up blue when the display - LG M4710C-BA | User Guide - Page 17
the Screen Name of the Buttons in the Screen Adjustment Unit AUTO/SET Button [For PC Analog signal] Auto in progress For opimal display change resolution to 1360 X 768 [When XGA Mode is active and 1360 X768 is selected] SOURCE Button SOURCE AUTO/SET • Select the input signal Input AV Component - LG M4710C-BA | User Guide - Page 18
Selecting and Adjusting the Screen OSD Menu Icon Function Description PICTURE SOUND TIMER SPECIAL SCREEN Adjusts screen brightness, contrast and color that you prefer. Adjusts the audio function. Adjusts the timer function. Adjusts the screen status according to the circumstances. Adjusts the - LG M4710C-BA | User Guide - Page 19
Selecting and Adjusting the Screen How to adjust the OSD (On Screen Display) screen Pops up the menu screen Move where you want to adjust Select a menu icon Move where you want to adjust Select a Adjust the status menu icon Save Exit from the adjustment menu screen. • Use the remote control - LG M4710C-BA | User Guide - Page 20
Selecting and Adjusting the Screen Adjusting Screen Color PSM CSM Advanced Reset PSM CSM The PSM function automatically adjusts the screen image quality depending on the AV usage environment. • Dynamic : Select this option to display with a sharp image. • Standard : The most general and natural - LG M4710C-BA | User Guide - Page 21
Adjusting the Screen Adjusting Screen Color XD XD is LG Electronics' unique picture improving technology that displays a real HD NR On Off MPEG NR 0 • Auto : XD is automatically changed to Auto. • Manual : When selecting the Manual, you can adjust the XD Contrast, XD Colour, XD NR, MPEG NR. • - LG M4710C-BA | User Guide - Page 22
Selecting and Adjusting the Screen Adjusting the audio function SSM AVL Balance 0 Speaker SSM SSM AVL Balance 0 Speaker Surround MAX Flat Music Movie Sports User The best sound tone quality will be selected automatically depending on the video type that you're currently watching. AVL - LG M4710C-BA | User Guide - Page 23
the timer function Clock Off time On time Auto sleep Power saving Clock If the time is on the clock is incorrect, reset the clock manually. 1) Press the MENU button and then use button to select the TIME menu. 2) Press the button and then use button to select the Clock menu - LG M4710C-BA | User Guide - Page 24
control names are displayed. Use the buttons to select On or Off. The monitor can be set up so that it can only be used with the remote screen for a long period of time. Normal : If image sticking is never a problem, ISM is not necessary -set to Normal. White wash : White wash removes permanent - LG M4710C-BA | User Guide - Page 25
Selecting and Adjusting the Screen Selecting the options • To use this function - Must be displayed with various other products. - Must be in a function that can be connected to RS-232C or RGB Out Tile mode • Tile Mode Language Child lock ISM Method Set ID Tile Mode Power Indicator Logo light - LG M4710C-BA | User Guide - Page 26
Selecting and Adjusting the Screen Selecting the options - Tile mode (product 1 ~ 9) : r(3) x c(3) row ID 1 ID 2 ID 4 ID 5 ID 7 ID 8 ID 3 ID 6 column ID 9 - Tile mode (product 1 ~ 2) : r(2) x c(1) row ID 1 ID 2 column - Tile mode (product 1 ~16) : r(4) x c(4) row ID 1 ID 2 ID 3 ID - LG M4710C-BA | User Guide - Page 27
Selecting and Adjusting the Screen Selecting the options Language Child lock ISM Method Set ID Tile Mode Power Indicator Logo light Demo Tile Mode Natural Tile ID H-Size V-Size H-Position V-Position Reset Off Off 0 0 0 To set • Natural The image is omitted by the distance between the screens to - LG M4710C-BA | User Guide - Page 28
clear after auto adjustment and characters are still trembling, adjust the picture phase manually. * Phase, Clock function are not available in RGB DTV, Component, HDMI the same mode corresponding to computer resolution. Auto config. Manual config. XGA Mode ARC Reset 1024x768 1280x768 1360x768 1366x768 - LG M4710C-BA | User Guide - Page 29
of the picture may be lost. MODE ARC AV Spectacle Full Original 4:3 16:9 14:9 Zoom1 Zoom2 1:1 Component HDMI/DVI DTV PC RGB DTV PC Return Manual config. to the default factory settings. 28 - LG M4710C-BA | User Guide - Page 30
Troubleshooting product. Adjust the frequency range by referring to the Specifications in this manual. * Maximum resolution RGB : 1600 x 1200 @60Hz HDMI/DVI : 1280 ) • See if the plug&play function is supported by referring to the video card user manual. 'Controls Locked' message appears. G The ' - LG M4710C-BA | User Guide - Page 31
Troubleshooting The screen image looks abnormal. G Is the screen position wrong? • D- Position OSD menu. • See if the video card resolution and frequency are supported by the product. If the frequency is out of range, set to the recommended resolution in the Control Panel - Display - Setting menu. - LG M4710C-BA | User Guide - Page 32
Troubleshooting The audio function does not work. equalize sound. • Adjust the volume. Screen color is abnormal. G Screen has poor color resolution (16 colors). • Set the number of colors to more than 24 bits (true color) unique characteristics of the LCD panel. It is not a malfunction of the - LG M4710C-BA | User Guide - Page 33
The product specifications can change without prior notice for product improvement. LCD Panel Power 47 inches (119.28 cm) TFT (Thin Film Transistor) LCD (Liquid Crystal Display) Panel Anti-Glare coating Visible diagonal size: 119.28 cm 0.76125 mm X 0.76125 mm (Pixel Pitch) Rated Voltage - LG M4710C-BA | User Guide - Page 34
product specifications can change without prior notice for product improvement. Video Signal Input Connector Environmental Conditions Max. Resolution RGB : 1600 X 1200 @60Hz HDMI/DVI : 1280 X 1024 @60Hz - It may not be supported depending on the OS or video card type. Recommended Resolution RGB - LG M4710C-BA | User Guide - Page 35
Specifications PC Mode - Preset Mode Preset mode Horizontal Vertical 1280 x 720 44.772 60 14 VESA 1280 x 768 47 60 15 VESA 1360 x 768 47.72 60 16 VESA 1366 x 768 47 60 17 VESA1280 x 1024 63.981 60 18 VESA1280 x available for PC resolutions : 640 X 480/60Hz, 1280 X 720/60Hz and DTV - LG M4710C-BA | User Guide - Page 36
Specifications VESA wall mounting Connected to another object (stand type and wall-mounted type.) This product accepts a VESAcompliant mounting interface pad.- (This has to be purchased separately if required.) For further information, refer to the VESA Wall Mounting Instruction Guide. Kensington - LG M4710C-BA | User Guide - Page 37
the product on/off, select an input source or adjust the OSD menu from your PC. RS-232C (CONTROL & SERVICE) RS-232C Cable (not included) PC monitor 1 monitor 2 monitor 3 monitor 4 RS-232C Configurations 7-Wire Configurations (Standard RS-232C cable) PC RXD 2 TXD 3 GND 5 DTR 4 DSR 6 RTS 7 CTS - LG M4710C-BA | User Guide - Page 38
RS-232C Controlling the Multiple Product Command Reference List 01. Power 02. Input Select 03. Aspect Ratio 04. Screen Mute 05. Volume Mute 06. Volume Control 07. Contrast 08. Brightness 09. Color 10. Tint 11. Sharpness 12. OSD Select 13. Remote Lock/ key Lock 14. Balance 15. Color Temperature 16. - LG M4710C-BA | User Guide - Page 39
RS-232C Controlling the Multiple Product Transmission / Receiving Protocol Transmission [Command1][Command2][ ][Set ID][ ][Data][Cr] * [Command 1]: First command. (j, k, m, d) * [Command 2]: Second command. * [Set ID]: Set up the Set ID number of product. range : 1~99. by setting '0', server can - LG M4710C-BA | User Guide - Page 40
L RS-232C Controlling the Multiple Product Transmission / Receiving Protocol L 01. Power(Command : a) To control Power On/Off of the Set. Transmission [k][a][ ][Set ID][ ][Data][Cr] Data 0 : Power Off 1 : Power On Acknowledgement [a][ ][Set ID][ ][OK][Data][x] To show the status of Power - LG M4710C-BA | User Guide - Page 41
RS-232C Controlling the Multiple Product Transmission / Receiving Protocol L 03. Aspect Ratio(Command : c) (Main picture format) To adjust the screen format. You can also adjust the screen format using the ARC (Aspect Ratio Control) button on remote control or in the Screen menu. Transmission - LG M4710C-BA | User Guide - Page 42
L L RS-232C Controlling the Multiple Product Transmission / Receiving Protocol 05. Volume Mute(Command : e) To control On/Off of the Volume Mute. Transmission [k][e][ ][Set ID][ ][Data][Cr] Data 0 : Volume Mute On (Volume Off) 1 : Volume Mute Off (Volume On) Acknowledgement [e][ ][Set ID][ ][OK][ - LG M4710C-BA | User Guide - Page 43
L RS-232C Controlling the Multiple Product Transmission / Receiving Protocol 07. Contrast(Command : g) To adjust screen contrast. You can also adjust the contrast in the Picture menu. Transmission [k][g][ ][Set ID][ ][Data][Cr] Data Min : 00H ~ Max : 64H • Refer to 'Real data mapping' as shown - LG M4710C-BA | User Guide - Page 44
L L RS-232C Controlling the Multiple Product Transmission / Receiving Protocol 09. Color(Command : i) (Video only) To adjust the screen color. You can also adjust the color in the Picture menu. Transmission [k][i][ ][Set ID][ ][Data][Cr] Data Min : 00H ~ Max : 64H (Hexadecimal code) • Refer to ' - LG M4710C-BA | User Guide - Page 45
RS-232C Controlling the Multiple Product Transmission / Receiving Protocol L 11. Sharpness(Command : k) (Video only) To adjust the screen Sharpness. You can also adjust the sharpness in the Picture menu. Transmission [k][k][ ][Set ID][ ][Data][Cr] Data Min : 00H ~ Max : 64H (Hexadecimal code) • - LG M4710C-BA | User Guide - Page 46
L L RS-232C Controlling the Multiple Product Transmission / Receiving Protocol 14 Balance(Command : t) To adjust the sound balance. Transmission [k][t][ ][Set ID][ ][Data][Cr] Data Min : 00H ~ Max : 64H (Hexadecimal code) • Refer to 'Real data mapping' page A7. Acknowledgement [t][ ][Set ID][ ][OK - LG M4710C-BA | User Guide - Page 47
: Used to Read the power off status when Stand-by mode. Transmission [k][z][ ][Set ID][ ][Data][ monitor off by remote control 3 : Turn the monitor off by sleep time function 4 : Turn the monitor off by RS-232C function 6 : AC down 8 : Turn the monitor off by off time function 9 : Turn the monitor - LG M4710C-BA | User Guide - Page 48
L L RS-232C Controlling the Multiple Product Transmission / Receiving Protocol 18. Auto Configure(Command: j u) To adjust picture position and minimize image shaking automatically. it works only in RGB(PC) mode. Transmission [j][u][ ][Set ID][ ][Data][Cr] Data 1 : To set Acknowledgement [u][ ][Set - LG M4710C-BA | User Guide - Page 49
L RS-232C Controlling the Multiple Product Transmission / Receiving Protocol 20. Tile Mode(Command : d d) Change a Tile Mode. Transmission [d][d][][Set ID][][Data][x] Data 00 12 13 14 ... 44 Description Tile mode is off. 1 x 2 mode(column x row) 1 x 3 mode 1 x 4 mode ... 4 x 4 mode * The data - LG M4710C-BA | User Guide - Page 50
L L RS-232C Controlling the Multiple Product Transmission / Receiving Protocol 21. Tile H Size(Command : d g) To set the Horizontal size. Transmission [d][g][][Set ID][][Data][x] Data Min : 00H ~ Max : 64H Acknowledgement [g][][Set ID][][OK/NG][Data][x] 22. Tile V Size(Command : d h) To set the - LG M4710C-BA | User Guide - Page 51
L L RS-232C Controlling the Multiple Product Transmission / Receiving Protocol 23. Tile ID Set(Command : d i) To assign the Tile ID for Tiling function . Transmission [d][i][][Set ID][][Data][x] Data Min : 00H ~ Max : 10H (Hexadecimal code) Acknowledgement [i][][Set ID][][OK/NG][Data][x] 24 - LG M4710C-BA | User Guide - Page 52
L L RS-232C Controlling the Multiple Product Transmission / Receiving Protocol 26. Temperature value (Command : d n) To read the inside temperature value. Transmission [d][n][][Set ID][][Data][x] * The data is always FF(in Hex). Acknowledgement [n][][Set ID][][OK/NG][Data][x] * The data is 1 byte - LG M4710C-BA | User Guide - Page 53
RS-232C IR Codes L L L How to connect Connect your wired remote control to Remote Control port on the Product. Remote Control IR Code Output waveform single pulse, modulated with 37.917KHz signal at 455KHz Tc Carrier frequency FCAR = 1/Tc = fosc/12 T1 Duty ratio = T1/Tc = 1/3 - LG M4710C-BA | User Guide - Page 54
RS-232C IR Codes Code(Hexa) 00 01 02 03 08 C4 C5 09 98 0B 0E 43 5B 6E 44 10 11 12 13 14 15 16 17 18 19 5A BF D4 D5 D7 C6 79 76 77 AF 99 L L Function L M VOL( ) VOL( ) POWER ON/OFF POWER ON POWER OFF MUTE AV INPUT SLEEP MENU EXIT PSM SET Number Key 0 Number Key 1 Number Key 2 Number Key 3 Number
-
 1
1 -
 2
2 -
 3
3 -
 4
4 -
 5
5 -
 6
6 -
 7
7 -
8
-
9
-
10
-
11
-
12
-
13
-
14
-
15
-
16
-
17
-
18
-
19
-
20
-
21
-
22
-
23
-
24
-
25
-
26
-
27
-
28
-
29
-
30
-
31
-
32
-
33
-
34
-
35
-
36
-
37
-
38
-
39
-
40
-
41
-
42
-
43
-
44
-
45
-
46
-
47
-
48
-
49
-
50
-
51
-
52
-
53
-
54
 |
 |

M
ake sure to read the
Important Precautions
before using the product.
Keep the User's Guide(CD) in an accessible place for future reference.
S
ee the label attached on the product and give the information to your dealer when you ask
for service.
M4710C
User’s Guide