LG MVEM1825D INSTALLATION - Page 7
Installing the Microwave
 |
View all LG MVEM1825D manuals
Add to My Manuals
Save this manual to your list of manuals |
Page 7 highlights
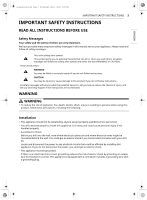
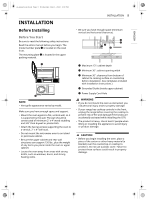
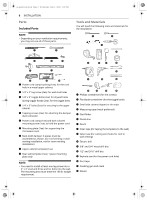
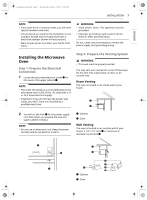
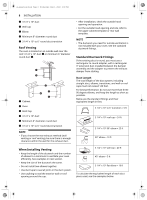
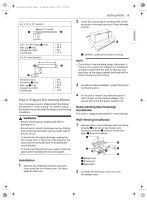
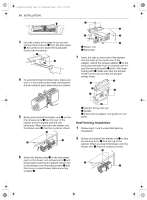
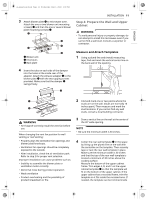
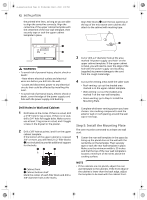
ENGLISH us_main.book.book Page 7 Wednesday, May 4, 2022 1:09 PM INSTALLATION 7 NOTE • If you have brick or masonry walls, you will need special hardware and tools. • The ductwork you need for the installation is not included. All wall and roof caps must have a back-draft damper (shown in Parts section). • Wear proper gloves to protect your hands from injury. WARNING • Avoid electric shock. This appliance must be grounded. • Improper grounding could result in electric shock or other personal injury. Do not, under any circumstances, remove the power supply cord grounding prong. Installing the Microwave Oven Step 1: Prepare the Electrical Connection 1 Locate the grounded electrical outlet b for this oven in the upper cabinet a. NOTE • The outlet should be on a circuit dedicated to the microwave oven (120V, 60 Hz., AC only) with a 15 or 20 A fused electrical supply. • Important: If you do not have the proper wall outlet, you MUST have one installed by a qualified electrician. Step 2: Prepare the Venting System WARNING • This oven must be properly vented. You may vent your ductwork in one of three ways. Do not vent into a wall cavity, an attic, or an unused area. Room Venting The oven is located on an inside wall of your house. 2 You will cut the hole c for the power supply cord later when you prepare the wall and upper cabinet in Step 4. NOTE • Do not use an extension cord. Keep the power cord dry and do not pinch or crush it. a Cabinet b Oven Wall Venting The oven is located on an outside wall of your house: 3 1/4" x 10" duct c or minimum 6" diameter round duct f. a Cabinet b Oven
-
 1
1 -
 2
2 -
 3
3 -
 4
4 -
 5
5 -
 6
6 -
 7
7 -
 8
8 -
 9
9 -
 10
10 -
 11
11 -
 12
12 -
13
-
14
-
15
-
16
 |
 |