Lantronix EDS2100 Linux SDK - Quick Start Guide - Page 8
Connecting an Evaluation Board – Ethernet, Connecting the EDS1100/2100, Booting the Target Device
 |
View all Lantronix EDS2100 manuals
Add to My Manuals
Save this manual to your list of manuals |
Page 8 highlights
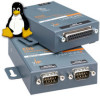
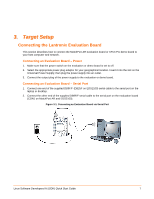
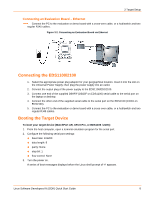
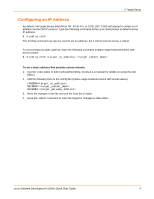
3 Target Setup Connecting an Evaluation Board - Ethernet Connect the PC to the evaluation or demo board with a cross-over cable, or a hub/switch and two regular RJ45 cables. Figure 3-2. Connecting an Evaluation Board via Ethernet Connecting the EDS1100/2100 1. Select the appropriate power plug adaptor for your geographical location. Insert it into the slot on the Universal Power Supply; then plug the power supply into an outlet. 2. Connect the output plug of the power supply to the EDS1100/EDS2100. 3. Connect one end of the supplied DB9F/F (DB25F on EDS1100) serial cable to the serial port on the laptop or desktop. 4. Connect the other end of the supplied serial cable to the serial port on the EDS1100 (CON1 on EDS2100). 5. Connect the PC to the evaluation or demo board with a cross-over cable, or a hub/switch and two regular RJ45 cables. Booting the Target Device To boot your target device (MatchPort AR, XPort Pro, or EDS1100 / 2100): 1. From the host computer, open a terminal emulation program for the serial port. 2. Configure the following serial port settings: baud rate: 115200 data length: 8 parity: None stop bit: 1 flow control: None 3. Turn the power on. A series of boot messages displays before the Linux shell prompt of '#' appears. Linux Software Developers Kit (SDK) Quick Start Guide 8
-
 1
1 -
2
-
 3
3 -
 4
4 -
 5
5 -
 6
6 -
 7
7 -
 8
8 -
 9
9 -
 10
10 -
 11
11 -
 12
12 -
 13
13 -
14
-
15
 |
 |
