Lantronix NM2-FXS-2230-SFP-201 NM2-FXS-201 Installation Guide Rev F - Page 13
Installing the NM2-FXS-2230-SFP-201 in the OptiPlex
 |
View all Lantronix NM2-FXS-2230-SFP-201 manuals
Add to My Manuals
Save this manual to your list of manuals |
Page 13 highlights
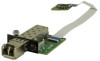
Lantronix NM2-FXS-2230-SFP-201 Install Guide Installing the NM2-FXS-2230-SFP-201 in the OptiPlex The NM2-FXS-2230-SFP-201 consists of a M.2 NIC that installs into the OptiPlex Micro PC's M.2 "A or E keyed" interface, and a fiber optic adapter that installs into the OptiPlex Micro PC's Option port. 1. Remove the PC cover. 2. Gently remove the HDD Assembly. See the Dell documentation. 3. Remove the 15-Pin DSUB knockout. 4. Insert the M.2 NIC into the OptiPlex Micro PC's M.2 "A or E keyed" interface. 5. Secure the M.2 NIC Assembly into place using the Securing Screw. 6. Insert the fiber optic adapter into the OptiPlex Micro PC's Option port. 7. Attach to PC Case using Black SEMS Screw #6-32x1/4", and partially tighten to hold in place as shown below. 8. Align #4 Standoff with Top Hole in PC Case. 9. Slip #4 Nylon Washer on top of #4 Standoff and insert #4 Screw to secure. 10. Tighten using Black SEMS Screw #6-32x1/4". 11. Lift Locking Lever of FFC Connector on fiber optic adapter. 12. Insert end of 20-Position FFC Cable into fiber optic adapter, with Pins facing down. 13. Push Locking Lever Down to Lock. Check that Cable is secure. See figure below for final placement. 14. Gently replace the HDD Assembly. 15. Replace PC cover. 16. Install the SFP in the open SFP slot. 17. Power up the PC. 33759 Rev. F https://www.lantronix.com/ 13
-
 1
1 -
2
-
3
-
4
-
5
-
6
-
7
-
 8
8 -
 9
9 -
 10
10 -
 11
11 -
 12
12 -
 13
13 -
 14
14 -
 15
15 -
 16
16 -
 17
17 -
 18
18
 |
 |
