Lantronix S6310-3340 C6310-3340 and S6310-3340 User Guide Rev A - Page 13
Standard Configuration, Install Fiber Cable, Install Copper Cable, Automatic Ring-down Configuration
 |
View all Lantronix S6310-3340 manuals
Add to My Manuals
Save this manual to your list of manuals |
Page 13 highlights
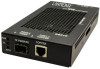
Lantronix x6310 ION POTS Media Converter User Guide Standard Configuration In a standard configuration, the FXO Mode converter connects to the Central Office (CO) or PBX while the FXS Mode converter connects to the analog phone. Install Fiber Cable 1. Locate a fiber cable with male, two-stranded TX to RX connectors installed at both ends. 2. Connect the fiber cables to FXS Mode module as described: • Connect the male TX cable connector to the female TX port. • Connect the male RX cable connector to the female RX port. 3. Connect the fiber cables to FXS Mode module as described: • Connect the male TX cable connector to the female RX port. • Connect the male RX cable connector to the female TX port. Install Copper Cable 1. Locate a copper cable with male RJ-11C connectors installed at both ends. 2. Connect the copper cable to the FXO Mode module as described: • Connect the RJ-11C connector at one end of the cable to the RJ-11C port. • Connect the RJ-11C connector at the other end of the cable to the RJ-11C telephone line wall jack or FXS. 3. Connect the copper cables to the FXO Mode module as described: • Connect the RJ-11C connector at one end of the cable to the RJ-11C port. • Connect the RJ-11C connector at the other end of the cable to the RJ-11C port on the telephone terminal equipment or FXO. Automatic Ring-down Configuration Automatic Ring Down (ARD) is a dedicated, point-to-point voice system. When one telephone is taken off-hook, the other telephone rings without the need to dial. Two modules connected via the fiber ports (a telephone device at each end) is the requirement for this configuration. Automatic Ring Down is supported when both converters are configured to FXO Mode. Automatic Ring Down is also supported when both converters are configured to FXS Mode. Note: Both modules MUST be configured for Automatic Ring-Down. Install Fiber Cable 1. Locate or build fiber cable with male, two-stranded TX to RX connectors installed at both ends. 2. Connect the fiber cables to the first FXO Mode module as described: • Connect the male TX cable connector to the female TX port. • Connect the male RX cable connector to the female RX port. 3. Connect the fiber cables to the second FXO Mode module as described: • Connect the male TX cable connector to the female RX port. • Connect the male RX cable connector to the female TX port. Install Copper Cable 1. Locate or build copper cables with male RJ-11C connectors installed at both ends. 2. Connect the copper cables to both FXO Mode modules as described: • Connect the RJ-11C cable connector to the RJ-11C port on the FXO Mode module. • Connect the other end of the cable to the RJ-11C port on the analog phone telephone terminal equipment (FXO Mode module). 3. Connect the copper cables to the second (FXO Mode) module as described in step 2. 33818 Rev. A https://www.lantronix.com/ Page 13 of 39
-
 1
1 -
2
-
3
-
4
-
5
-
6
-
7
-
 8
8 -
 9
9 -
 10
10 -
 11
11 -
 12
12 -
 13
13 -
 14
14 -
 15
15 -
 16
16 -
 17
17 -
 18
18 -
19
-
20
-
21
-
22
-
23
-
24
-
25
-
26
-
27
-
28
-
29
-
30
-
31
-
32
-
33
-
34
-
35
-
36
-
37
-
38
-
39
 |
 |
