Lenovo 42963L5 User Manual - Page 94
Applying labels to the base cover
 |
View all Lenovo 42963L5 manuals
Add to My Manuals
Save this manual to your list of manuals |
Page 94 highlights
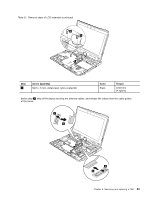
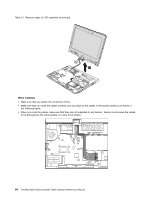
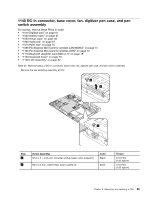
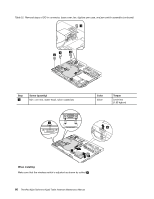
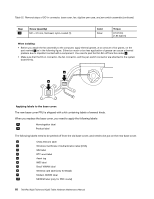
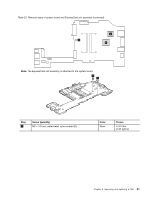
Table 22. Removal steps of DC-in connector, base cover, fan, digitizer pen case, and pen switch assembly (continued) Step 11 Screw (quantity) M2 × 3.5 mm, flat-head, nylon-coated (1) Color Silver Torque 0.181 Nm (1.85 kgfcm) When installing: • Before you attach the fan assembly to the computer, apply thermal grease, at an amount of 0.2 grams, on the part marked a as in the following figure. Either too much or too less application of grease can cause a thermal problem due to imperfect contact with a component. You need to peel the thin film off from the rubber b . • Make sure that the DC-in connector, the fan connector, and the pen switch connector are attached to the system board firmly. b a a Applying labels to the base cover: The new base cover FRU is shipped with a kit containing labels of several kinds. When you replace the base cover, you need to apply the following labels: 19 Homologation label 20 Product label The following labels need to be peeled off from the old base cover, and need to be put on the new base cover. 1 China telecom label 2 Windows Certificate of Authentication label (COA) 3 SIM label 4 BTY word label 5 Asset tag 6 IMEI label 7 Brazil WWAN label 8 Wireless card label (only for Brazil) 9 Modem AMOM label 10 MEDEM label (only for PRC model) 88 ThinkPad X220 Tablet and X220i Tablet Hardware Maintenance Manual
-
 1
1 -
2
-
3
-
4
-
5
-
6
-
7
-
8
-
9
-
10
-
11
-
12
-
13
-
14
-
15
-
16
-
17
-
18
-
19
-
20
-
21
-
22
-
23
-
24
-
25
-
26
-
27
-
28
-
29
-
30
-
31
-
32
-
33
-
34
-
35
-
36
-
37
-
38
-
39
-
40
-
41
-
42
-
43
-
44
-
45
-
46
-
47
-
48
-
49
-
50
-
51
-
52
-
53
-
54
-
55
-
56
-
57
-
58
-
59
-
60
-
61
-
62
-
63
-
64
-
65
-
66
-
67
-
68
-
69
-
70
-
71
-
72
-
73
-
74
-
75
-
76
-
77
-
78
-
79
-
80
-
81
-
82
-
83
-
84
-
85
-
86
-
87
-
88
-
 89
89 -
 90
90 -
 91
91 -
 92
92 -
 93
93 -
 94
94 -
 95
95 -
 96
96 -
 97
97 -
 98
98 -
 99
99 -
100
-
101
-
102
-
103
-
104
-
105
-
106
-
107
-
108
-
109
-
110
-
111
-
112
-
113
-
114
-
115
-
116
-
117
-
118
-
119
-
120
-
121
-
122
-
123
-
124
-
125
-
126
-
127
-
128
-
129
-
130
-
131
-
132
-
133
-
134
-
135
-
136
-
137
-
138
-
139
-
140
-
141
-
142
-
143
-
144
 |
 |
