Lenovo 74499EU User Manual - Page 107
the keys with your thumbs and try to slide the keyboard toward you.
 |
View all Lenovo 74499EU manuals
Add to My Manuals
Save this manual to your list of manuals |
Page 107 highlights
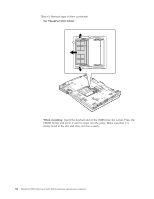
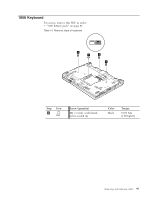
Table 14. Removal steps of keyboard (continued) When installing: 1. Attach the keyboard connector firmly. 2. Make sure that the keyboard edges are under the frame as shown in this figure. Then press the keys to latch the keyboard firmly in place. 3. To make sure that the front side of the keyboard is housed firmly, gently press the keys with your thumbs and try to slide the keyboard toward you. 4. Secure the keyboard by tightening the screws from the bottom side of the computer. Removing and replacing a FRU 99
-
 1
1 -
2
-
3
-
4
-
5
-
6
-
7
-
8
-
9
-
10
-
11
-
12
-
13
-
14
-
15
-
16
-
17
-
18
-
19
-
20
-
21
-
22
-
23
-
24
-
25
-
26
-
27
-
28
-
29
-
30
-
31
-
32
-
33
-
34
-
35
-
36
-
37
-
38
-
39
-
40
-
41
-
42
-
43
-
44
-
45
-
46
-
47
-
48
-
49
-
50
-
51
-
52
-
53
-
54
-
55
-
56
-
57
-
58
-
59
-
60
-
61
-
62
-
63
-
64
-
65
-
66
-
67
-
68
-
69
-
70
-
71
-
72
-
73
-
74
-
75
-
76
-
77
-
78
-
79
-
80
-
81
-
82
-
83
-
84
-
85
-
86
-
87
-
88
-
89
-
90
-
91
-
92
-
93
-
94
-
95
-
96
-
97
-
98
-
99
-
100
-
101
-
 102
102 -
 103
103 -
 104
104 -
 105
105 -
 106
106 -
 107
107 -
 108
108 -
 109
109 -
 110
110 -
 111
111 -
 112
112 -
113
-
114
-
115
-
116
-
117
-
118
-
119
-
120
-
121
-
122
-
123
-
124
-
125
-
126
-
127
-
128
-
129
-
130
-
131
-
132
-
133
-
134
-
135
-
136
-
137
-
138
-
139
-
140
-
141
-
142
-
143
-
144
-
145
-
146
-
147
-
148
-
149
-
150
-
151
-
152
-
153
-
154
-
155
-
156
-
157
-
158
-
159
-
160
-
161
-
162
-
163
-
164
-
165
-
166
-
167
-
168
-
169
-
170
-
171
-
172
-
173
-
174
-
175
-
176
-
177
-
178
-
179
-
180
-
181
-
182
-
183
-
184
-
185
-
186
-
187
-
188
-
189
-
190
-
191
-
192
-
193
-
194
-
195
-
196
-
197
-
198
-
199
-
200
-
201
-
202
-
203
-
204
-
205
-
206
-
207
-
208
-
209
-
210
-
211
-
212
-
213
-
214
-
215
-
216
-
217
-
218
-
219
-
220
-
221
-
222
-
223
-
224
-
225
-
226
-
227
-
228
-
229
-
230
-
231
-
232
-
233
-
234
-
235
-
236
-
237
-
238
-
239
-
240
-
241
-
242
-
243
-
244
-
245
-
246
-
247
-
248
-
249
-
250
-
251
-
252
-
253
-
254
-
255
-
256
-
257
-
258
-
259
-
260
 |
 |
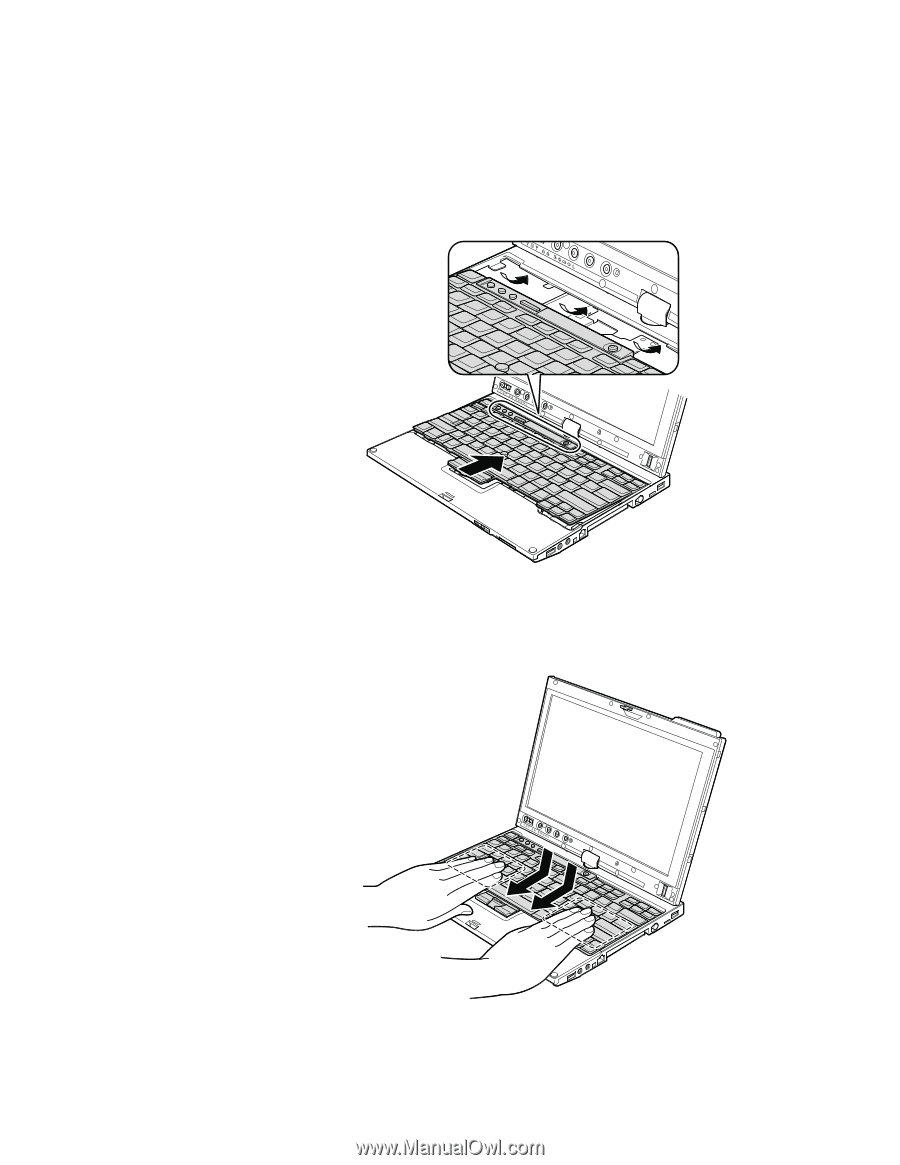
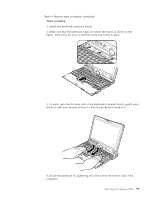
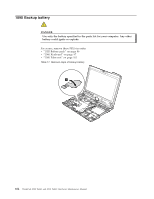
Table 14. Removal steps of keyboard (continued)
When installing:
1. Attach the keyboard connector firmly.
2. Make sure that the keyboard edges are under the frame as shown in this
figure. Then press the keys to latch the keyboard firmly in place.
3. To make sure that the front side of the keyboard is housed firmly, gently press
the keys with your thumbs and try to slide the keyboard toward you.
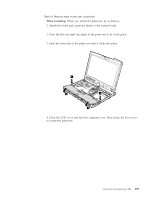
4. Secure the keyboard by tightening the screws from the bottom side of the
computer.
Removing and replacing a FRU
99