Lenovo 765912U User Manual - Page 84
speaker, connector, attached, firmly, cables, routed,
 |
View all Lenovo 765912U manuals
Add to My Manuals
Save this manual to your list of manuals |
Page 84 highlights
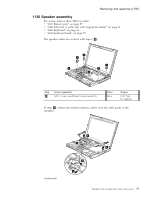
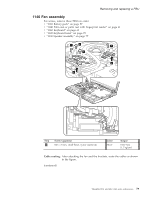
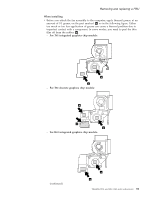
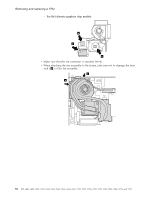
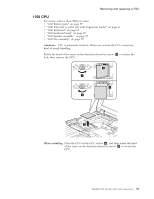
Removing and replacing a FRU When installing: Make sure that the speaker connector is attached firmly, and the cables are routed as in this figure. 78 MT 6480, 6481, 7658, 7659, 7660, 7661, 7662, 7663, 7664, 7665, 7732, 7733, 7734, 7735, 7738, 7742, 7743, 7744, 7751, and 7755
-
 1
1 -
2
-
3
-
4
-
5
-
6
-
7
-
8
-
9
-
10
-
11
-
12
-
13
-
14
-
15
-
16
-
17
-
18
-
19
-
20
-
21
-
22
-
23
-
24
-
25
-
26
-
27
-
28
-
29
-
30
-
31
-
32
-
33
-
34
-
35
-
36
-
37
-
38
-
39
-
40
-
41
-
42
-
43
-
44
-
45
-
46
-
47
-
48
-
49
-
50
-
51
-
52
-
53
-
54
-
55
-
56
-
57
-
58
-
59
-
60
-
61
-
62
-
63
-
64
-
65
-
66
-
67
-
68
-
69
-
70
-
71
-
72
-
73
-
74
-
75
-
76
-
77
-
78
-
 79
79 -
 80
80 -
 81
81 -
 82
82 -
 83
83 -
 84
84 -
 85
85 -
 86
86 -
 87
87 -
 88
88 -
 89
89 -
90
-
91
-
92
-
93
-
94
-
95
-
96
-
97
-
98
-
99
-
100
-
101
-
102
-
103
-
104
-
105
-
106
-
107
-
108
-
109
-
110
-
111
-
112
-
113
-
114
-
115
-
116
-
117
-
118
-
119
-
120
-
121
-
122
-
123
-
124
-
125
-
126
-
127
-
128
-
129
-
130
-
131
-
132
-
133
-
134
-
135
-
136
-
137
-
138
-
139
-
140
-
141
-
142
-
143
-
144
-
145
-
146
-
147
-
148
-
149
-
150
-
151
-
152
-
153
-
154
-
155
-
156
-
157
-
158
-
159
-
160
-
161
-
162
-
163
-
164
-
165
-
166
-
167
-
168
-
169
-
170
-
171
-
172
-
173
-
174
-
175
-
176
-
177
-
178
 |
 |

When
installing:
Make
sure
that
the
speaker
connector
is
attached
firmly,
and
the
cables
are
routed
as
in
this
figure.
Removing
and
replacing
a
FRU
78
MT
6480,
6481,
7658,
7659,
7660,
7661,
7662,
7663,
7664,
7665,
7732,
7733,
7734,
7735,
7738,
7742,
7743,
7744,
7751,
and
7755