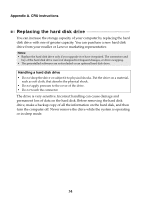
Lenovo G50-80 Touch Laptop (English) User Guide - Lenovo G40, G50, Z40, Z50 - Page 45
o a new hard d, he screws.
 |
View all Lenovo G50-80 Touch Laptop manuals
Add to My Manuals
Save this manual to your list of manuals |
Page 45 highlights
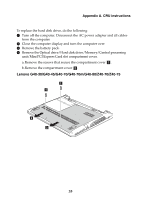
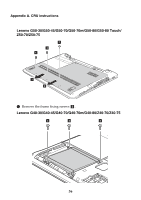
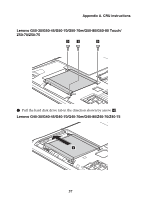
Appendix A. CRU instructions Lenovo G50-30/G50-45/G50-70/G50-70m/G50-80/G50-80 Touch/ Z50-70/Z50-75 5 8 Remove the screws and detach the metal frame from the hard disk drive. 9 Attach the metal frame to a new hard disk drive and tighten the screws. 0 Put the hard disk drive gently into the hard disk drive bay with the tab facing upwards and the connectors facing each other; then push it firmly into space. A Reinstall the frame fixing screws. B After aligning the attachment clips with their matching gaps, reinstall the compartment cover. C Reinstall and tighten the screws. D Reinstall the battery pack. E Turn the computer over again. F Connect the AC power adapter and the cables to the computer. 39
-
 1
1 -
2
-
3
-
4
-
5
-
6
-
7
-
8
-
9
-
10
-
11
-
12
-
13
-
14
-
15
-
16
-
17
-
18
-
19
-
20
-
21
-
22
-
23
-
24
-
25
-
26
-
27
-
28
-
29
-
30
-
31
-
32
-
33
-
34
-
35
-
36
-
37
-
38
-
39
-
 40
40 -
 41
41 -
 42
42 -
 43
43 -
 44
44 -
 45
45 -
 46
46 -
 47
47 -
 48
48 -
 49
49 -
 50
50 -
51
-
52
-
53
-
54
-
55
-
56
-
57
-
58
-
59
-
60
-
61
-
62
 |
 |

Appendix A. CRU instructions
39
Lenovo G50-30/G50-45/G50-70/G50-70m/G50-80/G50-80 Touch/
Z50-70/Z50-75
8
Remo
v
e
t
he screws and de
t
ach
t
he me
t
al frame from
t
he hard d
i
sk dr
iv
e.
9
A
tt
ach
t
he me
t
al frame
t
o a new hard d
i
sk dr
iv
e and
tig
h
t
en
t
he screws.
0
P
ut
t
he hard d
i
sk dr
iv
e
g
en
t
ly
i
n
t
o
t
he hard d
i
sk dr
iv
e bay w
it
h
t
he
t
ab
fac
i
n
g
u
pwards and
t
he connec
t
ors fac
i
n
g
each o
t
her;
t
hen p
u
sh
it
f
i
rmly
i
n
t
o space.
A
Re
i
ns
t
all
t
he frame f
i
x
i
n
g
screws.
B
Af
t
er al
ig
n
i
n
g
t
he a
tt
achmen
t
cl
i
ps w
it
h
t
he
i
r ma
t
ch
i
n
g
g
aps, re
i
ns
t
all
t
he
compar
t
men
t
co
v
er.
C
Re
i
ns
t
all and
tig
h
t
en
t
he screws.
D
Re
i
ns
t
all
t
he ba
tt
ery pack.
E
T
u
rn
t
he comp
ut
er o
v
er a
g
a
i
n.
F
Connec
t
t
he AC power adap
t
er and
t
he cables
t
o
t
he comp
ut
er.
5