Lenovo NetVista Hardware Maintenance Manual (HMM) for NetVista 2259 and 6049 s
Lenovo NetVista Manual
 |
View all Lenovo NetVista manuals
Add to My Manuals
Save this manual to your list of manuals |
Lenovo NetVista manual content summary:
- Lenovo NetVista | Hardware Maintenance Manual (HMM) for NetVista 2259 and 6049 s - Page 1
IBM NetVista Type 6049 and 2259 Refresh 1.1 IBM NetVista Type: 6049 and 2259 Hardware Maintenance Manual Version: HMM02 Version: HMM02 1 of 35 - Lenovo NetVista | Hardware Maintenance Manual (HMM) for NetVista 2259 and 6049 s - Page 2
IBM NetVista Type 6049 and 2259 Refresh 1.1 Safety information DANGER Electrical current from power this product. • When possible, use one hand only to connect or disconnect signal power cords, telecommunications systems, networks, and modems before you open the device covers, unless instructed - Lenovo NetVista | Hardware Maintenance Manual (HMM) for NetVista 2259 and 6049 s - Page 3
the factory with a CD-ROM drive or a DVD-ROM drive. CD-ROM drives and DVD-ROM drives are also sold separately as options. CD-ROM drives and DVD-ROM drives are laser products. These drives are certified in the U.S. to conform to the requirements of the Department of Health and Human Services 21 Code - Lenovo NetVista | Hardware Maintenance Manual (HMM) for NetVista 2259 and 6049 s - Page 4
IBM NetVista Type 6049 and 2259 Refresh 1.1 CAUTION: Use of controls or adjustme nts or performance of procedures other than those specified herein might result in hazardous radiation exposure. Removing the covers of the CD-ROM drive or DVD-ROM drive could result in exposure to hazardous laser - Lenovo NetVista | Hardware Maintenance Manual (HMM) for NetVista 2259 and 6049 s - Page 5
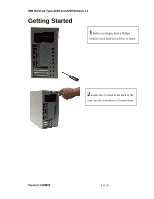
IBM NetVista Type 6049 and 2259 Refresh 1.1 Getting Started 1.Before you begin, have a Philips medium sized head screwdriver to begin. 2.Locate the 3 screws at the back of the case; use the screwdriver to loosen them. Version: HMM02 5 of 35 - Lenovo NetVista | Hardware Maintenance Manual (HMM) for NetVista 2259 and 6049 s - Page 6
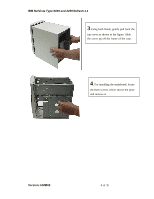
IBM NetVista Type 6049 and 2259 Refresh 1.1 3.Using both hands, gently pull back the top cover as shown in the figure. Slide the cover up off the frame of the case. 4. For installing the mainboard, locate the three screws which secure the plate and remove it. Version: HMM02 6 of 35 - Lenovo NetVista | Hardware Maintenance Manual (HMM) for NetVista 2259 and 6049 s - Page 7
IBM NetVista Type 6049 and 2259 Refresh 1.1 Installing the Power Supply Fan 1.The power supply should be installed in the back of the chassis. This is to draw the air out of the inside of the case. Check the position of the power supply fan as shown in the figure. 2.Using the screwdriver, gently - Lenovo NetVista | Hardware Maintenance Manual (HMM) for NetVista 2259 and 6049 s - Page 8
IBM NetVista Type 6049 and 2259 Refresh 1.1 Assembling the Mainboard 1.The plastic spacers provide extreme support in areas of high mechanical stress on your mainboard. Insert the plastic spacers in the 2 mounting holes as shown in the figure through the back - Lenovo NetVista | Hardware Maintenance Manual (HMM) for NetVista 2259 and 6049 s - Page 9
IBM NetVista Type 6049 and 2259 Refresh 1.1 3.Prepare the CPU, heatsink and the CPU cooling fan. 478 Pins ? Pentium 4 CPU 4 Pull the CPU socket-locking lever away - Lenovo NetVista | Hardware Maintenance Manual (HMM) for NetVista 2259 and 6049 s - Page 10
IBM NetVista Type 6049 and 2259 Refresh 1.1 6. Attach the CPU cooling fan on top of the heatsink. Snap the four retention legs fan to their opposite sides to secure the cooling fan on top of the heatsink. 8. Connect the CPU cooling fan power cable to the CPU fan connector. Version: HMM02 10 of 35 - Lenovo NetVista | Hardware Maintenance Manual (HMM) for NetVista 2259 and 6049 s - Page 11
IBM NetVista Type 6049 and 2259 Refresh 1.1 Installing the Memory Modules 9.Open the left and right levers of the slot. Then firmly slide the Memory so that they can only be installed correctly. 10.After installing, the Memory Module should look like this. 11.To install the mainboard inside the case - Lenovo NetVista | Hardware Maintenance Manual (HMM) for NetVista 2259 and 6049 s - Page 12
IBM NetVista Type 6049 and 2259 Refresh 1.1 12.Place the mainboard over the mounting brackets. Then slide the mainboard into place as shown in the next figure. - Lenovo NetVista | Hardware Maintenance Manual (HMM) for NetVista 2259 and 6049 s - Page 13
IBM NetVista Type 6049 and 2259 Refresh 1.1 Connecting the Power Supply 1.After you have installed the mainboard into the case, you should connect the power cable from the case power supply unit to the mainboard power connector. Since the floppy drive is situated closely to the power supply. For - Lenovo NetVista | Hardware Maintenance Manual (HMM) for NetVista 2259 and 6049 s - Page 14
IBM NetVista Type 6049 and 2259 Refresh 1.1 4. The power connector should fit perfectly in the slot on the ma inboard. Note the orientation of the cables before trying to connect them. Each function of the cable is already defined. 5. Connect the +12V power connector. Make sure the power connectors - Lenovo NetVista | Hardware Maintenance Manual (HMM) for NetVista 2259 and 6049 s - Page 15
IBM NetVista Type 6049 and 2259 Refresh 1.1 7. The storage bay should slide easily back to place. 8. Secure the chassis and the storage bay with screws. Do not over tighten the screws. Gentle pressure is enough. Version: HMM02 15 of 35 - Lenovo NetVista | Hardware Maintenance Manual (HMM) for NetVista 2259 and 6049 s - Page 16
IBM NetVista Type 6049 and 2259 Refresh 1.1 Installing the CD-ROM, Floppy and Hard Drives 1. There are two different size "bays" into which each of the various drives will fit. Take a close look at the drive and determine which is the "bay" for the floppy drive. Install the floppy drive into the - Lenovo NetVista | Hardware Maintenance Manual (HMM) for NetVista 2259 and 6049 s - Page 17
IBM NetVista Type 6049 and 2259 Refresh 1.1 3.For the hard disk drive, follow the same manner for installing the floppy disk drive. Always secure the screws when installing the drives. This will prevent them from moving and falling from the storage bay. Version: HMM02 17 of 35 - Lenovo NetVista | Hardware Maintenance Manual (HMM) for NetVista 2259 and 6049 s - Page 18
IBM NetVista Type 6049 and 2259 Refresh 1.1 4.For the CD-ROM drive, gently open the door panel. Version: HMM02 5. Slide the CD-ROM drive into the bay and align the drive's faceplate with the front of the case. 6. When the CD-ROM drive is positioned correctly, secure the drive to the bay using four - Lenovo NetVista | Hardware Maintenance Manual (HMM) for NetVista 2259 and 6049 s - Page 19
is use for the floppy drives, the second cable is for the hard disk drive and the third long cable is use for the CD-ROM drive. For the power cables, the cable has peripheral and floppy drive power connector and is designed to connect from the power supply to the drives. 9.Plug the CD-ROM cable - Lenovo NetVista | Hardware Maintenance Manual (HMM) for NetVista 2259 and 6049 s - Page 20
IBM NetVista Type 6049 and 2259 Refresh 1.1 10.Connect the other end of the cable to the CD-ROM drive. Note the orientation of the cable before trying to connect it. 11. Next, plug the hard disk cable into the Secondary IDE channel on the mainboard. The edge of the cable that is red determines its - Lenovo NetVista | Hardware Maintenance Manual (HMM) for NetVista 2259 and 6049 s - Page 21
IBM NetVista Type 6049 and 2259 Refresh 1.1 13.Lastly, connect the cables of the floppy drive as you did with the CD-ROM and hard disk drive. The edge of the cable that is yellow should situate firmly on the plastic shroud. 14.Then connect the other end to the Floppy drive. 15.Use the audio cable - Lenovo NetVista | Hardware Maintenance Manual (HMM) for NetVista 2259 and 6049 s - Page 22
IBM NetVista Type 6049 and 2259 Refresh 1.1 16.Attach the other end of the cable to the controller on the mainboard. See figure for reference. 17.Then attach the other end of the cable to the CD-ROM drive audio port. This completes the installation for the CD-ROM, Floppy and Hard drive. Version: - Lenovo NetVista | Hardware Maintenance Manual (HMM) for NetVista 2259 and 6049 s - Page 23
button located in front of the case only works when the Power Switch connector is connected to the mainboard. Power SW 2. Connect the Power SW (usually with green wires) into the connector of the mainboard. 3. The HDD LED indicates the usage of the hard disk drives. Version: HMM02 23 of 35 - Lenovo NetVista | Hardware Maintenance Manual (HMM) for NetVista 2259 and 6049 s - Page 24
IBM NetVista Type 6049 and 2259 Refresh 1.1 4. Next, Connect the HDD LED into the connector of the mainboard. The HDD LED indicator has two pins with one of them marked positive. One of the wires from the HDD LED is usually red and goes on the positive pin. The Power SW and HDD LED should look - Lenovo NetVista | Hardware Maintenance Manual (HMM) for NetVista 2259 and 6049 s - Page 25
IBM NetVista Type 6049 and 2259 Refresh 1.1 Installing the USB Cable 1. This is the real side of the Dragon system. 2. Remove the dust cover from the COM - Lenovo NetVista | Hardware Maintenance Manual (HMM) for NetVista 2259 and 6049 s - Page 26
IBM NetVista Type 6049 and 2259 Refresh 1.1 5. Remove one screw from the USB bracket using a screwdriver. 6. Then, loosen the screw on the other side. 7. Place the USB cable behind the port. 8. Attached the bracket - Lenovo NetVista | Hardware Maintenance Manual (HMM) for NetVista 2259 and 6049 s - Page 27
IBM NetVista Type 6049 and 2259 Refresh 1.1 9. Using the screwdriver, gently tighten the screws. 10. Following the same procedure in step 8. Attached the other USB cable to the USB port Version: HMM02 11. Secure the USB cable with the screw. 27 of 35 - Lenovo NetVista | Hardware Maintenance Manual (HMM) for NetVista 2259 and 6049 s - Page 28
IBM NetVista Type 6049 and 2259 Refresh 1.1 12. This completes the installation for the USB cable. Version: HMM02 13. The figure shows the USB connector. 14. Locate - Lenovo NetVista | Hardware Maintenance Manual (HMM) for NetVista 2259 and 6049 s - Page 29
IBM NetVista Type 6049 and 2259 Refresh 1.1 16. The USB should look like this after it is connected. 17. To reduce unnecessary tangles, place the cables beside - Lenovo NetVista | Hardware Maintenance Manual (HMM) for NetVista 2259 and 6049 s - Page 30
IBM NetVista Type 6049 and 2259 Refresh 1.1 Installing the Expansion Card 1.The most commonly used expansion card is the AGP and modem card. Let's start by installing - Lenovo NetVista | Hardware Maintenance Manual (HMM) for NetVista 2259 and 6049 s - Page 31
IBM NetVista Type 6049 and 2259 Refresh 1.1 4.Secure the AGP card with the screw. Version: HMM02 5.Next, install the Modem card as the same way with the - Lenovo NetVista | Hardware Maintenance Manual (HMM) for NetVista 2259 and 6049 s - Page 32
IBM NetVista Type 6049 and 2259 Refresh 1.1 You have finished installing the Modem and AGP cards. Make sure that the add-on cards are installed properly on the mainboard See figure for reference. Version: HMM02 32 of 35 - Lenovo NetVista | Hardware Maintenance Manual (HMM) for NetVista 2259 and 6049 s - Page 33
IBM NetVista Type 6049 and 2259 Refresh 1.1 Completing the Assembly 1.When all necessary peripherals and drivers are installed in the case and that there are no loose wires that may get in the way of the CPU fan and other components. - Lenovo NetVista | Hardware Maintenance Manual (HMM) for NetVista 2259 and 6049 s - Page 34
IBM NetVista Type 6049 and 2259 Refresh 1.1 FRU list Items Recovery CDs System Board CPU Fansink DIMM HDD CD- ROM IBM P/N 38L4525 38L4526 38L4623 38L4625 38L4645 46L5376 38L2818 38L4294 46L5450 46L5452 FRU P/N 46P6851 46P6852 46P6853 46P6854 46P6848 46P6847 46P6849 46L5519 25P5040 25P5041 - Lenovo NetVista | Hardware Maintenance Manual (HMM) for NetVista 2259 and 6049 s - Page 35
IBM NetVista F1156IV+/R9C CABLE SIG 7FT PHONE TIER4 SPEAKERS (Black) KBD Mouse Power Cord System BD Video CD FDD FDD Cable HDD Cable Front Bezel Chassis (w/Top Cover BUTTON (White) SP II (Black) POWER CORD Header Code : 5M- 07D Header Code : 5M- 07E Header Code : 5M- 07F (White) (Black) (White)
-
 1
1 -
 2
2 -
 3
3 -
 4
4 -
 5
5 -
 6
6 -
 7
7 -
8
-
9
-
10
-
11
-
12
-
13
-
14
-
15
-
16
-
17
-
18
-
19
-
20
-
21
-
22
-
23
-
24
-
25
-
26
-
27
-
28
-
29
-
30
-
31
-
32
-
33
-
34
-
35
 |
 |

IBM NetVista
Type 6049 and 2259 Refresh 1.1
Version: HMM02
1 of 35
IBM NetVista
Type: 6049 and 2259
Hardware
Maintenance
Manual
Version: HMM02