Lenovo S300 Laptop User Guide V2.0 - IdeaPad S300, S400, S405 - Page 7
Left-side view, Getting to know your computer, Novo button, Fan louvers, RJ-45 port
 |
View all Lenovo S300 Laptop manuals
Add to My Manuals
Save this manual to your list of manuals |
Page 7 highlights
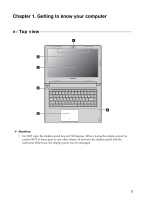
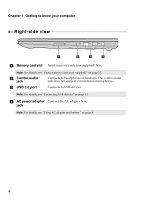
Chapter 1. Getting to know your computer Left-side view a b cd e a Novo button When the computer is off, press this button to start the Lenovo OneKey Recovery system or the BIOS setup utility, or to enter the boot menu. Note: For details, see "Chapter 5. Lenovo OneKey Recovery system" on page 30. b Fan louvers Dissipate internal heat. Note: Make sure that none of the fan louvers are blocked or else overheating of the computer may occur. c RJ-45 port This port connects the computer to an Ethernet network. Note: For details, see "Wired connection" on page 26. d HDMI port e USB 3.0 port Connects to devices with HDMI input such as a TV or a display. Connect to USB devices. Note: For details, see "Connecting USB devices" on page 14. 3
-
 1
1 -
 2
2 -
 3
3 -
 4
4 -
 5
5 -
 6
6 -
 7
7 -
 8
8 -
 9
9 -
 10
10 -
 11
11 -
 12
12 -
13
-
14
-
15
-
16
-
17
-
18
-
19
-
20
-
21
-
22
-
23
-
24
-
25
-
26
-
27
-
28
-
29
-
30
-
31
-
32
-
33
-
34
-
35
-
36
-
37
-
38
-
39
-
40
-
41
-
42
-
43
-
44
-
45
 |
 |

Chapter 1. Getting to know your computer
3
Left-side view
- - - - - - - - - - - - - - - - - - - - - - - - - - - - - - - - - - - - - - - - - - - - - - - - - - - - - - - - - - - - - - - - - - - - - - - - - - - - - - - - - - - - - -
Novo button
When the computer is off, press this button to start the
Lenovo OneKey Recovery system or the BIOS setup
utility, or to enter the boot menu.
Note:
For details, see “Chapter 5. Lenovo OneKey Recovery system” on page 30.
Fan louvers
Dissipate internal heat.
Note:
Make sure that none of the fan louvers are blocked or else overheating of the
computer may occur.
RJ-45 port
This port connects the computer to an Ethernet network.
Note:
For details, see “Wired connection” on page 26.
HDMI port
Connects to devices with HDMI input such as a TV or a
display.
USB 3.0 port
Connect to USB devices.
Note:
For details, see “Connecting USB devices” on page 14.
d
e
c
b
a
a
b
c
d
e