Lenovo ThinkCentre A50 Hardware Maintenance Manual - Page 48
Replacing, diskette, drive, Connecting
 |
View all Lenovo ThinkCentre A50 manuals
Add to My Manuals
Save this manual to your list of manuals |
Page 48 highlights
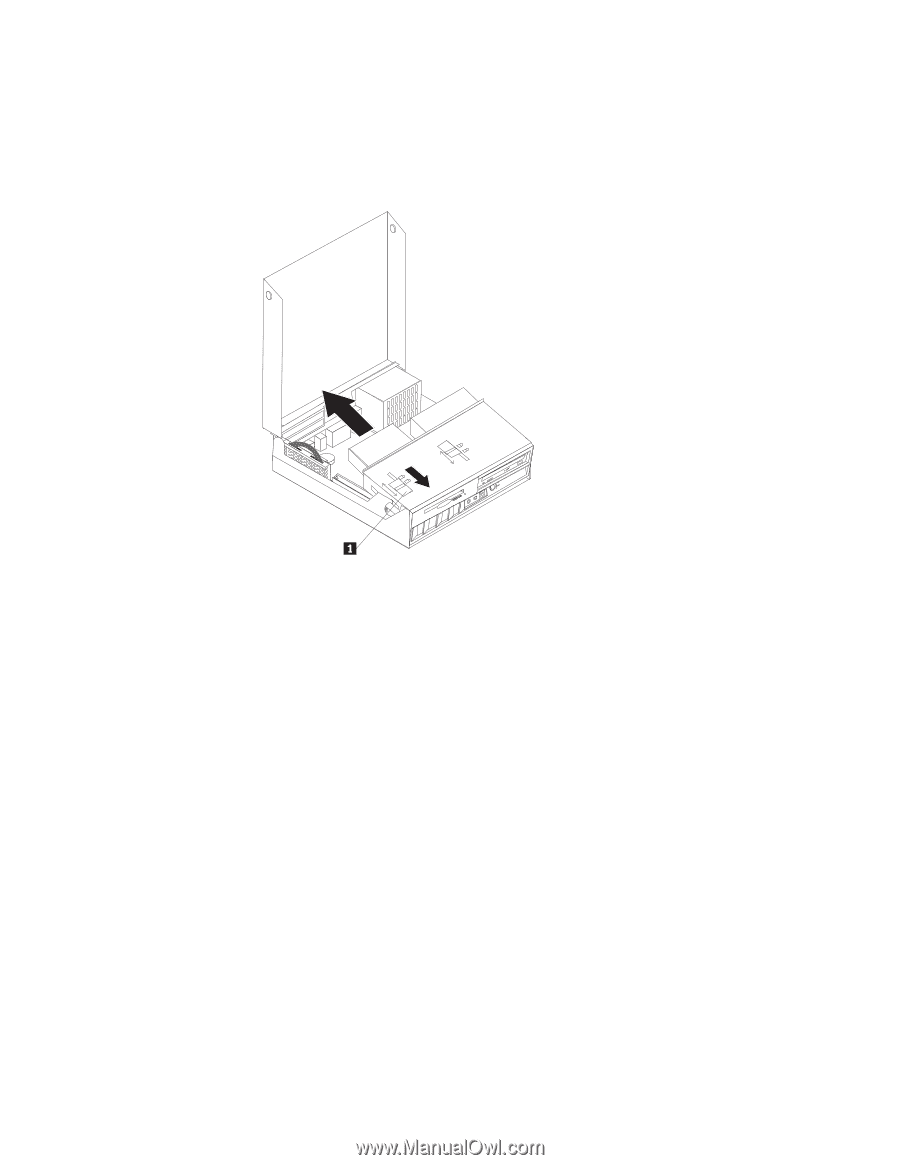
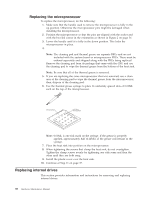
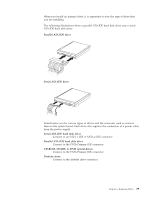
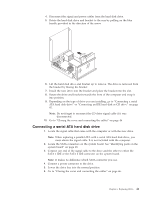
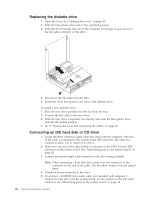
Replacing the diskette drive 1. Open the cover. See "Opening the cover" on page 25. 2. Slide the blue plastic drive lock to the unlocked position. 3. Slide the drive towards the rear of the computer far enough to gain access to the flat cable connector on the drive. 4. Disconnect the flat cable from the drive. 5. Rotate the drive bay upward and remove the diskette drive. To install a new diskette drive: 1. Slide the new drive partially into the bay from the rear. 2. Connect the flat cable to the new drive. 3. Slide the new drive completely into the bay and slide the blue plastic drive lock into the locked position. 4. Go to "Closing the cover and connecting the cables" on page 46. Connecting an IDE hard disk or CD drive 1. Locate the three-connector signal cable that came with the computer. One end of the cable is connected to the system board IDE connector. The other two connectors allow you to connect two drives. 2. Make sure one end of the signal cable is connected to the PATA Primary IDE connector on the system board. See "Identifying parts on the system board" on page 28. 3. Connect an unused signal cable connector to the drive being installed. Note: When connecting a hard disk drive make sure you connect it to the connector on the end of the cable. Use the other connector for the optical drive. 4. Connect a power connector to the drive. 5. If you have a CD-ROM drive audio cable (not included with computer), connect it to the drive and the system board. For the location of the CD audio connector, see "Identifying parts on the system board" on page 28. 42 Hardware Maintenance Manual
-
 1
1 -
2
-
3
-
4
-
5
-
6
-
7
-
8
-
9
-
10
-
11
-
12
-
13
-
14
-
15
-
16
-
17
-
18
-
19
-
20
-
21
-
22
-
23
-
24
-
25
-
26
-
27
-
28
-
29
-
30
-
31
-
32
-
33
-
34
-
35
-
36
-
37
-
38
-
39
-
40
-
41
-
42
-
 43
43 -
 44
44 -
 45
45 -
 46
46 -
 47
47 -
 48
48 -
 49
49 -
 50
50 -
 51
51 -
 52
52 -
 53
53 -
54
-
55
-
56
-
57
-
58
-
59
-
60
-
61
-
62
-
63
-
64
-
65
-
66
-
67
-
68
-
69
-
70
-
71
-
72
-
73
-
74
-
75
-
76
-
77
-
78
-
79
-
80
-
81
-
82
-
83
-
84
-
85
-
86
-
87
-
88
-
89
-
90
-
91
-
92
-
93
-
94
-
95
-
96
-
97
-
98
-
99
-
100
-
101
-
102
-
103
-
104
-
105
-
106
-
107
-
108
-
109
-
110
-
111
-
112
-
113
-
114
-
115
-
116
-
117
-
118
-
119
-
120
-
121
-
122
-
123
-
124
-
125
-
126
-
127
-
128
-
129
-
130
-
131
-
132
-
133
-
134
-
135
-
136
-
137
-
138
-
139
-
140
-
141
-
142
-
143
-
144
-
145
-
146
-
147
-
148
-
149
-
150
-
151
-
152
-
153
-
154
-
155
-
156
-
157
-
158
-
159
-
160
-
161
-
162
-
163
-
164
-
165
-
166
-
167
-
168
-
169
-
170
-
171
-
172
-
173
-
174
-
175
-
176
-
177
-
178
-
179
-
180
-
181
-
182
-
183
-
184
-
185
-
186
-
187
-
188
-
189
-
190
-
191
-
192
-
193
-
194
-
195
-
196
 |
 |