Lenovo ThinkCentre M79 (English) Safety, Warranty and Setup Guide - ThinkCentr - Page 1
Lenovo ThinkCentre M79 Manual
 |
View all Lenovo ThinkCentre M79 manuals
Add to My Manuals
Save this manual to your list of manuals |
Page 1 highlights
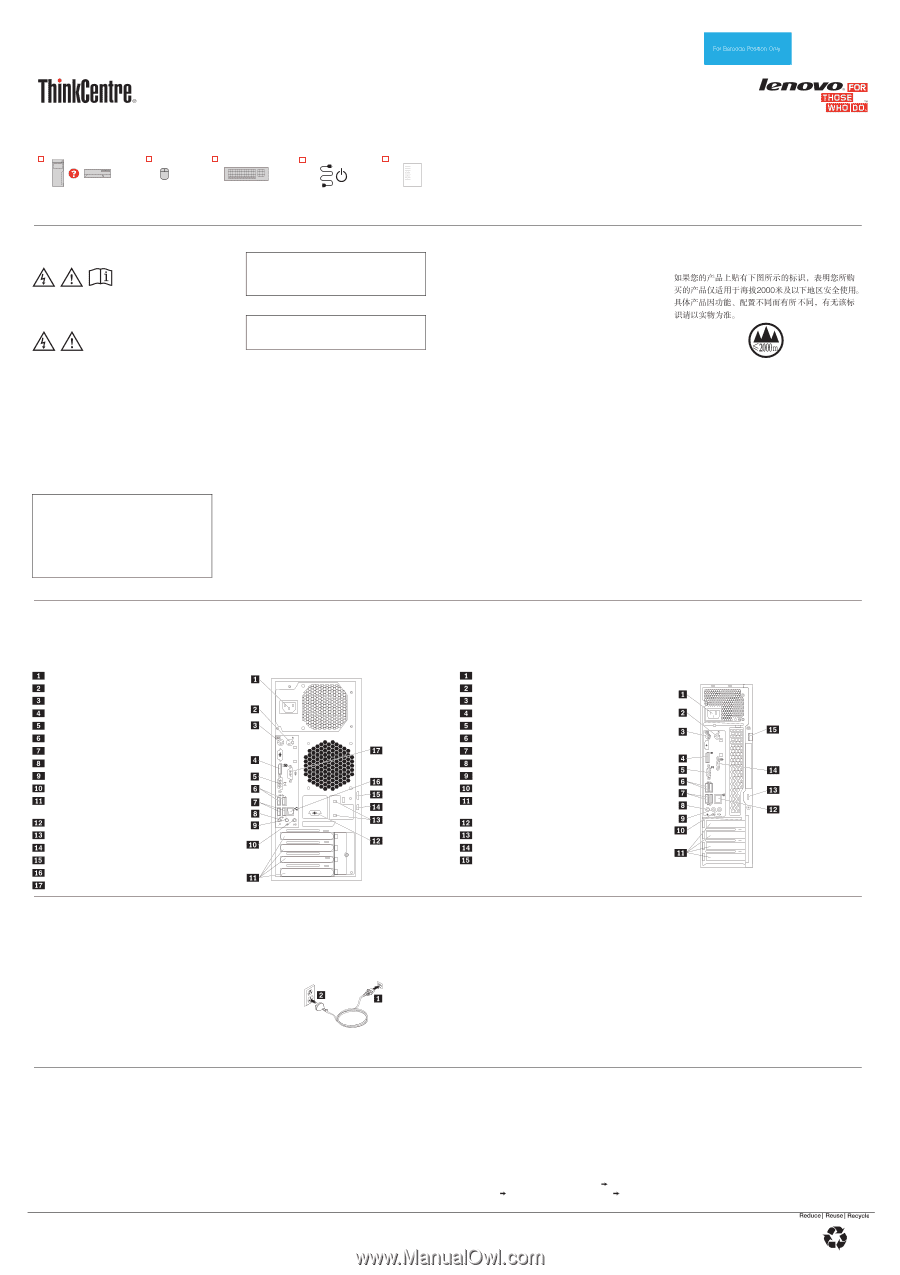
Unpack ThinkCentre® computer Safety, Warranty, and Setup Guide Brief user notices ThinkCentre M79 http://www.lenovo.com/support Lenovo® electronic manuals... for a greener planet! Refer to the electronic User Guide for detailed product information: http://www.lenovo.com/UserManuals PN: SP40A14969 Printed in China Mouse Keyboard Power cord Documentation Note: Recovery discs are not provided. Instead, everything needed for recovering factory-installed files and applications is provided in the Lenovo_Recovery partition on your hard disk drive. If you decide to remove the Lenovo_Recovery partition, be sure to create a recovery disc first. For more information, see the recovery information in the User Guide. See "Accessing your User Guide" for instructions on opening the electronic User Guide provided on your computer. Read this documentation before using your computer This documentation provides critical safety and regulatory information for Lenovo computers. Safety information Laser compliance statement CAUTION: When laser products (such as CD-ROMs, DVD drives, fiber optic devices, or transmitters) are installed, note the following: Do not remove the covers. Removing the covers of the laser product could result in exposure to hazardous laser radiation. There are no serviceable parts inside the device. Use of controls or adjustments or performance of procedures other than those specified herein might result in hazardous radiation exposure. DANGER Some laser products contain an embedded Class 3A or Class 3B laser diode. Note the following: Laser radiation when open. Do not stare into the beam, do not view directly with optical instruments, and avoid direct exposure to the beam. Plastic bag notice DANGER Plastic bags can be dangerous. Keep plastic bags away from babies and children to avoid danger of suffocation. Lithium coin cell battery notice DANGER Danger of explosion if battery is incorrectly replaced. When replacing the lithium coin cell battery, use only the same type or equivalent type that is recommended by the manufacturer. The battery contains lithium and can explode if not properly used, handled, or disposed of. Do not: Throw or immerse into water Heat to more than 100°C (212°F) Repair or disassemble Dispose of the battery as required by local ordinances or regulations. The following statement applies to users in the state of California, U.S.A. California Perchlorate Information: Products containing manganese dioxide lithium coin cell batteries may contain perchlorate. Perchlorate Material - special handling may apply, See www.dtsc.ca.gov/hazardouswaste/perchlorate Polyvinyl Chloride (PVC) cable and cord notice Warning: Handling the cord on this product or cords associated with accessories sold with this product will expose you to lead, a chemical known to the State of California to cause cancer, and birth defects or other reproductive harm. Wash hands after handling. Using headphones or earphones If your computer has both a headphone connector and an audio line-out connector, always use the headphone connector for headphones (also called a headset) or earphones. CAUTION: Excessive sound pressure from earphones and headphones can cause hearing loss. Adjustment of the equalizer to maximum increases the earphone and headphone output voltage and the sound pressure level. Therefore, to protect your hearing, adjust the equalizer to an appropriate level. Excessive use of headphones or earphones for a long period of time at high volume can be dangerous if the output of the headphone or earphone connectors do not comply with specifications of EN 50332-2. The headphone output connector of your computer complies with EN 50332-2 Sub clause 7. This specification limits the computer's maximum wide band true RMS output voltage to 150 mV. To help protect against hearing loss, ensure that the headphones or earphones you use also comply with EN 50332-2 (Clause 7 Limits) or a wide band characteristic voltage of 75 mV. Using headphones that do not comply with EN 50332-2 can be dangerous due to excessive sound pressure levels. If your Lenovo computer came with headphones or earphones in the package, as a set, the combination of the headphones or earphones and the computer already complies with the specifications of EN 503321. If different headphones or earphones are used, ensure that they comply with EN 50332-1 (Clause 6.5 Limitation Values). Using headphones that do not Connector locations Note: The locations of the connectors, controls, and indicators on your computer might be slightly different from the illustrations. * Available on some models Tower, rear view Power-cord connector PS/2 mouse connector* PS/2 keyboard connector* DisplayPort® connector VGA connector USB 3.0 connectors (2) USB 2.0 connectors (2) Microphone connector Audio line-out connector Audio line-in connector PCI/PCI-Express card area (different cards provide different connectors) Serial connector* Cable-lock slots (2)* Security-lock slot Padlock loop Ethernet connector Serial connector Small desktop, rear view Power-cord connector PS/2 mouse connector* PS/2 keyboard connector* DisplayPort connector VGA connector USB 3.0 connectors (2) USB 2.0 connectors (2) Microphone connector Audio line-out connector Audio line-in connector PCI/PCI-Express card area (different cards provide different connectors) Ethernet connector Security-lock slot Serial connector Padlock loop Initial setup instructions 1. Connect the cable from your monitor to the appropriate video connector on the computer (DisplayPort, DVI, HDMI, or VGA). Note: If your computer contains a graphics card in one of the card slots, connect the cable from your monitor to the appropriate connectors on the graphics card. 2. Connect the keyboard cable and the mouse cable to the appropriate connector respectively (PS/2 or USB). 3. If you will be using a wired network connection, connect the Ethernet cable to the Ethernet connector. 4. Connect the power cord to the power-cord connector on the computer first and then connect it to a properly-grounded electrical outlet. Ensure that all power cord connectors are securely and completely plugged into receptacles. 5. Press the power button on the front of your computer. 6. Follow the on-screen instructions to complete the setup. For additional information about using your computer, refer to the User Guide for your computer. Accessing your User Guide Your User Guide contains detailed information about your computer. To access your User Guide, do the following: Microsoft® Windows® 8.1 and Windows 7: comply with EN 50332-1 can be dangerous due to excessive sound pressure levels. China altitude notice Regulatory information Computer models equipped with wireless communications comply with the radio frequency and safety standards of any country or region in which it has been approved for wireless use. Ensure that you read the Regulatory Notice for your country or region before using the wireless devices contained in your computer. To obtain a PDF version of the Regulatory Notice, see "Downloading publications" in this document. Brazil regulatory notice Ouvir sons com mais de 85 decibéis por longos períodos pode provocar danos ao sistema auditivo. Mexico regulatory notice Advertencia: En Mexico la operación de este equipo está sujeta a las siguientes dos condiciones: (1) es posible que este equipo o dispositivo no cause interferencia perjudicial y (2) este equipo o dispositivo debe aceptar cualquier interferencia, incluyendo la que pueda causar su operación no deseada. 5 6 3 4 1. On your keyboard, press the Windows key+F1. Windows Help and Support opens. 2. Click Lenovo User Guide. Models without preinstalled operating systems and Virtual Desktop Infrastructure (VDI) clients: Go to the Lenovo Support Web site to access your User Guide. See "Downloading publications" for additional information. Downloading publications The latest electronic publications for your computer are available from the Lenovo Support Web site. To download the publications, go to: http://www.lenovo.com/UserManuals Service, support, and warranty information The following information describes the technical support that is available for your product during the warranty period and throughout the life of your product. Online technical support is available throughout the lifetime of your product at: http://www.lenovo.com/support If you purchased Lenovo services, refer to the following terms and conditions for detailed information: For Lenovo Warranty Service Upgrades or Extensions, go to: http://support.lenovo.com/lwsu For Lenovo Accidental Damage Protection Services, go to: http://support.lenovo.com/ladps Warranty information Lenovo provides a warranty period for your computer. To check the warranty status of your computer, go to http://www.lenovo.com/warranty-status, and then follow the instructions on the screen. Your computer is covered by the terms of the Lenovo Limited Warranty (LLW), version L505-0010-02 08/2011. The LLW is displayed on your computer during the initial setup. After the initial setup has been completed, you can view the warranty information from your computer by doing the following: Windows 8.1: 1. Go to the Start screen. 2. Click the arrow icon in the bottom-left corner of the screen to go to the Apps screen. If you are using a touch screen, swipe up to go to the Apps screen. 3. Click or tap Warranty Information. Windows 7: From the Windows desktop, click Start All Programs Lenovo Device Experience Lenovo Warranty. If you cannot view the LLW either from the Web site (http://www.lenovo.com/warranty/llw_02) or from your computer, contact your local Lenovo office or reseller to obtain a printed version. Customer Replaceable Units Customer Replaceable Units (CRUs) are parts that can be upgraded or replaced by the customer. To view the instructions on replacing the CRUs, see the respective section in the User Guide. The following table lists the CRUs for your computer. Machine types: 10CN, 10CQ, 10CR, 10CS, 10CT, 10CU, 10CV, and 10CW First Edition (July 2014) © Copyright Lenovo 2014. LIMITED AND RESTRICTED RIGHTS NOTICE: If data or software is delivered pursuant a General Services Administration "GSA" contract, use, reproduction, or disclosure is subject to restrictions set forth in Contract No. GS-35F-05925. Lenovo, For Those Who Do., the Lenovo logo, ThinkCentre, and ThinkStation are trademarks of Lenovo in the United States, other countries, or both. Microsoft and Windows are trademarks of the Microsoft group of companies. DisplayPort is a Trademark of the Video Electronics Standards Association. Other company, product, or service names may be trademarks or service marks of others.
-
 1
1 -
 2
2
 |
 |