| Section |
Page |
| Introduction |
11 |
| Portable Computer Descriptions |
12 |
| Drive and Diskette Compatibility Matrix |
14 |
| Important Service Information |
15 |
| How to Use Error Messages |
16 |
| How to Read POST Error Messages |
16 |
| Safety Notices (Multi-lingual |
17 |
| Safety Information |
24 |
| General Safety |
24 |
| Electrical Safety |
25 |
| Safety Inspection Guide |
26 |
| Handling Electrostatic Discharge-Sensitive Devices |
28 |
| Grounding Requirements |
28 |
| Laser Compliance Statement |
29 |
| Screw Size Chart |
30 |
| ThinkPad 340x (IBM 2610) |
33 |
| General Checkout |
35 |
| Memory Checkout |
36 |
| System Board |
37 |
| Keyboard/Auxiliary Input Device |
37 |
| TrackPoint II and III Checkout |
38 |
| Diskette Drive Test |
38 |
| Power Systems Checkout |
39 |
| Power Management Features |
43 |
| Symptom-to-FRU Index |
44 |
| Numeric Error Codes |
45 |
| FRU Codes |
47 |
| Beep Symptoms |
48 |
| No Beep Symptoms |
48 |
| LCD Related Symptoms |
49 |
| Keyboard/TrackPoint II or III Related Symptoms |
50 |
| Indicator Related Symptoms |
50 |
| Power Related Symptoms |
50 |
| Function/Audio Related Symptoms |
51 |
| Peripheral Device Related Symptoms |
52 |
| Other Symptoms |
52 |
| Intermittent Problems |
52 |
| Undetermined Problems |
52 |
| Related Service Procedures |
53 |
| Status Indicators |
54 |
| How to Run the Diagnostics |
55 |
| Error Log |
55 |
| Reset Pushbutton |
56 |
| Checking the Installed Devices List |
56 |
| How to Run the Low Level Format |
56 |
| PC Test Card LED |
56 |
| Fn Key Combinations |
57 |
| How To Run the Keyboard Diagnostics |
57 |
| Product Overview |
58 |
| FRU Removals and Replacements |
59 |
| 1010 Rear Connector Door |
60 |
| 1020 Battery Pack |
60 |
| 1030 Backup Battery |
61 |
| 1040 IC DRAM Card |
61 |
| 1050 Standby Battery |
61 |
| 1060 Top Cover |
62 |
| 1070 Indicator Card |
63 |
| 1080 Keyboard Unit |
64 |
| 1090 LCD Assembly |
65 |
| 1100 Diskette Drive |
67 |
| 1110 Hard Disk Drive |
67 |
| 1120 System Board/Speaker |
68 |
| Locations |
69 |
| Front View |
69 |
| Rear View |
70 |
| Interior View |
70 |
| System Board |
71 |
| Indicator Card |
71 |
| Parts Listing |
72 |
| ThinkPad 700, 700C, 720, 720C |
77 |
| General Checkout |
78 |
| Memory Checkout |
80 |
| Power Systems Checkout |
81 |
| Power Management Features |
91 |
| Symptom-to-FRU Index |
92 |
| Numeric Error Codes |
92 |
| Beep Symptoms |
98 |
| Miscellaneous Symptoms |
99 |
| Undetermined Problem |
103 |
| Related Service Procedures |
104 |
| System Status Indicators |
104 |
| Check Point (CP) Codes |
106 |
| System Error Log |
106 |
| Checking the Installed Devices List |
107 |
| Power-On Password (700, 700C) |
107 |
| Power-On Password (720, 720C) |
107 |
| Privileged-Access Password (PAP) |
107 |
| Set Startup Sequence |
108 |
| Restore System Partition |
108 |
| Hard Disk Low Level Format |
109 |
| Replacing the Hard Disk Drive |
109 |
| System Diskettes |
110 |
| Making a System Partition Backup Copy |
111 |
| 173 and 11350 Error Combination |
112 |
| PCMCIA Card Removal Tip |
112 |
| Product Overview |
112 |
| FRU Removals and Replacements |
114 |
| Locations |
120 |
| Front View |
120 |
| System Board (700) |
121 |
| System Board (720, 720C) |
122 |
| Video Card |
123 |
| Keyboard Control Card |
123 |
| Voltage Converter |
124 |
| Parts Listing (700) |
125 |
| Parts Listing (720, 720C) |
128 |
| FRU Service Procedures |
134 |
| ThinkPad 701C/701CS (2630) |
135 |
| Checkout Guide |
137 |
| General Checkout |
138 |
| Memory Checkout |
138 |
| Keyboard/Auxiliary Input Device |
141 |
| TrackPoint III Checkout |
142 |
| Diskette Drive Checkout |
143 |
| Hard Disk Drive Checkout |
143 |
| MultiPort II Checkout |
144 |
| Power Systems Checkout |
145 |
| Infrared Transceiver Checkout |
147 |
| PCMCIA Checkout |
149 |
| Symptom-to-FRU Index |
151 |
| Numeric Error Codes |
152 |
| FRU Codes |
154 |
| Beep Symptoms |
155 |
| No-Beep Symptoms |
156 |
| LCD-Related (Video) Symptoms |
156 |
| Keyboard and TrackPoint III Symptoms |
158 |
| MultiPort II Related Symptoms |
158 |
| Indicator Related Symptoms |
159 |
| Power Related Symptoms |
159 |
| Function Related Symptoms |
160 |
| Infrared Related Symptoms |
161 |
| Audio Related Symptoms |
161 |
| Peripheral Device Related Symptoms |
161 |
| Other Symptoms |
162 |
| Intermittent Problems |
162 |
| Undetermined Problems |
162 |
| Related Service Procedures |
164 |
| Understanding Fn Key Combinations |
164 |
| Reading Status Indicators |
165 |
| Running the Diagnostics |
166 |
| Printing and Displaying Error Logs |
167 |
| Checking Installed Devices |
167 |
| Running the Low-Level Format |
168 |
| Reading the PC Test Card LED |
168 |
| Removing PCMCIA Cards |
169 |
| Product Overview |
169 |
| FRU Removals and Replacements |
171 |
| Locations |
191 |
| Front View |
191 |
| Left Side View |
192 |
| Right Side View |
192 |
| Rear View |
193 |
| Top System Board (Top View) |
194 |
| Top System Board (Bottom View) |
195 |
| Bottom System Board (Top View) |
196 |
| Bottom System Board (Bottom View) |
197 |
| Inverter Card (Front View) |
198 |
| Inverter Card (Rear View) |
198 |
| MultiPort II (Front View) |
199 |
| MultiPort II (Rear View) |
199 |
| Parts Listing |
200 |
| ThinkPad 355x, 360x, 370C, 750x,,755C,755Cs |
205 |
| Read This First |
207 |
| General Checkout |
210 |
| Memory Checkout |
211 |
| System Board and Processor Card Checkout (370C, 750Ce, 755C, 755Cs) |
213 |
| Keyboard/Auxiliary Input Device Checkout |
213 |
| TrackPoint II checkout |
214 |
| Pen and Digitizer Checkout |
215 |
| Audio Card Checkout |
215 |
| Diskette Drive Test |
216 |
| Power Systems Checkout |
217 |
| Power Management Features |
223 |
| Symptom-to-FRU Index |
226 |
| Numeric Error Codes |
227 |
| FRU Codes |
230 |
| Beep Symptoms |
231 |
| No Beep Symptoms |
232 |
| LCD Related Symptoms |
233 |
| Keyboard/TrackPoint II Related Symptoms |
233 |
| Indicator Related Symptoms |
234 |
| Power Related Symptoms |
234 |
| Function/Audio Related Symptoms |
234 |
| Peripheral Device Related Symptoms |
235 |
| Other Symptoms |
236 |
| Intermittent Problems |
236 |
| Undetermined Problems |
237 |
| Related Service Procedures |
238 |
| Status Indicators |
238 |
| How to Run the Diagnostics |
239 |
| Error Log |
239 |
| Checking the Installed Devices List |
240 |
| Password Combinations |
240 |
| How to Run the Low Level Format |
240 |
| PC Test Card LED |
241 |
| Fn Key Combinations |
241 |
| How To Run the Keyboard Diagnostics |
241 |
| Product Overview |
242 |
| Models 355x, 360x |
242 |
| Model 370C |
243 |
| Model 750x |
243 |
| Models 755C, 755Cs |
245 |
| FRU Removals and Replacements |
246 |
| Removals Models 355x, 360x |
247 |
| 1010 Rear Connector Door |
247 |
| 1015 Foot |
247 |
| 1020 Battery Pack |
248 |
| 1030 Diskette Drive |
249 |
| 1035 Hard Disk Drive |
250 |
| 1040 Keyboard Unit |
251 |
| 1050 IC DRAM Card |
254 |
| 1055 Diskette Drive Bezel |
254 |
| 1060 Status Indicator |
255 |
| 1070 LCD Assembly |
257 |
| 1080 Modem Card (355x) |
259 |
| 1085 Bezel (360x) |
259 |
| 1090 Speaker Shield Assembly |
263 |
| 1095 Interposer Card |
263 |
| 1100 DC/DC Card |
265 |
| 1110 Backup Battery |
266 |
| 1115 Standby Battery |
266 |
| 1120 System Board Assembly |
267 |
| 1130 PCMCIA Slot Assembly |
269 |
| Removals Models 370C, 750x, 755C, 755Cs |
271 |
| 2010 Rear Connector Door |
271 |
| 2015 Foot |
271 |
| 2020 Battery Pack |
272 |
| 2030 Diskette Drive |
273 |
| 2035 Hard Disk Drive |
274 |
| 2040 Keyboard Unit |
275 |
| 2050 IC DRAM Card |
278 |
| 2055 DIMM and DIMM Adapter (755C, 755Cs) |
279 |
| 2056 Diskette Drive Bezel |
281 |
| 2060 Status Indicator |
282 |
| 2070 LCD Assembly |
284 |
| 2080 Speaker Shield Assembly |
287 |
| 2085 Audio Card |
290 |
| 2090 Interposer Card |
290 |
| 2100 DC/DC Card |
291 |
| 2110 Backup Battery |
292 |
| 2105 Standby Battery |
292 |
| 2120 System Board Assembly |
294 |
| 2130 PCMCIA Slot Assembly |
296 |
| 2140 Processor Card (750Ce, 755C, 755Cs) |
297 |
| Locations |
299 |
| System - Front View (750, 750Cx, 755Cx, 370C, 360x, 355x) |
299 |
| System Front View - (750P, 360P, 360PE) |
300 |
| System Rear View - All Models |
301 |
| System Board (Top View) |
302 |
| System Board (Bottom View) |
303 |
| Processor Card (370C, 750Ce, 755C, 755Cs) |
304 |
| DC/DC Card - Top View |
304 |
| Interposer Card - All Models (Front View) |
305 |
| Parts Listing |
306 |
| Models 350x, 360x |
306 |
| Model 370C |
310 |
| Model 750x |
313 |
| Models 755C and 755Cs |
317 |
| Common/Option Parts List |
320 |
| ThinkPad 755CD, 755CDV (9545) |
325 |
| General Checkout |
327 |
| Memory Checkout |
327 |
| System Board and Processor Card Checkout |
329 |
| Keyboard/Auxiliary Input Device Checkout |
330 |
| TrackPoint III Checkout |
330 |
| Game Port Checkout |
331 |
| Diskette Drive Test |
331 |
| Power Systems Checkout |
332 |
| Power Management Features |
338 |
| Port Replicator Power Overload |
340 |
| Symptom-to-FRU Index |
341 |
| Numeric Error Codes |
341 |
| FRU Codes |
344 |
| Beep Symptoms |
345 |
| No Beep Symptoms |
346 |
| LCD Related Symptoms |
346 |
| Model 755CDV Symptoms |
347 |
| Keyboard/TrackPoint III Related Symptoms |
349 |
| Indicator Related Symptoms |
349 |
| Power Related Symptoms |
349 |
| Function/Audio Related Symptoms |
350 |
| Peripheral Device Related Symptoms |
351 |
| Other Symptoms |
351 |
| Infrared Related Symptoms |
352 |
| Intermittent Problems |
352 |
| Undetermined Problems |
353 |
| Related Service Procedures |
354 |
| Status Indicators |
354 |
| How to Run the Diagnostics |
355 |
| Error Log |
356 |
| Reset Pushbutton |
356 |
| Checking the Installed Devices List |
356 |
| Password Combinations |
357 |
| How to Run the Low Level Format |
357 |
| PC Test Card LED |
357 |
| Fn Key Combinations |
358 |
| How To Run the Keyboard Diagnostics |
358 |
| Product Overview |
359 |
| FRU Removals and Replacements |
360 |
| 2010 Rear Connector Door |
361 |
| 2015 Foot |
361 |
| 2020 Battery Pack |
362 |
| 2030 CD-ROM/Diskette Drive |
363 |
| 2040 Hard Disk Drive |
364 |
| 2050 IC DRAM Card or DIMM Adapter |
365 |
| 2060 Keyboard Spacer |
368 |
| 2080 Keyboard Unit |
369 |
| 2090 Status Indicator |
372 |
| 2100 Standby Battery and Front IR |
373 |
| 2110 Backup Battery |
374 |
| 2115 Logic Assembly |
375 |
| 2120 Shield Assembly |
377 |
| 2125 Video Card or Rear IR |
378 |
| 2130 DC/DC Card |
379 |
| 2140 DSP Card |
380 |
| 2150 Interposer Card |
381 |
| 2160 System Board Assembly |
382 |
| 2170 PCMCIA Slot Assembly |
383 |
| 2180 Processor Card |
385 |
| 2190 LCD Assembly |
387 |
| 2195 LCD Rear Cover (755CDV only) |
388 |
| 2200 Lower Shield Assembly |
389 |
| 2210 Memory Card |
390 |
| Locations |
391 |
| Front View |
391 |
| Rear View |
392 |
| Parts Listing |
393 |
| Common/Option Parts List |
396 |
| ThinkPad 755CE, 755CSE, 755CV, 755CX (9545) |
401 |
| General Checkout |
403 |
| Memory Checkout |
403 |
| System Board and Processor Card Checkout |
405 |
| Keyboard/Auxiliary Input Device Checkout |
406 |
| TrackPoint III Checkout |
406 |
| Diskette Drive Test |
407 |
| Power Systems Checkout |
408 |
| Power Management Features |
415 |
| Port Replicator Power Overload |
417 |
| Symptom-to-FRU Index |
418 |
| Numeric Error Codes |
418 |
| FRU Codes |
421 |
| Beep Symptoms |
422 |
| LCD Related Symptoms |
423 |
| Model 755CV Symptoms |
424 |
| Keyboard/TrackPoint III Related Symptoms |
426 |
| Indicator Related Symptoms |
426 |
| Power Related Symptoms |
426 |
| Function/Audio Related Symptoms |
427 |
| Peripheral Device Related Symptoms |
427 |
| Infrared Related Symptoms |
428 |
| Other Symptoms |
428 |
| Intermittent Problems |
428 |
| Undetermined Problems |
429 |
| Related Service Procedures |
430 |
| Status Indicators |
430 |
| How to Run the Diagnostics |
431 |
| Error Log |
431 |
| Reset Pushbutton |
432 |
| Checking the Installed Devices List |
432 |
| Password Combinations |
432 |
| How to Run the Low Level Format |
433 |
| PC Test Card LED |
433 |
| Fn Key Combinations |
433 |
| How To Run the Keyboard Diagnostics |
434 |
| Product Overview |
434 |
| FRU Removals and Replacements |
436 |
| 1010 Rear Connector Door |
437 |
| 1015 Foot |
437 |
| 1020 Battery Pack |
438 |
| 1030 Diskette Drive |
439 |
| 1040 Hard Disk Drive |
440 |
| 1050 IC DRAM Card or DIMM Adapter |
441 |
| 1070 Diskette Drive Bezel |
444 |
| 1080 Keyboard Unit |
445 |
| 1090 Status Indicator |
447 |
| 1100 Standby Battery and Front IR |
448 |
| 1110 Backup Battery |
449 |
| 1115 Logic Assembly |
450 |
| 1120 Shield Assembly |
452 |
| 1130 DC/DC Card |
455 |
| 1140 DSP Card |
456 |
| 1150 Interposer Card and Rear IR |
457 |
| 1160 System Board Assembly |
458 |
| 1170 PCMCIA Slot Assembly |
459 |
| 1180 Processor Card |
461 |
| 1190 LCD Assembly |
463 |
| 1195 LCD Rear Cover (755CV only) |
465 |
| 1200 Lower Shield Assembly |
466 |
| 1210 Memory Card |
467 |
| Locations |
468 |
| Front View |
468 |
| Rear View |
469 |
| Parts Listing |
470 |
| Common/Option Parts List |
474 |
| Common Devices Checkout |
479 |
| External Diskette Drive Test |
480 |
| External Display Self-Test |
480 |
| External Keyboard/Auxiliary Input Device Checkout |
481 |
| Fax/Modem Checkout |
482 |
| Printer Checkout |
484 |
| Port Replicator Checkout |
485 |
| TrackPoint II Checkout |
486 |
| TV Tuner |
487 |
| Using the Front Panel |
488 |
| Troubleshooting |
491 |
| Common Parts Listing |
493 |
| Miscellaneous Information |
499 |
| Acronyms, Abbreviations and Terms |
499 |
| Send Us Your Comments! |
501 |
| Do You Need Technical References? |
502 |
| Problem Determination Tips |
503 |
| Phone Numbers, U.S. and Canada |
504 |

 1
1 251
251 252
252 253
253 254
254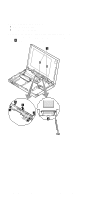 255
255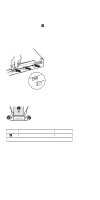 256
256 257
257 258
258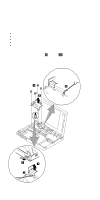 259
259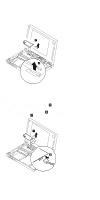 260
260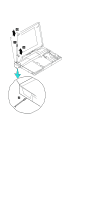 261
261