Lenovo ThinkPad 380ED English - Windows 2000 Professional Setup Guide - Page 22
Installing TrackPoint, device driver for Windows 2000 ThinkPad APM model
 |
View all Lenovo ThinkPad 380ED manuals
Add to My Manuals
Save this manual to your list of manuals |
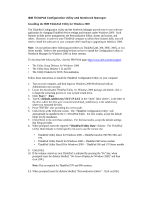
Page 22 highlights
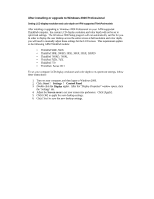
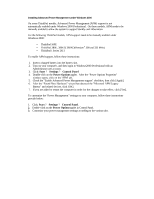
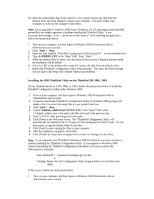
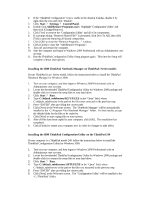
Installing TrackPoint® device driverfor Windows 2000 (ThinkPad APM model only) On the ThinkPad 770 and i-Series 2611 APM-supported models, the IBM TrackPoint® driver will not be automatically installed by the Windows 2000 Professional Setup program. In order to provide your ThinkPad with additional pointing device support and functionality under Windows 2000, you will need to install this device driver on your system. With this driver you can use the features with the TrackPoint® pointing device: Magnifying Glass, Press-to-Select, and Scrolling capabilities. To install the TrackPoint® driver on your ThinkPad, follow the instructions provided below: 1. Turn on your computer, and then logon to Windows 2000 Professional with an Administrator user account. 2. Click: Start ? Settings ? Control Panel. 3. Double-click the Mouse applet, then click on the 'Hardware' tab. 4. Highlight "Microsoft PS/2 Mouse" under 'Devices', and click [Properties]. This will open the 'Microsoft PS/2 Mouse Properties' window. 5. Click the 'Driver' tab, and then click [Update Driver...]. 6. Click [Next] at the welcome screen. 7. Select "Display a list of the known drivers..." option, and then click [Next]. 8. Click "Show all hardware...". 9. In the 'Manufactures:' box, select "IBM Corporation". 10. Highlight "IBM PS/2 TrackPoint" under 'Models', then click [Next]. 11. Click [Yes] in the "Update Driver Warning" window, then click [Next]. 12. When the "Confirm Driver Install" window opens, click [Yes] to install the device. 13. After the files are copied to your system and the device is properly configured, click [Finish]. 14. Click [Close] in the 'Microsoft PS/2 Mouse' window, then click [Yes] to restart your computer for the changes to take effect. 15. After the system restarts, click on the "Mouse" applet located in Control Panel and then select the 'TrackPoint' tab to customize the TrackPoint® pointing device features.
-
 1
1 -
2
-
3
-
4
-
5
-
6
-
7
-
8
-
9
-
10
-
11
-
12
-
13
-
14
-
15
-
16
-
 17
17 -
 18
18 -
 19
19 -
 20
20 -
 21
21 -
 22
22 -
 23
23 -
 24
24 -
 25
25 -
 26
26 -
 27
27 -
28
-
29
-
30
-
31
-
32
-
33
-
34
-
35
-
36
-
37
-
38
-
39
-
40
-
41
-
42
-
43
-
44
-
45
-
46
-
47
-
48
-
49
-
50
-
51
-
52
-
53
-
54
-
55
-
56
-
57
-
58
-
59
-
60
-
61
-
62
-
63
-
64
-
65
-
66
-
67
-
68
-
69
-
70
 |
 |
