Lenovo ThinkPad 600 English - Windows 2000 Professional Setup Guide - Page 29
Start, ThinkPad Data Fax Modem - driver downloads
 |
View all Lenovo ThinkPad 600 manuals
Add to My Manuals
Save this manual to your list of manuals |
Page 29 highlights
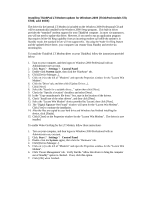
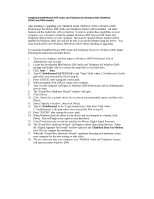
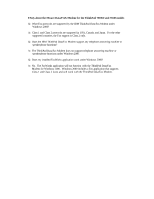
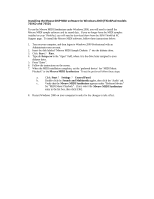
Installing the IBM Mwave DSP Audio and Telephony for Windows 2000 (ThinkPad 760XD and 765D models) After installing or upgrading your ThinkPad model 760XD or 765D to Windows 2000 Professional, the Mwave DSP Audio and Telephone features will be disabled. All audio features and the modem/fax will not function. In order to enable these capabilities on your computer, you will need to install the updated Windows 2000 Mwave DSP Audio and Telephony device drivers on your computer. Because the internal Mwave modem will be disabled on Windows 2000, you will not be able to access the Internet using this device. You must download the new Windows 2000 device driver before installing or upgrading. To install the ThinkPad Mwave DSP Audio and Telephony device for Windows 2000, please following the instructions provided below: 1. Turn on you computer, and then logon to Windows 2000 Professional with an Administrator user account. 2. Locate the downloaded IBM Mwave DSP Audio and Telephony for Windows 2000 package and double-click it to extract the setup files to your hard drive. 3. Click: Start ? Run. 4. Type C:\[subdirectory]\SETUP.EXE in the "Open" field, where C:\[subdirectory] is the path where you extracted the files in step #2. 5. Press 'ENTER' after typing the correct path. 6. When prompted, click [OK] to restart your computer. 7. Turn on your computer and logon to Windows 2000 Professional with an Administrator user account. 8. The "Found New Hardware Wizard" window will open. 9. Click [Next]. 10. Click "Search for a suitable driver for my device (recommended)" option; and then click [Next]. 11. Select "Specify a location", then click [Next]. 12. Type C:\[subdirectory] in the "Copy manufacture's files from" field, where C:\[subdirectory] is the path where you extracted the files in step #2. 13. Press "ENTER" after typing the correct path. 14. When Windows finds the driver for the device and are prompted to continue, click [Next]. Files will begin to be copied to your hard drive. 15. Click [Finish] after the wizard has installed the Mwave Digital Signal Processor. 16. The "Found New Hardware Wizard" will begin to detect other related devices. When the "Digital Signature Not Found" window opens for the ThinkPad Data Fax Modem , click [Yes] to continue the installation. 17. When the "Found New Hardware Wizard" completes detecting new hardware, restart your computer for the new settings to take effect. 18. The next time you start your computer, your ThinkPad Audio and Telephony features will function under Windows 2000.
-
 1
1 -
2
-
3
-
4
-
5
-
6
-
7
-
8
-
9
-
10
-
11
-
12
-
13
-
14
-
15
-
16
-
17
-
18
-
19
-
20
-
21
-
22
-
23
-
 24
24 -
 25
25 -
 26
26 -
 27
27 -
 28
28 -
 29
29 -
 30
30 -
 31
31 -
 32
32 -
 33
33 -
 34
34 -
35
-
36
-
37
-
38
-
39
-
40
-
41
-
42
-
43
-
44
-
45
-
46
-
47
-
48
-
49
-
50
-
51
-
52
-
53
-
54
-
55
-
56
-
57
-
58
-
59
-
60
-
61
-
62
-
63
-
64
-
65
-
66
-
67
-
68
-
69
-
70
 |
 |