Lenovo ThinkPad R60e Hardware Maintenance Manual - Page 72
shown
 |
View all Lenovo ThinkPad R60e manuals
Add to My Manuals
Save this manual to your list of manuals |
Page 72 highlights
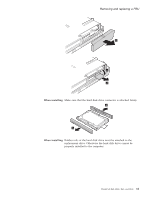
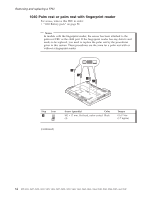
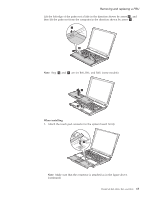
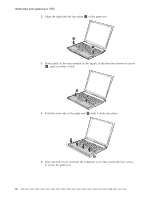
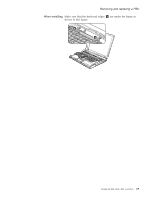
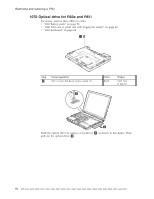
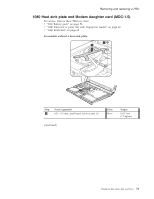
Removing and replacing a FRU 2. Align the right and left top edges 2 of the palm rest. 2 2 3. Push gently on the area marked in this figure, in the direction shown by arrow 3 , until you hear a click. 3 3 4. Push the front side of the palm rest 4 until it clicks into place. 4 5. Close the LCD cover and turn the computer over. Then fasten the four screws to secure the palm rest. 66 MT 0656, 0657, 0658, 0659, 9455, 9456, 9457, 9458, 9459, 9460, 9461, 9462, 9463, 9464, 8942, 8943, 8944, 8945, and 8947
-
 1
1 -
2
-
3
-
4
-
5
-
6
-
7
-
8
-
9
-
10
-
11
-
12
-
13
-
14
-
15
-
16
-
17
-
18
-
19
-
20
-
21
-
22
-
23
-
24
-
25
-
26
-
27
-
28
-
29
-
30
-
31
-
32
-
33
-
34
-
35
-
36
-
37
-
38
-
39
-
40
-
41
-
42
-
43
-
44
-
45
-
46
-
47
-
48
-
49
-
50
-
51
-
52
-
53
-
54
-
55
-
56
-
57
-
58
-
59
-
60
-
61
-
62
-
63
-
64
-
65
-
66
-
 67
67 -
 68
68 -
 69
69 -
 70
70 -
 71
71 -
 72
72 -
 73
73 -
 74
74 -
 75
75 -
 76
76 -
 77
77 -
78
-
79
-
80
-
81
-
82
-
83
-
84
-
85
-
86
-
87
-
88
-
89
-
90
-
91
-
92
-
93
-
94
-
95
-
96
-
97
-
98
-
99
-
100
-
101
-
102
-
103
-
104
-
105
-
106
-
107
-
108
-
109
-
110
-
111
-
112
-
113
-
114
-
115
-
116
-
117
-
118
-
119
-
120
-
121
-
122
-
123
-
124
-
125
-
126
-
127
-
128
-
129
-
130
-
131
-
132
-
133
-
134
-
135
-
136
-
137
-
138
-
139
-
140
-
141
-
142
-
143
-
144
-
145
-
146
-
147
-
148
-
149
-
150
-
151
-
152
-
153
-
154
-
155
-
156
-
157
-
158
-
159
-
160
-
161
-
162
-
163
-
164
-
165
-
166
-
167
-
168
-
169
-
170
-
171
-
172
-
173
-
174
-
175
-
176
-
177
-
178
-
179
-
180
-
181
-
182
-
183
-
184
-
185
-
186
-
187
-
188
-
189
-
190
-
191
-
192
-
193
-
194
-
195
-
196
-
197
-
198
-
199
-
200
-
201
-
202
-
203
-
204
-
205
-
206
-
207
-
208
-
209
-
210
-
211
-
212
-
213
-
214
-
215
-
216
-
217
-
218
-
219
-
220
-
221
-
222
-
223
-
224
-
225
-
226
-
227
-
228
-
229
-
230
-
231
-
232
-
233
-
234
-
235
-
236
-
237
-
238
-
239
-
240
-
241
-
242
-
243
-
244
 |
 |
2.
Align
the
right
and
left
top
edges
±2²
of
the
palm
rest.
2
2
3.
Push
gently
on
the
area
marked
in
this
figure,
in
the
direction
shown
by
arrow
±3²
,
until
you
hear
a
click.
3
3
4.
Push
the
front
side
of
the
palm
rest
±4²
until
it
clicks
into
place.
4
5.
Close
the
LCD
cover
and
turn
the
computer
over.
Then
fasten
the
four
screws
to
secure
the
palm
rest.
Removing
and
replacing
a
FRU
66
MT
0656,
0657,
0658,
0659,
9455,
9456,
9457,
9458,
9459,
9460,
9461,
9462,
9463,
9464,
8942,
8943,
8944,
8945,
and
8947