Lenovo ThinkPad T30 Client Security Password Manager v1.3 - User's Guide (Engl - Page 11
Procedures - support
 |
View all Lenovo ThinkPad T30 manuals
Add to My Manuals
Save this manual to your list of manuals |
Page 11 highlights
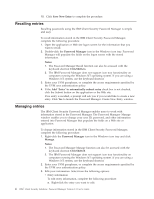
Chapter 2. Procedures This section provides step-by-step procedures on how to perform common IBM Client Security Password Manager functions. Creating new entries The IBM Client Security Password Manager enables users to enter information into Web sites and applications using the Password Manager interface. The IBM Password Manager program encrypts and saves the information that is entered into the appropriate fields through the IBM embedded Security Chip. Once the information is saved in Password Manager, these fields are automatically populated with this secure information whenever access to the Web site or application is granted according to the UVM user authentication policy. To enter password information into the IBM Client Security Password Manager, complete the following procedure: 1. Open the application or Web site logon screen. 2. Right-click the Password Manager icon in the Windows icon tray and select Create. Notes: 1. The Password Manager Create function can also be accessed with the keyboard shortcut Ctrl+Shift+H. 2. The IBM Password Manager does not support icon tray functionality on computers running the Windows NT operating system. If you are using a Windows NT system, use the keyboard shortcut. 3. Enter the information for a field in the Password Manager- Create New Entry window. Note: The information in this field must be less than 260 characters in length. 4. If you do not want the entered text to be displayed, click the Obscure typed text for privacy check box. Note: This check box only controls how the text is displayed within Password Manager. After the text is dropped into a Web site or application, its properties will be controlled by that application. 5. Use the Select Field ″target″ icon to drag the text from the Password Manager utility into the appropriate field on the Web site or application. Note: This icon enables the text to be copied without using your computer clipboard or other non-secure location. 6. Repeat step 3 through step 5 for each field, as necessary. 7. Click Save New Entry. 8. Type a descriptive name for the new entry. 9. Click the Add ″Enter″ to automatically submit entry check box if you want Password Manager to submit the login information after recalling. Note: Some Web sites do not use the Enter key to submit login information. If login is failing, disable this convenience feature. © Copyright IBM Corp. 2002 3
-
 1
1 -
2
-
3
-
4
-
5
-
 6
6 -
 7
7 -
 8
8 -
 9
9 -
 10
10 -
 11
11 -
 12
12 -
 13
13 -
 14
14 -
 15
15 -
 16
16 -
17
-
18
-
19
-
20
 |
 |
